EasyManua.ls Logo

Broan 696 - User Manual

Broan 696
4 pages
Print Icon
To Next Page IconTo Next Page
Loading...
READ AND SAVE
THESE INSTRUCTIONS
COMBINATION UNIT
MODEL 696 FAN/LIGHT
UNIDADE COMBINADA
MODELO 696 VENTILADOR/LUZ
LEA Y CONSERVE
ESTAS INSTRUCCIONES
INSTALLER: Leave This Manual With The Homeowner. HOMEOWNER: Use and Care Information on Page 3.
INSTALADOR: Deje este manual con el dueño de la casa. DUEÑO DE LA CASA: Información del uso y MANTENIMIENTO en la página 3.
NOTAS DE SEGURIDAD
1. EL TRABAJO DE INSTALACION Y ALAMBRADO
ELECTRICO DEBEN DE LLEVARSE A CABO
POR PERSONAL CALIFICADO DE ACUERDO
CON TODOS LOS CODIGOS Y LAS NORMAS
APLICABLES. POR RAZONES DE SEGURIDAD,
ESTE PRODUCTO DEBE SER CONECTADO A
TIERRA. SI USTED NO ESTA FAMILIARIZADO CON
LOS METODOS DE INSTALACION DE ALAMBRADO
ELECTRICO, PROCURESE LOS SERVICIOS DE UN
ELECTRICISTA CALIFICADO.
2. DESCONECTE LA CORRIENTE EN LA ENTRADA
DE SERVICIO ANTES DE INSTALAR, CONECTAR
O DAR SERVICIO A ESTE PRODUCTO
3. Este producto está diseñado solamente para instalarse
en el cielo raso. Este producto está diseñado para
instalarse en cielos rasos con una pendiente de hasta
12/12. El sistema de conductos debe apuntar hacia
arriba. NO MONTE ESTE PRODUCTO EN LA PARED.
4. PRECAUCION:Haga siempre que este producto ventile
hacia el exterior -NO hacia adentro de espacios entre
paredes o cielo raso, áticos, espacios reducidos,
garages, etc.
5. Para evitar daños al cojinete del motor o impulsores
ruidosos o desequilibrados, mantenga la fuente
de potencia lejos de rocíos de yeso, de polvo de
construcción, etc.
6. Chimeneas, calentadores de gas, calentadores de
agua, y unidades de este tipo, requieren un flujo
apropiado de aire de combustión y escape. Para
evitar que este flujo sea alterado por un ventilador
de escape, siga las especificaciones y estándares de
seguridad del fabricante, tales como los publicados
por la Asociación Nacional de Protección Contra
Incendios (NFPA por sus siglas en inglés), y la
Sociedad Americana de Ingenieros de Calefacción,
Refrigeración y Aire Acondicionado (ASHRAE).
Por favor dirija sus preguntas al departamento de
ingeniería de Broan.
7. Lea la etiqueta de especificaciones del producto para
más información y requisitos.
HERRAMIENTAS Y
MATERIALES NECESARIOS
• Destornilladores con rectos lados y Phillips
• Sierra de punta o saber
• Martillo
• Ducto redondo de 10,16 cm (4 pulg.) y codos (los que
se necesiten)
• Funda para pared o techo.
• Cinta adhesiva para ductos
• Material eléctrico (para cumplir con los códigos)
SAFETY NOTES
1. ALL ELECTRICAL WORK MUST BE DONE IN AC-
CORDANCE WITH LOCAL AND/OR NATIONAL
ELECTRICAL CODE AS APPLICABLE. FOR SAFE-
TY, THIS PRODUCT MUST BE GROUNDED. IF YOU
ARE UNFAMILIAR WITH METHODS OF INSTALLING
ELECTRICAL WIRING, SECURE THE SERVICES OF
A QUALIFIED ELECTRICIAN.
2. TURN OFF POWER AT SERVICE ENTRANCE BE-
FORE INSTALLING, WIRING OR SERVICING THIS
PRODUCT.
3. This product is designed for ceiling installation only.
This product is designed for installation in ceilings up
to a 12/12 pitch. Ductwork must point up. DO NOT
MOUNT THIS PRODUCT IN A WALL.
4. CAUTION: Always vent this product to the outside -
NOT into spaces within walls or ceilings, attics, crawl
spaces, garages, etc.
5. To avoid motor bearing damage and noisy and/or
unbalanced impellers, keep drywall spray, construction
dust, etc. off power unit.
6. Fireplaces, gas furnaces, water heaters and the like,
require proper flow of combustion air and exhaust. To
prevent this flow from being altered by an exhaust fan,
follow the heating equipment manufacturer’s guidelines
and see safety standards such as those published
by NFPA and ASHRAE. Please direct any remaining
questions to the Broan Engineering Department.
7. Please read specification label on product for further
information and requirements.
TOOLS AND MATERIALS
REQUIRED
• Straight-blade & Phillips screwdrivers
• Saber or keyhole saw
• Hammer
• 4” round duct and elbows (as needed)
• Roof or wall cap
• Duct tape
• Electrical supplies (to comply with codes)
Question and Answer IconNeed help?

Do you have a question about the Broan 696 and is the answer not in the manual?

Summary

SAFETY NOTES

Electrical Safety and Code Compliance

Ensure compliance with electrical codes and use qualified personnel for safe installation.

Power Disconnection and Installation Location

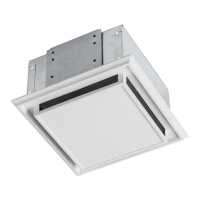
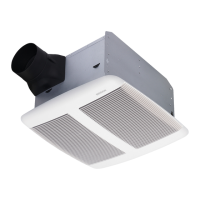
Always disconnect power before servicing. Product is designed for ceiling installation only.

Ventilation and Motor Protection Guidelines

Vent exhaust to the exterior only. Protect motor from dust to prevent damage and noise.

Combustion Air and Exhaust Flow Considerations

Follow heating equipment guidelines for combustion air and exhaust flow when using the fan.

TOOLS AND MATERIALS REQUIRED

Essential Tools for Installation

Basic tools required include screwdrivers, a saber saw, and a hammer for mounting.

Required Venting and Electrical Supplies

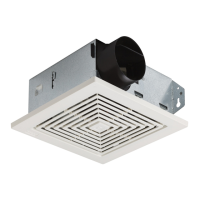
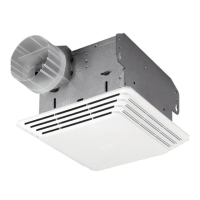
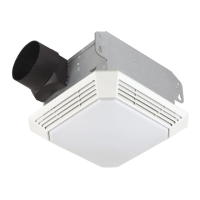
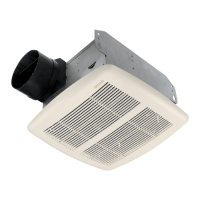
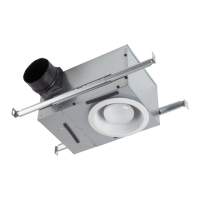
Install with 4" duct, roof/wall cap, duct tape, and electrical supplies meeting code requirements.

PREPARE THE FAN ASSEMBLY

Disconnect and Remove Fan Assembly

Disconnect the fan from power and carefully lift the fan assembly out of the housing.

Prepare Housing for Wiring and Mounting Brackets

Remove knockouts per wiring diagram and insert adjustable mounting brackets into housing channels.

INSTALL THE FAN UNIT

Optimal Fan Location and Bracket Positioning

Select an ideal location for short duct runs. Position brackets for flush ceiling alignment.

Secure Unit to Joists and Ensure Flush Fit

Hang unit from joists, check for flushness, and secure with nails or screws for a rigid mount.

Install Damper;Duct Connector Securely

Snap the damper/duct connector onto housing, ensuring proper flap placement and a secure fit.

Wire Unit and Reinstall Fan Assembly

Wire the unit according to the diagram, then reinstall the fan assembly and connect power.

Install Light Reflector and Bulb

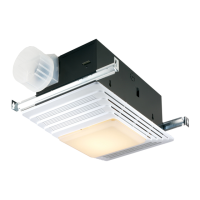
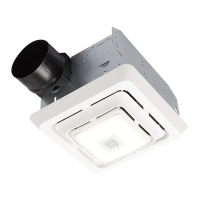
Mount the light reflector, connect to the white receptacle, and secure with the acorn nut.

Install Light Lens Properly

Install the light lens by hooking tabs into the grille/reflector notches and snapping it into place.

USE AND CARE INSTRUCTIONS

Servicing Precautions and Bulb Replacement

Disconnect power before servicing. Replace bulbs carefully using only 100W maximum bulbs.

Cleaning Lens, Grille, and Fan Assembly

Clean lens, grille, and fan assembly using mild soap and water. Avoid abrasive materials.

Reassembly Steps and Water Immersion Warning

Reverse disassembly steps for reassembly. Never immerse metal or electrical parts in water.

BROAN-NUTONE ONE YEAR LIMITED WARRANTY

Warranty Coverage and Exclusions

Covers material/workmanship defects for one year, excluding consumables, misuse, and improper installation.

Warranty Duration and State Law Limitations

Implied warranty duration is one year; state laws may affect limitations on implied warranties.

Purchasers Sole Remedy and Damage Limitations

Sole remedy is repair/replacement. No liability for incidental, consequential, or special damages.

How to Obtain Warranty Service

Notify Broan-NuTone with model/part info, defect description, and proof of purchase for service.

SERVICE PARTS LISTING

Part Identification and Ordering Process

Identify parts using key/part numbers. Order replacement parts by part number, not key number.

Online Replacement Parts Ordering

Replacement parts can be conveniently ordered directly from the Broan website at www.Broan.com.

Broan 696 Specifications

General IconGeneral
Duct Diameter4 inches
Voltage120V
Mounting TypeCeiling Mount
Housing MaterialGalvanized Steel
TypeCeiling Exhaust Fan

Related product manuals