8 9
991592_INS_CHEFS_FORK_PRO
Size:5”Wx4.75”H_Output:100%_Prints:1/1,Blk
INSTALLING THE BATTERIES
1. Twist the BATTERY COVER counter clock-wise until the icon aligns with the
icon to unlock and remove.
2. Insert 4 AAA batteries (not included) according to polarity indicators.
3. Replace the BATTERY COVER and twist clockwise until the icon aligns with
the icon and lock in place.
4. The LOW BATTERY INDICATOR will appear on the LCD DISPLAY when the
batteries need to be replaced.
TEMPERATURE PROBE RELEASE
1. Press the TEMPERATURE PROBE RELEASE BUTTON to release and
remove the TEMPERATURE PROBE.
2. Insert the TEMPERATURE PROBE and press down until the probes are
firmly locked into position to replace.
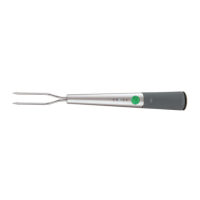
USING THE CHEF’S FORK
1. Remove the TEMPERATURE PROBE COVER from the TEMPERATURE PROBE.
2. Press and hold the POWER/SELECT BUTTON to turn the Chef’s Fork on.
3. Press POWER/SELECT BUTTON repeatedly until your desired entrée appears
on the LCD DISPLAY: Beef, Hamburger (HMBR), Chicken (CHCK), Pork,
Turkey (TRKY), Fish, Veal, Lamb or Baked Potato (BPOT).
4. Insert the TEMPERATURE PROBE into the center of the thickest portion of
your entrée.
5. Hold the Chef’s Fork in position for 6-10 seconds for an accurate
measurement.
6. The color-changing LCD DISPLAY shows your entree’s progress:
Green: Just Started
Blue: Rare
Pink: Medium Rare
Purple: Medium
Yellow: Medium Well
Red: Well Done/Done
Flashing Red: Over-Cooked.
7. The DONENESS LED INDICATORS show the doneness level of your entree.
8. Press and hold the POWER/SELECT BUTTON to turn the Chef’s Fork off.
Notes:
• Ensure the TEMPERATURE PROBE is inserted at least 1/2" deep into
the meat to give a more accurate temperature readout. Avoid touching