Do you have a question about the Broyhill SC-K-454PGS2 and is the answer not in the manual?
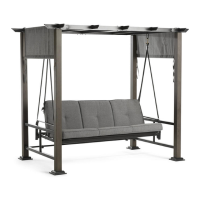
Attach 1 leg post (A) to the post base (Q) and base plate (R) with 2 bolts (Sa).
Attach 1 side panel (B) to the leg posts (A) with 8 bolts (Se), 8 large locker washers (Ss), and 8 large metal washers (Si).
Assemble 1 top crossbar (C) and 1 top crossbar (D) with 4 bolts (Sb), 4 small locker washers (Sr), and 4 small metal washers (Sh).
Attach 2 pairs of assembled top crossbars (C & D) to leg posts (A) with 16 bolts (Sd), 16 large locker washers (Ss), and 16 large metal washers (Si).
Attach 2 top crossbars (E) to top crossbars (C & D) with 8 bolts (Sf), 8 large locker washers (Ss), and 8 large metal washers (Si).
Insert 3 inside canopy crossbars (F1) into top crossbars (C & D).
Insert 2 outside canopy crossbars (F2) into top crossbars (C & D) with 4 bolts (Sb), 4 small locker washers (Sr), and 4 small metal washers (Sh).
Attach 1 leg support bar (G) to side panels (B) with 2 bolts (Sc), 2 small locker washers (Sr), and 2 small metal washers (Sh).
Connect 2 rear and front connector bars (J) to left and right arms (I & H).
Attach 1 seat and back (K) to left and right arms (H & I) with 2 bolts (Sg), 2 plastic washers (Sk), 2 large metal washers (Si), and 2 nuts (Sj).
Attach 4 hanging bars (L) and 2 hanging bars (M) to the arms (I & H) and top crossbars (E) with hooks (SI).
Attach 16 lawn stakes (Sm) to base plate (R).
Attach 1 canopy (N) to canopy cross bars.
Insert 2 canopy side bars (O) into canopy (N) and attach cushion.
Convert swing to canopy Bed. Remove the cushions.
Insert the support bar on the back of seat and back (K) into the U-shaped brackets.
Recommendations for safe and efficient assembly, including space, adult supervision, and part verification.
Crucial warnings regarding flame sources, weight limits, usage restrictions, and proper placement.
Instructions for annual checks, lubrication, cleaning, and recommended storage for longevity.
Detailed list of all physical components required for assembling the Pergola Daybed Swing.
Comprehensive list of all bolts, washers, nuts, and tools included for assembly.
| Brand | Broyhill |
|---|---|
| Model | SC-K-454PGS2 |
| Category | Baby Swing |
| Language | English |