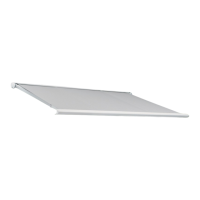
BRUSTOR B50
BRUSTOR B50BRUSTOR B50
BRUSTOR B50
27/06/16 EG
901-00
E - INSTALLATION INSTRUCTIONS B50
Read these installation instructions carefully. A correct
functioning needs a correct installation. No guarantee will be
allowed for wrong installation.
CONTENT MOUNTING KIT
Wall adapter 100mm.. … … …………………….……2
Installation instructions B 50 …………………….…1
SELECTION OF FIXATION MATERIAL
Take into account a retracting force on the bolts of 370 kg(830
lbs)(for a windpressure of 70 N/m² or 1.5 lbf/ft²).
Eventually consult a fixations material expert.
REQUIRED TOOLS
- Drilling machine with rock-drill
- Open ended spanner SW13 and SW19
- Hexagon pin wrench 4mm
- Rope and spirit level
INSTALLATION OF WALL BRACKETS(Fig. 1)
Put the wall brackets horizontally in line
Distance between the wall brackets = Awning width –220 mm.
Hang the awning in the supports and fix them with the 2 set
screws underneath each endcap(see fig. 2) This is very
important, if this is not done correctly the awning might fall from
the wall upon opening it.
ADJUSTMENT OF THE PASSAGE HEIGHT
- Check the passage height
- To adjust the inclination of the arm (fig.3.)
- Unscrew the 2 top nuts a little bit. Use SW13
- Open the awning about 50 cms.
- Adjust the passage height to the required level by
turning the lower adjusting bolt. Use SW 19
- Close the awning and tighten the 2 top nuts securely
ELECTRICAL CONNECTION OF THE MOTOR
Wiring and tuning of the motor are shown on scheme and also
on the instruction sheet delivered with the motor.
ADJUSTMENT OF ENDPOSITIONS OF THE SLT MOTOR
The end positions of the motor are already set during the
assembly of the awning. In case of re-adjustment, proceed as
follows :
Press both the blue and yellow or white buttons in, by doing so
all previous settings are erased.
Open the awning until it has reached its desired lower position.
Unlock the yellow or white button by pressing it again.Now the
lower position is set.
Close the awning and stop the motor at about 10 cms before the
leadrail hits the box. Unlock the blue button by pressing it
again.Now the upper position is set.
From this point onwards the motor will continue at reduced force
and stop after some seconds, ensuring that the awning will
always be completely closed.
ADJUSTMENT OF ENDPOSITIONS OF THE ELERO MOTOR
See enclosed page.
USER INSTRUCTIONS
- The awning is for sun- and not for rail – protection so roll it
up in case of rain or snow.
Make sure the awning is closed in windy weather
conditions.
- Do not hang any other objects on the front profile or on the
arms.
- For electric powered awnings, put the switch back in 0-
position after using.
D – MONTAGEANWEISUNG DER B 50
Lesen Sie die Montageanleitung sorgfältig durch , da der
Garantieanspruch bei unsachgemäßen Montage erlischt.
INHALT BEFESTIGUNGSSATZ
Wandkonsolen 100mm… … .. ….………………….……2
Montageanweisung der B 50 ……………………….…1
WAHL DES BEFESTIGUNGSMATERIALS
Beachten Sie daß die Zugkraft auf den Bolzen bis 370 Kg
beträgt (bei einem Winddruck von 70 N/m² ). Befragen Sie
eventuell einen Spezialisten in Befestigungsmaterialien .
BENOTIGTES WERKZEUG
- Bohrmaschine mit Steinbohrer
- Maulschlüssel SW13 und SW19
- Imbusschlüssel 4mm
- Schnur und Wasserwaage
MONTAGE MAUERSTÛTZE (Siehe Bild 1)
Montieren Sie die Stütze gerade gegenüber einander und
horizontal .Der Abstand zwischen die Stütze = Breite der
Markiese – 220mm Hängen Sie die Markise in seine Stütze und
ziehen Sie diese an mit den 2 Schrauben (Siehe Bild 2). Dies ist
sehr wichtig , da das Schirm sonst beim ausdrehen vom Stütze
herausfallen kann !!
EINSTELLEN DES NEIGUNGSWINKEL
- Die Durchgangshöhe kontrollieren.
- So stellen Sie den Neigungswinkel des Gelenkarmes ein
(Siehe Bild 3):
- Die 2 Muttern oben ein wenig lösen und die Markise
etwa 50 cm öffnen.
- Die Höhe einstellen ,indem Sie die untere
Regulierungsmutter verdrehen Schlussel SW19
- Die Markise schliessen und die 2 Muttern oben gut
wieder ansiehen
ELEKTRO-ANSCHLUSS UND EINSTELLUNG
Der Elektro-Anschluß und die Einstellung vom Motor erfolgen
laut schema und die mit dem Motor mitgelieferten Instruktionen.
EINSTELLUNG DER ENDBEGRENZUNG DES SLT-MOTOR
Der Motor wurde werksseitig bereits eingestellt, sollten Sie
jedoch den Motor später neuregulieren müssen, gehen Sie bitte
wie folgt vor :
Die blaue und die gelbe oder weisse Einstelltaste beide
eindrücken. Hiermit ist die bestehende Einstellung
ausgeschaltet.
Die Markise bis zum gewünschten Auszug ausfahren.
Die gelbe oder weisse Einstelltaste durch drücken lösen. Der
Auszug ist somit eingestellt.
Die Markise bis ca 10 cm vor dem Schliessen der Kassette
einfahren. Die blaue Einstelltaste durch drücken lösen. Jetzt ist
die Markise so eingestellt, dass Sie komplett schliesst. Der
Antrieb reduziert ab diese Position sein Drehmoment und
schaltet nach einige Sekunden ab. Auf diese Weise bekommt
man immer ein komplett geschlossene Kassette.
EINSTELLUNG DER ENDBEGRENZ. DES ELERO MOTORS
Siehe mit dem Motor mitgelieferte Anleitung.
GEBRAUCHSANWEISUNG
- Die Markise nur als Sonnenschutz und nicht als
Abwetterschutz verwenden. Sie ist bei aufkommenden Regen
oder bei Schneefall und bei Wind einzufahren .
- Kleine Gegenstände an das Frontprofil oder an die Arme
hängen.
- Wenn die elektrisch bediente Markise nicht benützt wird,
empfiehlt es sich den Schalter auf null zu stellen .
 Loading...