EasyManua.ls Logo

Bubble Magus C3.5 - User Manual

Bubble Magus C3.5
3 pages
Print Icon
To Next Page IconTo Next Page
Loading...
ProteinSkimmerUserManual(compiledbySeaSideAquatics)
Product’sName:InternalProteinSkimmerC3.5
ValidAquarium:80gal
Pumpmodel:ROCKSP1000
TheBubbleMagusC3.5isthesuccessorofNAC3.5.ThenewerC3.5offersthe
ROCKSP1000,replacingtheNAC3.5’sATMANPH1100.Pleasereadthemanualcarefully
beforeuse.Ifyouencounteranissue,whetheritisinthepackaging,duringyourinstallation,or
duringnormaloperationofyourproduct,contactsupport@seasideaquatics.comforfurther
support.Besuretoregisteryourproducttoactivateyourwarranty.
PackagingOverview:collectioncup,skimmerbody,basesupport,waterdrainingsystem,
venturiwithtubing,waterpump,andusermanual.
PartsList:
1.
Lid
10.
WaterTubeGasket
2.
CollectionCup
11.
WaterPump
3.
DrainTube/Outlet
12.
PumpOutlet
4.
SkimmerBody
13.
Venturi(airintake)
5.
RiserBracket
14.
AirIntakeTube
6.
BasePlates(2)
15.
ORing:CupOutlet
7.
NylonScrew(4)
16.
ORing:PumpOutlet
8.
WaterOutputAdjustmentTube
17.
ORing:WaterOutputTube
9.
TConnector
**Note:partsmaycomepreassembled.
Installation:
1. Connecttheventuritothewaterpump(sometimesthisunitisalreadypreassembled).
2. Connectthewaterpumpoutlettotheskimmerbody.
3. Connecttheairintaketubetotheventuri.
4. Connectthecollectioncuptotheskimmerbody.Makesurethatthecupoutlet(atthe
bottom)hasarubberoringbeforeinsertingitintotheneckoftheskimmerbody.
5. Connectthedraintubetocup’soutlet.
Question and Answer IconNeed help?

Do you have a question about the Bubble Magus C3.5 and is the answer not in the manual?

Overview

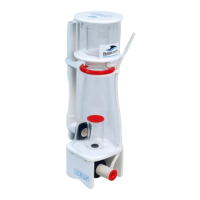
The Bubble Magus C3.5 is an internal protein skimmer designed for aquariums, serving as a crucial component in maintaining water quality by removing organic waste. It is the successor to the NAC3.5 model, featuring an upgraded ROCK-SP1000 pump, which replaces the ATMAN PH1100 pump found in its predecessor. This skimmer is suitable for aquariums with a valid capacity of 80 gallons.

Key Components and Packaging Overview:

The device comes with several essential parts, some of which may be pre-assembled. The packaging typically includes:

  • Collection Cup: Gathers the skimmed waste.
  • Skimmer Body: The main housing of the skimmer.
  • Base Support: Provides stability for the unit.
  • Water Draining System: Facilitates the removal of collected waste.
  • Venturi with Tubing: Responsible for drawing air into the pump to create fine bubbles.
  • Water Pump (ROCK-SP1000): The heart of the skimmer, generating the necessary water flow and air-water mixture.
  • User Manual: Provides instructions for installation, operation, and maintenance.

Detailed Parts List:

For a comprehensive understanding, the manual provides a detailed parts list:

  1. Lid: Covers the collection cup.
  2. Collection Cup: The primary receptacle for waste.
  3. Drain Tube/Outlet: For draining collected waste from the cup.
  4. Skimmer Body: The main structure.
  5. Riser Bracket: Supports internal components.
  6. Base Plates (2): Form the base support.
  7. Nylon Screw (4): Used for assembly.
  8. Water Output Adjustment Tube: Allows for control over the water output level.
  9. T Connector: A plumbing connector.
  10. Water Tube Gasket: Ensures a watertight seal.
  11. Water Pump: The ROCK-SP1000 model.
  12. Pump Outlet: Where water exits the pump.
  13. Venturi (air intake): The component that mixes air with water.
  14. Air Intake Tube: Connects the venturi to the outside air.
  15. O-Ring: Cup Outlet: A seal for the collection cup outlet.
  16. O-Ring: Pump Outlet: A seal for the pump outlet.
  17. O-Ring: Water Output Tube: A seal for the water output adjustment tube.

Installation Process:

The installation of the Bubble Magus C3.5 is straightforward, though some parts may arrive pre-assembled. The steps are as follows:

  1. Connect the venturi to the water pump: This unit might already be assembled.
  2. Connect the water pump outlet to the skimmer body: Ensures the pump is properly integrated.
  3. Connect the air intake tube to the venturi: Allows air to be drawn into the system.
  4. Connect the collection cup to the skimmer body: It's crucial to ensure the cup outlet has a rubber O-ring before insertion into the skimmer body's neck to prevent leaks.
  5. Connect the drain tube to the cup's outlet: For easy waste removal.
  6. Submerge the unit with water: The skimmer must be fully submerged before operation.
  7. Connect the power cord to an electric socket: Use a GFI (Ground Fault Interrupter) certified outlet for safety.
  8. Make adjustments using the adjustment tube: Fine-tune the skimmer's performance.

Usage Features and Operation:

Once installed and powered, the skimmer begins its operation. Bubbles should appear when the pump is active, indicating proper function. If no bubbles are observed, a system restart is recommended. New skimmers typically require a "break-in" period of a few days or more to achieve optimal performance. The suggested external water level for the skimmer is between 20-25 cm. Each unit undergoes pre-testing at the factory to ensure it is in working order, so traces of water upon unboxing are normal and do not indicate a used product. It is critical not to run the pump dry; always ensure it is submerged before operation to prevent damage.

Maintenance Features:

Regular maintenance is essential to ensure the longevity and efficiency of the protein skimmer. The manual outlines several key maintenance tasks:

  • Collection Cup and Neck Service: These components should be serviced regularly to remove accumulated waste.
  • Venturi and Pump Disassembly and Cleaning: Recommended every 3 to 6 months. This involves disassembling, inspecting, and cleaning the impeller to maximize the pump's life and performance.
  • Complete Skimmer Cleaning: A thorough cleaning of the entire skimmer is recommended every 6 to 12 months.
  • Cleaning Agents: Avoid using harsh cleaning chemicals and soaps. A 50/50 vinegar bath is recommended for cleaning, as it is effective yet gentle on the components.

Troubleshooting and Support:

In case of any issues, whether related to packaging, installation, or normal operation, users are advised to contact support@seasideaquatics.com for assistance. Product registration is also encouraged to activate the warranty.

Bubble Magus C3.5 Specifications

General IconGeneral
BrandBubble Magus
ModelC3.5
CategorySwimming Pool Filter
LanguageEnglish