18
DP12VL
OPERATING INSTRUCTIONS
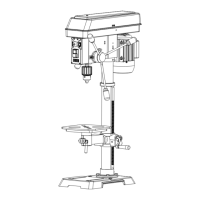
REPLACING THE BELT
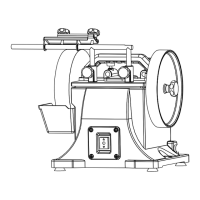
SPINDLE RETURN SPRING
The spindle is equipped with an auto-return mechanism. The main components are a
spring and a notched housing. The spring was properly adjusted at the factory and
should not be readjusted unless absolutely necessary.
1. Unplug the drill press.
2. Loosen the two housing nuts (1) approximately
1/4" (6 mm). Do not remove the nuts from the
threaded shaft. Do not allow the spring or spring
housing to slip out of control.
3. While firmly holding the spring housing (2),
carefully pull spring housing out until it clears
the raised stop (3).
4. Turn the housing so that the next notch (4)
is engaged with the raised stop (3).
• To increase the spindle return tension, turn the spring housing counter-clockwise.
• To decrease the tension, turn the spring housing clockwise.
5. Tighten the two housing nuts. Do not overtighten the two nuts. If the nuts are
tightened too much, the movement of the spindle and feed handles will become
sluggish.
Belt tension and drill press speed is controlled by automatic adjustments made to the
diameter of the front spindle when the speed handle is moved.
1. Plug in the drill press and turn it ON. Adjust
the speed to the highest setting, then turn the
drill press OFF and unplug it.
2. Open the belt cover, remove the Phillips-head
screw from the right side, then open the lid.
3. Press down on the bottom side of the motor
pulley (2). This will loosen the belt tension.
Work the belt (1) off the pulleys.
4. Place the new belt on the motor pulley (1), then press down on the bottom side of the
pulley as before and get the belt as close to the motor shaft as possible. Make sure
the bottom side of the pulley is pushed fully downward.
5. Work the belt around the spindle pulley (3). The belt will not be taut, but will self-seat
later.
6. Close and secure the belt cover.
7. Plug in and turn ON the drill press. The belt will self-seat and achieve proper tension
on its own.
2
3
1
1
2
3
4
 Loading...