11
9
10
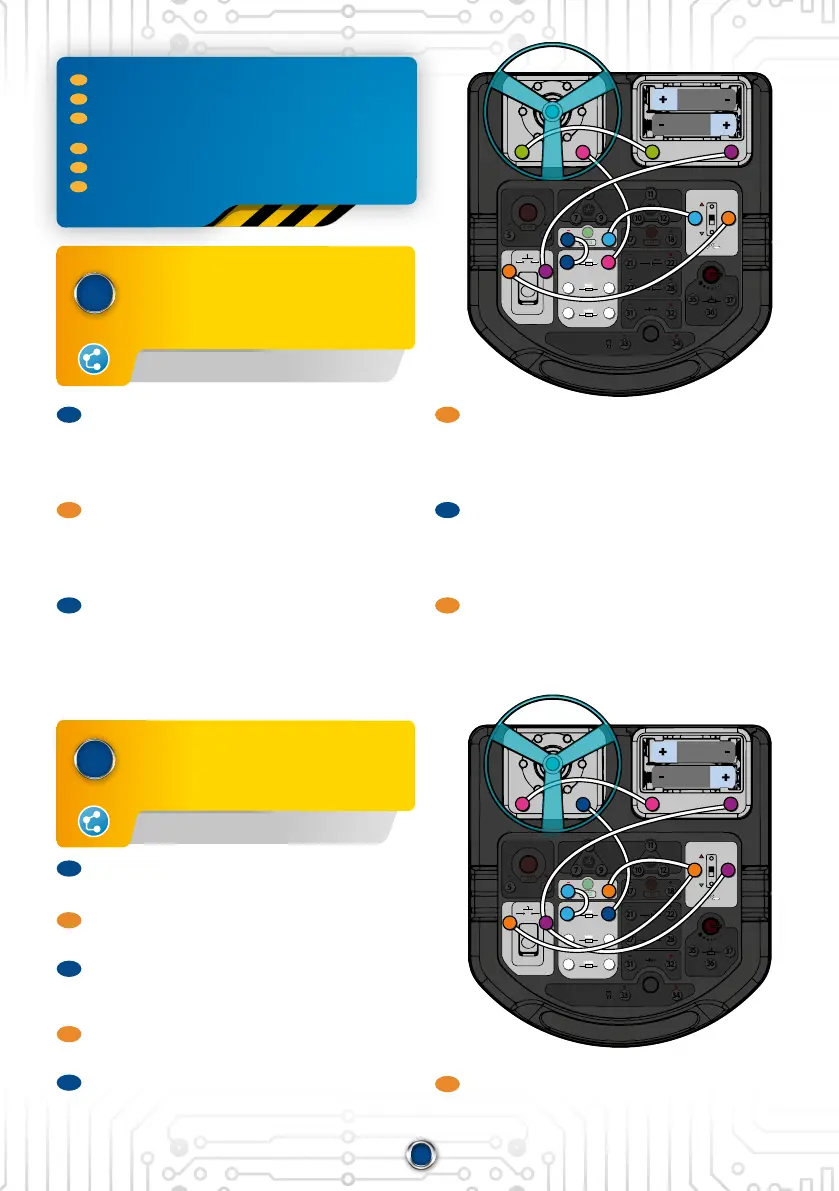
La fonction « ET » • The «AND»
function • Die Funktion „UND“ •
De ‘EN’-functie • La función «Y» •
Funzione “AND”
La fonction « OU » • The «OR»
function • Die Funktion „ODER“
De ‘OF’-functie • La función «Y»
Funzione “OR”
FR
Réalise les branchements. Mets l’interrupteur sur ON
sans appuyer sur le bouton poussoir, la LED ne s’allumera
pas. Maintenant appuie sur le bouton poussoir ETET mets
l’interrupteur principal sur ON en même temps, la LED
s’allume ! C’est ce qu’on appelle une fonction «ET». Pour
allumer (C), tu dois faire l’action A ETET l’action B.
EN
Make the connections. Set the switch to ON without
pressing the push switch; the LED will not light up. Now
press the push switch ANDAND set the main switch to ON at
the same time: the LED lights up! This is what is called
an «AND» function. To switch on (C), you have to perform
action A ANDAND action B.
DE
Stelle die elektrischen Verbindungen her. Schalte auf ON,
ohne auf den Drucktaster zu drücken, die LED leuchtet
nicht. Drücke jetzt gleichzeitig auf den Taster und stelle
den Hauptschalter auf ON, die LED leuchtet auf! Das
nennt man das UND-Gatter. Um die LED leuchten zu
lassen (C), musst du die Aktionen A UNDUND B ausführen.
FR
Réalise les branchements. Pour allumer la LED, tu dois
appuyer sur le bouton poussoir OUOU mettre l’interrupteur
sur ON. C’est la fonction « OU ».
EN
Make the connections. To light up the LED you have to
press the push switch OROR set the switch to ON. This is
the «OR» function.
DE
Stelle die elektrischen Verbindungen her. Damit die LED
aueuchtet, musst du entweder den Taster drücken
ODER ODER den Schalter auf ON stellen. Das ist das ODER-
Gatter.
NL
Maak de aansluitingen. Om de LED aan te zetten, moet
je op de drukknop drukken OFOF de schakelaar op ON
zetten. Dit is de ‘OF’-functie.
ES
Haz las conexiones. Para encender el LED, debes
presionar el botón O O encender el interruptor. Esta es
la función «O».
100KΩ100K Ω
100Ω10 0Ω
470μF470μF
100μF100μF
10KΩ10K Ω
B
E C
7
15 16
19 20
25 26
29 30
31
33 34
32
27 28
35
36
37
21 22
17
OFF
ON
18
5
6
23
24
9
B
E C
10 12 13 14
8
1 2 3 4
11
31
20
2
4
24
15
14
23
16
13
19
100KΩ100K Ω
100Ω10 0Ω
470μF470μF
100μF100μF
10KΩ10K Ω
B
E C
7
15 16
19 20
25 26
29 30
31
33 34
32
27 28
35
36
37
21 22
17
OFF
ON
18
5
6
23
24
9
B
E C
10 12 13 14
8
1 2 3 4
11
31
20
2
4
24
15
14
23
16
13
19
N L
Maak de aansluitingen. Zet de schakelaar op ON
zonder de drukknop in te drukken, de LED gaat niet
branden. Druk nu op de drukknop EN EN zet tegelijkertijd
de hoofdschakelaar op ON, de LED gaat nu wel branden!
Dit heet de ‘EN’-functie. Om (C) aan te zetten, moet je
actie A ENEN actie B uitvoeren.
ES
Haz las conexiones. Coloca el interruptor en ON sin
presionar el botón, el LED no se encenderá. Ahora
presiona el pulsador YY enciende el interruptor principal
al mismo tiempo, ¡el LED se iluminará! Esto se llama
función «Y». Para encender (C), debes realizar la acción
A Y Y la acción B.
IT
Effettua i collegamenti. Posiziona l’interruttore su ON
senza premere il pulsante. Il LED non si accende.
Ora premi il pulsante EE allo stesso tempo posiziona
l’interruttore su ON. Il LED si accende! Questa è la
funzione “AND”. Per accendere (C) devi implementare
l’azione A EE l’azione B.
IT
Effettua i collegamenti. Per accendere il LED devi premere
il pulsante OPPUREOPPURE posiziona l’interruttore su ON. Questa
è la funzione “OR”.
4-24-14, 4-24-14, 16-13-23,16-13-23, 15-19, 15-19, 20-2, 20-2, 3-13-1
FR
Les montages 9-10-11 traitent de la circulaon de l’informaon dans le circuit
EN
Assemblies 9-10-11 deal with the circulaon of informaon in the circuit.
DE
Bei den Auaumöglichkeiten 9-10-11 geht es um den Informaonsuss
im Stromkreis.
NL
De schema’s 9-10-11 gaan over de informaestroom in het circuit.
ES
Los montajes 9-10-11 tratan del ujo de información en el circuito.
IT
I setup 9-10-11 sono dedica al usso di informazioni nel circuito elerico.
4-24, 4-24, 14-23,14-23, 13-16, 13-16, 15-19, 15-19, 20-2,20-2, 3-13-1
 Loading...