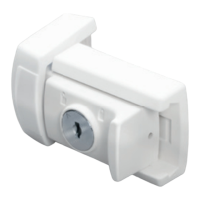
Komfort-
Riegel
WR 60 / WZ 60
Montagematerial
Mounting material
A
Fensterfl ügel / Sash
B
Fensterrahmen / Frame
Montage
Assembly
1
Zylinderschloss aufschließen (nur bei
Modell WZ). Madenschraube
F
mit
bei gefüg tem Inbusschüssel aus Riegel
heraus drehen.
Unlock the cylinder lock (model WZ only).
Use the attached key to turn out the
setscrew
F
from the bolt.
2
Riegel
A
nach vorne aus Riegel-
Grundplatte
B
herausschieben
Push bolt
A
forwards off mounting
plate
B
3
Riegel-Grundplatte
B
an der Türkante
oder Fensterrahmen bündig anlegen und
verschrauben. Fit bolt mounting plate
B
fl ush to the edge of the door and screw
in place.
4
Die Anpassung der Schließkastenhöhe
zum Riegel ergibt sich durch das
Unterlegen der Distanzscheiben
D
.
Schließkasten
C
anschrauben.
The adaptation of the lock casing height
to the bolt results from underlaying the
spacers
D
. Screw staple
C
on.
5
Schließkasten-Abdeckung
E
auf
Schließkasten
C
aufstecken.
Place staple cover
E
on staple
C
.
6
Riegel
A
auf Riegel-Grundplatte
B
schieben. Die in Punkt 1 gelöste Maden-
schraube, mit beigefügtem Schlüssel an
gleicher Position verschrauben.
Shift bolt
A
onto bolt mounting plate
B
.
Tighten the setscrew released in step 1 to
the same position using the attached key.
Benötigtes Werkzeug
Required tools
2 x
1 mm
2 mm
4 mm
1 x
1 x
1 x
1 x
1 x
WZ
Montageanleitung
Bitte lesen Sie die gesamte Anleitung bevor
Sie mit der Montage beginnen. Bewahren
Sie diese gut auf.
Assembly instructions
Please read the entire User Manual before
you start to mount the device. Keep these
instructions in a safe place.
Legende
Legend
A
– Riegel / Bolt
B
– Riegel-Grundplatte / Bolt mounting plate
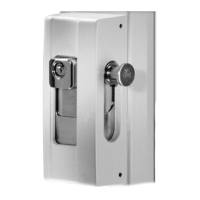
C
– Schließkasten / Staple
D
– Unterlagen-Set (1 mm, 2 mm und
4 mm Distanzscheibe) / Set of pads
(1 mm, 2 mm and 4 mm distance pads)
E
– Schließkasten-Abdeckung / Staple cover
F
– Madenschraube / Setscrew
B
A
max. 2mm
www.burg.biz
2
A
B
6
1
5
A
C
D
E
F
MA WR 60 / WZ 60 /
08 / 2015 g
l / sds
BURG-WÄCHTER KG
Altenhofer Weg 15
58300 Wetter
Germany
Seite 1 / 2
3 4
B
C