EasyManua.ls Logo

BuyTricycle Scout - User Manual

BuyTricycle Scout
16 pages
Print Icon
To Next Page IconTo Next Page
Loading...
ASSEMBLY GUIDE
BuyTricycle
Email: help@buytricycle.com
Twitter: @BuyTricycle
facebook: @B
uyTricycle
Phone: +44 7856 715212
Spanish, French, German, Dutch, Italian, Portuguese,
Polish :
www.buytricycle.com/instructions
Question and Answer IconNeed help?

Do you have a question about the BuyTricycle Scout and is the answer not in the manual?

Summary

Assembly Guide

Build Instructions

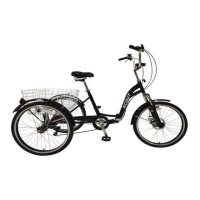
Guidance and steps for assembling the tricycle.

Tools Required

List of necessary tools for the assembly process.

Adult Trike Parts Identification

Assembly Steps

Fasten the Wheel

Instructions for securely attaching the wheel using a quick release axle.

Handlebar and Brake Installation

Guidance on installing handlebars and connecting brake cables.

Gear System Setup

Procedure for routing and connecting the gear cable.

Rear Derailleur Adjustment

Finishing Touches

Basket Installation

Steps for attaching the rear basket using provided hardware.

Folding the Tricycle

Instructions on how to fold and unfold the tricycle mechanism.

Parts List

Electric Tricycle Charging Information

Charging Instructions

Detailed steps for charging the electric tricycle battery.

Cautionary Notes

Important safety and usage precautions for charging.

Terms and Conditions

Returns Policy

Details on the 14-day money-back guarantee and return process.

Damaged or Faulty Goods

Procedures for reporting and handling damaged or faulty items.

Warranty Terms

Information regarding the 12-month warranty coverage and exclusions.

Important Notes and Feedback

Leaving Feedback

Encouragement for customers to provide feedback on their experience.

Overview

This document is an assembly and maintenance guide for the BuyTricycle Scout adult tricycle, including specific instructions for electric models.

Function Description:

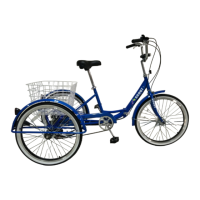
The BuyTricycle Scout is an adult tricycle designed for personal transportation, offering stability and cargo capacity with its rear basket. Electric models include a motor for assisted pedaling. The tricycle is designed with user safety in mind, including features like a free battery light (for electric models), a pump for tire inflation, and a cable lock with a weather cover. Some models are designed to be foldable for easier storage and transport.

Important Technical Specifications:

  • Frame Number: Located under the crank in the center of the trike.
  • Wheels: Features front and rear wheels, with the rear wheels having different cuts (right and left specific). Electric models use an electric wheel hub for the front wheel.
  • Brakes: Includes front and rear brakes (disc brake for the rear, V-brake for the front).
  • Gears: Equipped with a Shimano derailleur and gear cluster.
  • Axle: The front wheel uses a quick-release axle (for non-electric models), while the rear axle has pre-inserted bolts for attachment.
  • Battery (E-Trikes Only): Detachable, semi-charged out of the box. Requires specific charging instructions for optimal performance and longevity.
  • Hardware: All necessary nuts, bolts, and small components are provided in labeled bags.
  • Tools Included: Spanner, Phillips and flat blade screwdrivers, Metric Allen Keys, Bike chain tool/splitter.
  • Recommended Tools: Bicycle oil, bicycle grease, bike/trike stand.

Usage Features:

  • Assembly: The guide provides step-by-step instructions for assembling the tricycle, including attaching the rear axle, mudguards, wheels (front and rear), front fender, chain, chainguard, pedals, saddle, handlebars, brakes, and gears.
  • Pre-Ride Checks: Before the first ride, users must check that all nuts and bolts are tight, handlebars, wheels, pedals, and saddle are secure, gears and brakes operate correctly, and tires are inflated. Mudguards should be aligned and secured. For folding models, the quick-release system must be secure and locked.
  • Folding Mechanism (Folding Models): To fold, release the quick-release lever and lift the handle. To unfold, return the frame to its starting position and lock the quick-release lever.
  • Basket: The rear basket attaches using two white bars through the rear axle. Folding baskets are secured with plastic clips.
  • Gear Adjustment: Detailed instructions are provided for adjusting the rear derailleur's high and low limit screws to ensure smooth gear changes. Lubrication of cables is recommended for stiff shifters.
  • Brake Adjustment: Instructions for feeding and tightening brake cables for both front and rear brakes, and adjusting them for effective stopping.
  • E-Trike Specific Usage:
    • Front Motor Wheel: Attach the front motor wheel, ensuring directional arrows on the tire are correct and the motor cable is on the same side as the chain. The connection must be extremely tight for the wheel to spin freely.
    • Power Cable Connection: When joining the cable from the front electric wheel hub to the battery cable, ensure the two arrows meet. Use tie wraps to secure the cable to the forks. An "error 03" on the LCD screen indicates an incorrect cable insertion.
    • Charging: The battery is semi-charged out of the box and requires a full charge before first use. The first three charges should be at least 12 hours. The charger indicates full charge when the light turns from red to green. The charger enters "trickle charge" to maintain the charge.

Maintenance Features:

  • Regular Checks: Users are advised to regularly check all nuts and bolts, handlebars, wheels, pedals, saddle, gears, brakes, and tire pressure.
  • Tire Inflation: A pump is included to keep tires inflated correctly.
  • Cable Lubrication: Lubricating gear cables is recommended to prevent stiff shifting.
  • Cleaning: The charger for e-trikes should be used in a dry, clean, well-ventilated environment.
  • Battery Care (E-Trikes Only):
    • Ensure the e-trike power switch is off and the key is removed before charging.
    • Charge the battery at least once a month for a minimum of two hours, even when not in use.
    • Do not touch the two electrodes on the battery.
    • Do not open the battery casing, as this voids the warranty.
    • Keep one key safe, as spares are not provided, and keys are unique to each tricycle.
  • Warranty: A 12-month warranty is offered from the date of purchase, covering new parts and advice on fixing. Defective parts must be returned for inspection at the buyer's cost. The warranty does not cover:
    • Wear and tear parts (break pads, worn tires, bearings, brakes).
    • Damage due to abuse, misuse, accidents, or neglect.
    • Labor or servicing by unauthorized parties.
    • Damage from non-covered parts or parts not purchased from BuyTricycle.
    • Damage due to irregular checks and servicing.
    • Rust or weather damage.
    • Bending of soft metals like mudguards (which can occur during delivery).
  • Reporting Faults: All faults must be reported immediately in writing to help@buytricycle.com. Proof of purchase is required. BuyTricycle is not responsible for repairs by the customer or third parties if the problem is due to neglect, abuse, or accident.
  • Professional Assistance: The guide recommends seeking professional assistance for assembly if the user lacks experience with tricycle/bicycle assembly. BuyTricycle is not responsible for accidents/injuries due to improper build.

BuyTricycle Scout Specifications

General IconGeneral
BrandBuyTricycle
ModelScout
CategoryBicycle
LanguageEnglish

Related product manuals