EasyManua.ls Logo

Buzz Connect Hubba-X4 Duo User Manual

Buzz Connect Hubba-X4 Duo
27 pages
To Next Page IconTo Next Page
Page #1 background imageLoading...
Page #1 background image
Hubba-X4 Duo. Issue 2-7 Page 1
Hubba-X4 Duo user guide
Issue 2-7 February 2018
Basic set-up
Ensure that the breather top (1) is always tightly screwed on.
Ensure that the power connector (3) is fully connected (either DC or mains) To do this gently line up
the plug to the socket and rotate carefully until the spline engages. Now the socket will slide fully
into the plug at which point the locking ring on the plug can be rotated clockwise keeping the plug
firmly in position. Make sure that the locking ring is fully tightened.
If the LAN socket (2) or the AUX socket (5) are not in use then the waterproof cap should be securely
in place to protect the connectors.
The status indicator (4) is able to show a variety of conditions refer to page 3 for full details.
External GSM antenna
Internal Wi-Fi antennas
External antenna
extension leads up
to 20m
AUX socket (5)
LAN socket (2)
Mains PSU (3)
DC Power cable (3)
Status indicator (4)
Breather (1)
Roof mount
Question and Answer IconNeed help?

Do you have a question about the Buzz Connect Hubba-X4 Duo and is the answer not in the manual?

Buzz Connect Hubba-X4 Duo Specifications

General IconGeneral
BrandBuzz Connect
ModelHubba-X4 Duo
CategoryWireless Router
LanguageEnglish

Summary

Getting Started with Hubba-X4 Duo

Front Panel Indicators Explained

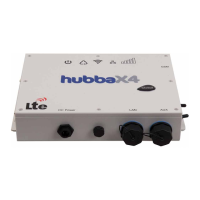
Details the meaning of each status light on the device's front panel for quick diagnostics.

DC Power Connection Guide

Instructions for correctly connecting the DC power supply, including voltage and polarity requirements.

External GSM Antenna Setup

Guidance on installing and positioning the external GSM antenna for optimal signal strength.

SIM Card Installation and Management

Replacing the SIM Card

A step-by-step procedure for safely removing and installing SIM cards, including handling internal components.

Web Interface and Initial Configuration

Accessing the Web Interface

How to connect to the device's web GUI using a browser and log in with default credentials.

Device Overview Page

Explanation of the main status screen, showing signal strength, data usage, and connection status.

Manual APN Configuration

Steps to manually set up Access Point Names (APNs) for establishing mobile data connections.

SIM Settings and Data Roaming

Configure SIM selection, APN, username, password, and control mobile data roaming behavior.

Data Connection and On-Demand Settings

Select data connection type (2G/3G/4G) and configure on-demand data usage for efficiency.

Advanced Connectivity and Failover

SIM Failover Configuration

Set up automatic switching between SIM cards based on network signal or data availability.

WAN Failover Setup

Configure the router to use a wired connection as the primary WAN, with mobile as a backup.

Wi-Fi as WAN Connection

Enable and configure the device to connect to and rebroadcast an external Wi-Fi network.

Port Forwarding Rules

Configure rules to allow incoming internet traffic to specific devices or services on the local network.

Dynamic DNS (DDNS) Setup

Configure DDNS to ensure consistent access to the router via a hostname, even with dynamic IP addresses.

Network and Data Management

Wi-Fi Network Settings

Customize Wi-Fi SSID, security type (WPA/WPA2), and password for the device's hotspot.

Data Limit Management

Set monthly data usage limits for SIM cards to prevent overage charges.

Hardware Assembly and Details

Cat5 Connector Assembly

Instructions for assembling Cat5 connectors, noting the importance of shroud presence or absence.