22
Fig. 1a
3. Using the appliance
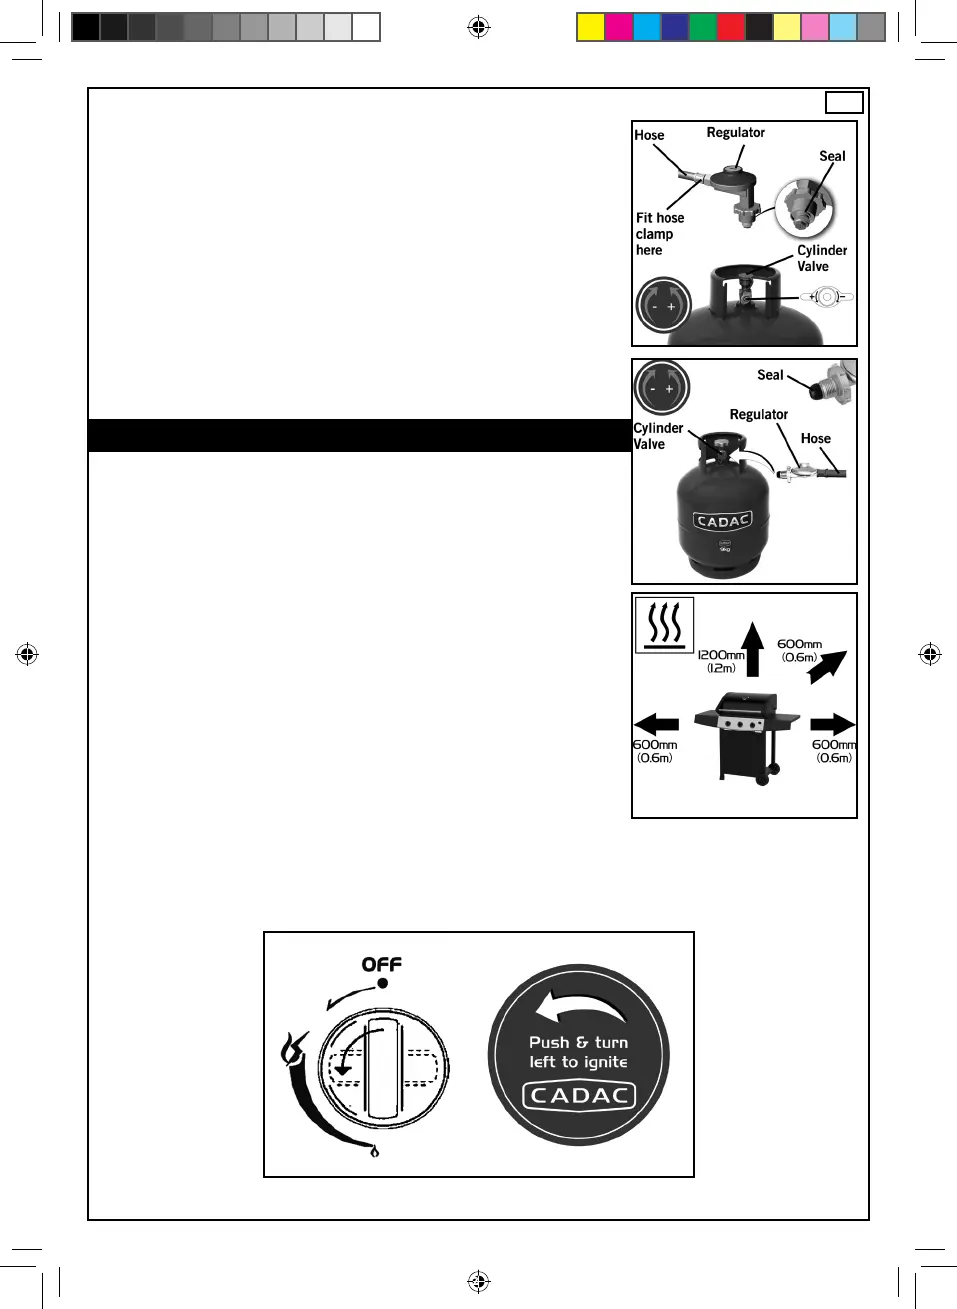
• Place the cylinder inside the cabinet in the space provided.
• Use this appliance only on a rm level surface.
• Before use ensure that the drip cup/tray is in place.
• Make sure the CADAC gas cylinder is correctly tted to the appliance.
• Ensure the cylinder control valve is in the open position.
• To light the appliance using the igniter, turn the control knob until spring resistance is felt.
Hold the knob in this position for 3 – 5 seconds to allow the gas to ow and then turn the
knob to the MAX position, at the same time push the igniter button. The electrode will spark
simultaneously to light the burner. Should the burner not ignite the rst time, push and turn
the control knob to the OFF position and wait 5 minutes, repeat the process until the burner
ignites.
• Note! All burners are tted with a piezo electrode igniter located at the front of each burner.
Gas needs to ow in the burner to the front before ignition will take place. The ignitor button
requires a AA battery to operate.
• Manual ignition: To light the burners manually, rst remove the cast iron grill plate and the
de ector plate directly underneath it. Ignite a match or relighter and position it next to the
left hand burner. Turn on the gas supply to that burner only by pushing the control valve in
and turning it. This will ignite the burner. Once the burner is ignited, carefully replace the
de ector plate and cast iron grill plate.
• Use the control knobs to adjust the individual burner ame intensity to the desired level by
turning the knob to decrease or increase the ame (see g.3).
• After use, rst close the valve on the gas cylinder. When the ame is extinguished, close the
burner control valves on the appliance by pushing in and turning the control knobs to the OFF
position.
Fig. 2
Fig. 3
GB
NOTE
• Do not twist or pinch the hose. Ensure that it is kept away from the BBQ body so as to
prevent deterioration/damage to the hose caused by heat.
• Screw the regulator into the cylinder and the other end of the hose is tted with a 1/4”BSP
nut that screws onto the appliance.
• Ensure that the connections are made securely and do not allow gas to leak.
• Check for gas leaks before using the appliance.
For use with an approved hose and regulator connected to a re llable gas container not
exceeding 9 kg and complying with local regulation in force.
• Do not obstruct the ventilation openings of the cabinet.
• Do not modify the appliance. Modifying the appliance may be dangerous.
• Warning: Since this barbecue has no restriction in the emission of unburned gas, this
barbecue must be installed and/or used OUTDOORS or in an AMPLY VENTILATED AREA.
Ensure this BBQ is installed in an AMPLY VENTILATED AREA, the area must have at least
25% of the surface (sum of the walls surface) area open.
• Do not move the appliance during use.
• Any modi cation of the appliance may be dangerous
• Warning: An LP cylinder not connected for use, shall not be stored in the vicinity of this or
any other appliance.
Fig. 1b
503-0756 LEV2 (1195-31, 1195-43) Commander 3 & 4 - User Manual (ZA).indd 2 2019/10/23 12:48:51
 Loading...