This document provides instructions for assembling and using the Callaway Base Hitting Net, a portable golf practice net designed for both indoor and outdoor use. The net allows golfers to practice their swing and ball striking in a contained environment, making it suitable for backyards, garages, or other open spaces. Its design emphasizes ease of setup, portability, and durability, catering to golfers of various skill levels who wish to improve their game without needing access to a driving range.
Function Description
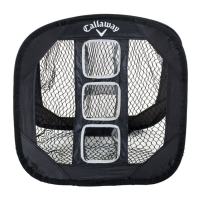
The Callaway Base Hitting Net serves as a robust and stable barrier to safely contain golf balls hit during practice. Its primary function is to absorb the impact of golf shots, preventing balls from traveling beyond the designated practice area and minimizing the risk of damage or injury to surroundings. The net features a central hitting target, which provides a focal point for golfers to aim at, helping them refine their accuracy and consistency. This target is designed to withstand repeated impacts, ensuring longevity and consistent performance. The overall structure is engineered to be stable against the force of a golf swing and the impact of the ball, maintaining its upright position during use. The net's construction allows for quick assembly and disassembly, making it a convenient tool for regular practice sessions. When not in use, the entire system can be compactly stored in its included carry case, facilitating transport and storage.
Usage Features
The Callaway Base Hitting Net is designed with several features to enhance its usability and convenience for golfers.
- Portable Design: The net is engineered for portability, allowing users to set it up in various locations. All components are lightweight and designed to fit into a compact carry case, making it easy to transport from one practice spot to another. This feature is particularly beneficial for golfers who have limited space or wish to practice in different environments.
- Quick and Easy Setup: The assembly process is straightforward, involving a series of interlocking poles and securing loops. The instructions are clearly laid out with diagrams, guiding users through each step from laying out the net to attaching the frame and target. Key components, such as the Straight Base Poles and Angled Base Poles, connect with a spring-lock button mechanism, ensuring a secure and audible "click" when properly engaged. This design minimizes the time and effort required for setup, allowing users to spend more time practicing.
- Durable Construction: The net itself is made from a resilient material designed to withstand the repeated impact of golf balls. The frame components, including the Vertical Frame Poles, Straight Base Poles, and Angled Base Poles, are constructed from sturdy materials to provide a stable and robust structure. This durability ensures the net can endure regular use over an extended period.
- Central Hitting Target: A prominent hitting target is integrated into the net, providing a clear visual aim point for golfers. This target helps users focus on their accuracy and consistency, making practice sessions more effective. The target is designed to absorb impacts efficiently, protecting the main net structure and extending its lifespan.
- Indoor and Outdoor Versatility: The net is suitable for both indoor and outdoor use. For outdoor setups, "U" shaped Ground Stakes are provided to firmly secure the base poles into the ground, enhancing stability against wind or powerful shots. This versatility allows golfers to practice in their backyard, garage, basement, or any other suitable space, regardless of weather conditions.
- Secure Fastening System: The net incorporates various securing mechanisms, such as Side Securing Sleeves, Top Securing Loops, Bottom Securing Loops, Base Hooks, and Sewn-In Tabs, to ensure all components are tightly connected. The Black Threaded Cord and Spring Loaded Holder are used to attach the hitting target securely to the net, preventing it from shifting during use. These features contribute to the overall stability and safety of the net during practice.
- Compact Storage: Once disassembled, all parts of the hitting net can be neatly packed into the included carry case. This compact storage solution not only makes the net easy to store in small spaces but also protects the components from damage when not in use.
Maintenance Features
While the document does not explicitly detail maintenance features, the design of the Callaway Base Hitting Net implies certain aspects that contribute to its upkeep and longevity.
- Modular Design for Easy Replacement: The net's modular construction, with separate poles, net, and target, suggests that individual components could potentially be replaced if damaged. This design approach can extend the overall life of the product, as users might not need to replace the entire net if only one part is worn out.
- Durable Materials: The use of robust materials for both the net and the frame components inherently reduces the need for frequent maintenance. The net material is designed to resist tearing and fraying from ball impacts, while the metal poles are likely treated to resist corrosion, especially when used outdoors.
- Simple Cleaning: The net material and frame components are likely easy to clean with a damp cloth, removing dirt or debris accumulated during outdoor use. Regular cleaning can help maintain the appearance and integrity of the net.
- Protective Carry Case: The included carry case serves as a crucial maintenance feature by protecting the net and its components from dust, dirt, and physical damage during storage and transport. Storing the net properly in its case helps prevent premature wear and tear.
- Clear Assembly Instructions for Proper Use: The detailed setup instructions, including diagrams, ensure that users assemble the net correctly. Proper assembly is a key aspect of maintenance, as incorrect setup can lead to undue stress on components, potentially causing damage or reducing the net's effectiveness and lifespan. Adhering to the instructions helps maintain the structural integrity of the net over time.
- Inspection for Wear and Tear: Although not explicitly stated, regular inspection of the net, poles, and securing mechanisms for any signs of wear, tears, or damage would be a recommended maintenance practice. Identifying and addressing minor issues early can prevent them from escalating into larger problems that might require more extensive repairs or replacement.