EasyManua.ls Logo

Candela GentleMax User Manual

Candela GentleMax
4 pages
To Next Page IconTo Next Page
Page #1 background imageLoading...
Page #1 background image
INSTRUCTIONS TO GET TO LVM SCREEN
System:
Candela GentleMax
La se r S e rvi c e S olut i o n s 650 Grov e R o a d , S u i t e 10 4 Pau l sbo r o , NJ 0 8 066
ww w. l a sers er v i c eso l u t i o n s . com P: 8 56 - 853 - 7 5 5 5 F: 8 5 6 - 85 3 -757 5
To get to the LVM screen on the Candela GentleMax (GMax), you will have to calibrate the laser for the
ALEX and YAG. If you know how to calibrate for both ALEX and YAG, proceed to step six for instructions
on how to go directly to the LVM and what information is needed by the technicians.
You can use whatever handpiece is available but our technicians recommend using a 15mm handpiece.
Step One: Turn key to power the GMax laser and allow to warm up for at least 10 minutes.
Step Two: Your GMax will default to either ALEX or YAG depending on which setting you used before
turning off the laser. In the center of the main screen will be a circular button and it will say either ALEX
or YAG. Your screen will also be a different color depending on the setting (ALEX is pinkish-red, YAG is
blueish-green).
It does not matter which laser is calibrated first
ALEX SCREEN YAG SCREEN
Step Three: The ALEX and YAG have the same settings. Adjust and confirm that:
DURATION: 3ms
RATE: 1.0 Hz
Question and Answer IconNeed help?

Do you have a question about the Candela GentleMax and is the answer not in the manual?

Candela GentleMax Specifications

General IconGeneral
BrandCandela
ModelGentleMax
CategoryMeasuring Instruments
LanguageEnglish

Summary

Candela GentleMax LVM Screen Access

System Overview and Handpiece Recommendation

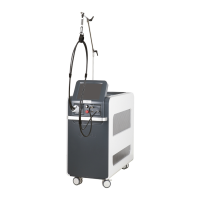
Guide to accessing the LVM screen on the Candela GentleMax, recommending a 15mm handpiece.

Identifying Default Laser Setting (ALEX/YAG)

How to identify the current laser setting (ALEX or YAG) based on screen color and button labels.

Setting Core Calibration Parameters (3ms, 1.0Hz)

Details for setting DURATION to 3ms and RATE to 1.0Hz for both ALEX and YAG laser modes.

Laser Calibration Procedure

Confirm Calibration Parameters

Verifying calibration parameters like Fluence, Duration, Spot Size, and DCD before proceeding with calibration.

Initiating and Completing Laser Calibration

Instructions on using screen buttons to start, confirm, and complete the laser calibration process.

Switching Laser Modes and Accessing LVM

Switching Between ALEX and YAG Settings

Procedure to switch the laser mode to the other setting (ALEX or YAG) and repeat calibration.

Navigating to the LVM Screen

How to access the LVM screen by pressing the 'Paper button' on the bottom right of the screen.

LVM Screen Data Capture for Troubleshooting

Accessing the LVM Tab in Reports

Instructions to navigate to the 'LVM' tab within the Reports screen to view detailed data.

Key Information for Technician Troubleshooting

Identifying critical data like Pulse Count and FOM on the left side for technician troubleshooting.

Related product manuals