20
• When using the product at “Co-sleeping function”, to prevent a suffocation hazard from
entrapment, the bedside sleeper shall be properly secured to the adult bed using the
attachment system.
• Always use the attachment system provided with this product.
• Check the tightness of the attachment system before each use by pulling the bedside
sleeper in a direction away from adult bed.
• If there is any gap between the bedside sleeper and adult bed DO NOT use the product.
• Gaps should not be filled with pillows, blankets or other items.
• WARNING – To avoid hazards from the child’s neck being caught on the top rail on the side
that is next to the adult bed, the top rail must not be higher than the adult bed mattress.
• WARNING – To avoid the risk of your child being strangled the attachment system to the
adult’s bed shall always be kept away from and out of the crib.
• DANGER! Always completely raise the drop side when not attached to the adult’s bed!
• When the drop side is in its lowest position and the mattress or mattress base, if adjustable,
is in its highest position, the distance from the highest surface of mattress to the top the
drop side shall be minimum of 120 mm.
• Assemble, unfold and fold the product ONLY by an adult.
• Do not allow children under 3 years of age till fully assemble the product to avoid access to
small and disassembled parts.
• Any plastic cover should be removed , destroyed or kept away from children to avoid
suffocation.
• Do not make any changes or improvements to the design of the crib, as this may damage
the crib and risk injury to the child.
IMPORTANT! The diagrams and figures in this instruction are illustrative and indicative only.
Follow exactly the instructions and sequence for assembling and operating with the product.
Check the securing of the fixation after each operation.
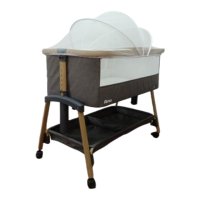
Components - illustration PD
After unpacking, make sure that all elements of illustration PD are available: 1. Mattress; 2. Cot;
3. Removable guardrail (Drop side); 4. Storage basket; 5. Transverse supporting tube (Cross bar);
6. Height adjustment handle.
Assembly and operation
ATTENTION! Follow exactly the instructions and sequence for assembling and using the product,
described in the text and illustrations attached to the instructions. The assembly and functions
are numbered from 1 to 6. Use the operations descriptions given in the manual and their
matching picture.
1.INSTALLING OF THE SUPPORT TUBE AND SIDE SUPPORTS – ILLUSTRATION 1:
Figure 1.1: Insert the support tube into the plastic joint of the structure. A clicking sound should
be audible when well fixed. Figure 1-2: Insert the transeverse support tube (a, b, c, d) into the
plastic joint of the structure. A clicking sound should be heard when good fixing is achieved.
Figure 1-3: Insert the transeverse support tube (e, f, g, h) into the plastic joint of the structure.
A clicking sound should be heard when well fixed.
2.INSTALLING THE COT – ILLUSTRATION 2:
 Loading...