Do you have a question about the Canon Canonet QL17 and is the answer not in the manual?
Clamp-on lens hood and 55mm screw-in filters for light control and image enhancement.
Various flash units (V-3, J-2, J-3, Quint) and related accessories like Canon Release and Speedlite 100.
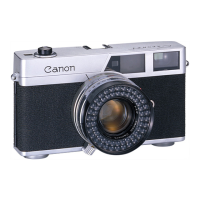
Revolutionary mechanism for easy and accurate film loading.
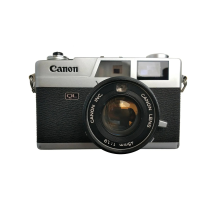
Features a fast F1.7 lens and a sensitive CdS exposure meter.
Enhanced finder optics and manual aperture control options.
Covers safe practices for shutter, QL cover, film loading, and self-timer usage.
Steps 1 & 2: Load film using QL mechanism and set film speed.
Steps 3 & 7: Set aperture to AUTO and focus the picture.
Step 8: Gently press the shutter release button.
Step 4: Adjust film speed setting lever using shutter speed ring.
Steps 5 & 6: Remove lens cap and wind the film advance lever.
Explains how to interpret meter needle for correct exposure.
Set AUTO mark and adjust film speed setting lever to loaded film.
Details film speeds (ASA/DIN) and conditions for sunny, cloudy, indoors.
Turn shutter ring to adjust film speed setting lever to simple exposure marks.
Adjust mark using the entire shutter ring, noting click stops.
Under & Over Exposure Lock prevents exposure outside EE range.
B exposure is not recommended for EE photography and works with the B index.
Hold camera firmly with both hands, press against cheek/forehead, keep elbows close to body.
Step 1: Wind film advance lever to advance frame and counter.
Step 2: Move focusing lever until two images coincide for correct focus.
Steps 3 & 4: Determine composition and press shutter button gently when needle is aligned.
Indicates distance between subject and film surface for focusing.
Adjust shutter ring based on viewfinder needle; safety prevents release if exposure is incorrect.
Arrow marks indicate shutter speed changes; aperture readings show correct exposure.
How to read the needle and adjust shutter ring for correct exposure.
Needle swings with light strength; adjust according to diagrams.
Tips for bright/dark subjects or backlighting, including lowering film speed.
Shutter actuates approx. 10 seconds after pressing the button.
Set flash lever to X; use slower shutter speeds for bulb photography.
Disable AUTO mark to manually control aperture and shutter speed.
Explains how aperture value affects light and depth of field.
Explains how shutter speed affects exposure time, blur, and aperture use.
For exposures over 1 sec; shutter stays open while button is pressed.
For extended periods; open shutter with a lock-attached release.
Attach flash to accessory shoe and insert cord into sync socket.
Set flash lever to M or X based on bulb type (M, F) or speedlight.
Open back cover, insert film cartridge, and set rewinding knob.
Pull film to red mark and engage perforations with the gear.
Check film engagement via sprocket window when cover is half-closed.
Make two unexposed shots to advance film counter and prepare for first shot.
Press rewind button and use crank to rewind film into the original cartridge.
Open back cover and remove cartridge after rewinding is complete.
| Aperture | f/1.7 - f/16 |
|---|---|
| Weight | 620g |
| Dimensions | 120 x 75 x 60 mm |
| Type | Rangefinder camera |
| Lens | Canon 40mm f/1.7 |
| Shutter Speed | 1/500 sec. - 1/4 sec. + B |
| Focus | Manual |
| Viewfinder | Coupled rangefinder with parallax correction |
| Exposure Meter | CdS cell |
| Battery | 1x PX625 1.35V mercury battery |
| Film Advance | Manual lever |
| Flash | Hot shoe and PC socket |