Do you have a question about the Canon pixma ip110 and is the answer not in the manual?
The paper output slot cover opens automatically when the rear tray cover is opened.
Press the ON button to turn on the printer; the POWER lamp will flash and then remain lit.
Press the ON button to turn off the printer. The POWER lamp stops flashing when the printer is turned off.
Confirm POWER lamp is off before unplugging or moving to prevent ink leaks or damage.
When unplugging, carrying, or standing up the printer, ensure the POWER lamp is off.
Avoid shock, vibration, heat, and heavy items to prevent damage or ink leaks.
Identifies and describes external parts: print head cover, paper guides, trays, and levers.
Details functions of ON button and RESUME/CANCEL button for operations and settings.
Explains POWER, ALARM, and Wi-Fi lamps for status, errors, and wireless connection.
Describes AC adapter connector and USB port for power and computer connection.
Identifies ink lamps, print head holder, and print head lock lever for maintenance.
Guides on checking printer status based on POWER and Alarm lamp states (off, lit, flashing).
Notes on initial boot-up noise and contacting support if issues persist or are abnormal.
Lists causes and support codes for Alarm lamp flashes (e.g., no paper, paper jam, ink issues).
Details support codes for errors indicated by simultaneous flashing of POWER and Alarm lamps.
Step-by-step guide for removing old ink tanks and installing new ones correctly.
How the Alarm lamp and ink lamps indicate low ink or errors during replacement.
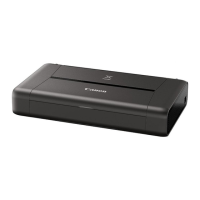
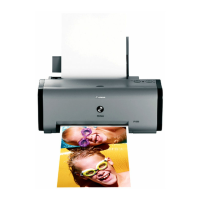
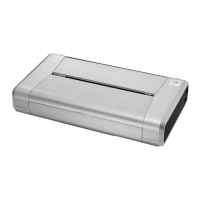
The Canon iP110 Series Printer is a compact and portable inkjet printer designed for on-the-go printing. It offers a range of features for both functionality and ease of use, making it suitable for various printing needs.
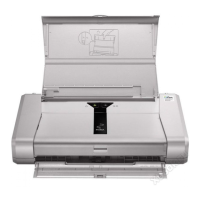
The primary function of the Canon iP110 is to print documents and images. It operates by loading paper into the rear tray and ejecting printed pages from the paper output slot. The printer utilizes ink tanks for color and black printing, which are installed in the print head holder. It supports wireless LAN connectivity, allowing users to print from various devices without a direct cable connection. The printer also features a USB port for wired connections to computers and an AC adapter connector for power.
Turning on the printer is a straightforward process. Users first open the rear tray cover, which automatically opens the paper output slot cover. Then, pressing the ON button initiates the power-up sequence. The POWER lamp will flash and then remain steadily lit, indicating the printer is ready for use. It's important to note that the printer may take a short while to warm up before it can start printing immediately.
For turning off the printer, simply press the ON button again. The POWER lamp will flash and then turn off, signaling that the printer is powered down. A crucial safety measure emphasized in the manual is to ensure the POWER lamp is off before unplugging the power cord, standing the printer up, or carrying it. Failing to do so could lead to ink leakage or damage to the printer. The printer also has an automatic shut-off feature that can be configured to power down after a certain interval of inactivity, conserving energy.
The printer's components are designed for intuitive use. The rear tray (5) is where paper is loaded, capable of holding multiple sheets of the same size and type, which are then fed automatically one at a time. The paper support (3) should be pulled out fully to properly support the loaded paper. A paper guide (2) helps align the paper stack to the left side of the tray. Printed paper is ejected from the paper output slot (6), which has a cover.
For specific media types, the paper thickness lever (7) can be adjusted. Setting it to the left is recommended for printing on envelopes, while setting it to the right is for other paper types.
The control panel features several buttons and lamps. The ON button (8) serves to power the printer on and off. The POWER lamp (9) indicates the printer's power status, lighting up after flashing when the power is on. The RESUME/CANCEL button (10) is used to stop a print job in progress. Holding this button down allows users to access maintenance options or printer settings. The ALARM LAMP (11) illuminates or flashes to signal an error condition. The number of flashes can indicate specific issues, which are detailed in the troubleshooting section. For wireless connectivity, the Wi-Fi button (12) can be held down for automatic wireless LAN setup, and the Wi-Fi lamp (13) lights or flashes to show the wireless LAN status.
The Canon iP110 includes features and guidelines for maintaining its performance and addressing common issues.
One of the most common maintenance tasks is replacing ink tanks. The printer provides clear indications when ink levels are low or when an error related to ink occurs, primarily through the flashing ALARM lamp. To replace an ink tank, first ensure the printer is powered on. Then, open the print head cover (1). The ink tank with the fast-flashing lamp is the one that needs replacement. To remove it, push the tab and lift the ink tank. It's important to replace ink tanks one by one, avoiding removing both at the same time. Once the old tank is out, remove the new ink tank from its packaging and take off the protective cap from the bottom. Insert the front end of the new ink tank into the print head at a slant and press it firmly until it clicks into place, ensuring it is secured. After installation, the ink lamp should light up. Finally, close the print head cover.
Troubleshooting is facilitated by the POWER and Alarm lamps. Different states of these lamps indicate various printer conditions:
When an error, such as a paper jam or an empty ink cartridge, causes the orange ALARM lamp to flash, a troubleshooting message may appear on the computer screen, providing a "Support Code" (error number). The manual provides a table correlating the number of flashes of the ALARM lamp with specific causes and their corresponding support codes. For example, two flashes indicate no paper in the rear tray or a mismatch in paper size settings, while three flashes suggest a paper jam. Issues like ink run-out, incorrect ink tank installation, or a damaged print head are also indicated by specific flash patterns.
In cases where the POWER lamp and ALARM lamp flash alternately, it signifies a more critical printer error, also associated with specific support codes. These errors often require contacting a service center.
The manual also provides guidance on carrying the printer. It reiterates the importance of ensuring the POWER lamp is off before moving the printer to prevent ink leakage or damage. When carrying, users should be careful to avoid shocking the printer, subjecting it to strong vibrations, placing it in excessive heat, or putting heavy objects on it, as these can cause damage or ink leakage. It is also advised to pack the printer carefully. The manual assures users that X-ray and other baggage inspection devices will not adversely affect the printer.
For any hardware or system-related issues not covered in the troubleshooting guide, users are advised to contact their Case Manager for further assistance. It is also noted that the printer may make noise during startup, which is normal, but persistent or uncharacteristically loud noise should be reported.
| Color | Yes |
|---|---|
| Product color | Black |
| Printing colors | Black, Cyan, Magenta, Yellow |
| Market positioning | Home & office |
| Maximum duty cycle | - pages per month |
| Number of print cartridges | 2 |
| Page description languages | - |
| Print technology | Inkjet |
| Maximum resolution | 9600 x 2400 DPI |
| Print speed (color, draft quality, A4/US Letter) | 5.8 ppm |
| Print speed (black, normal quality, A4/US Letter) | 9 ppm |
| Sound pressure level (printing) | 38.5 dB |
| Total input capacity | - sheets |
| Maximum input capacity | 50 sheets |
| Envelopes sizes | 10, DL |
| Photo paper sizes | 10x15, 13x18, 20x25 cm |
| Maximum print size | A4 (210 x 297 mm) |
| Paper tray media types | Envelopes, Matte paper, Photo paper, Plain paper |
| Paper tray media weight | 64 - 105 g/m² |
| Recommended media weight | 64 - 105, 250 g/m² |
| Non-ISO print media sizes | Legal |
| ISO A-series sizes (A0...A9) | A4, A5 |
| ISO B-series sizes (B0...B9) | B5 |
| Borderless printing media sizes | 10x15, A4, Letter |
| Maximum ISO A-series paper size | A4 |
| Ethernet LAN | No |
| Wi-Fi standards | 802.11b, 802.11g, Wi-Fi 4 (802.11n) |
| USB connector | USB Type-B |
| Standard interfaces | USB |
| USB 2.0 ports quantity | 1 |
| Minimum RAM | 3072 MB |
| Mac operating systems supported | Mac OS X 10.6 Snow Leopard, Mac OS X 10.7 Lion, Mac OS X 10.8 Mountain Lion, Mac OS X 10.9 Mavericks |
| Other operating systems supported | Android, iOS |
| Windows operating systems supported | Windows 10 Education, Windows 10 Education x64, Windows 10 Enterprise, Windows 10 Enterprise x64, Windows 10 Home, Windows 10 Home x64, Windows 10 IOT Core, Windows 10 Pro, Windows 10 Pro x64, Windows 7 Enterprise, Windows 7 Enterprise x64, Windows 7 Home Basic, Windows 7 Home Basic x64, Windows 7 Home Premium, Windows 7 Home Premium x64, Windows 7 Professional, Windows 7 Professional x64, Windows 7 Starter, Windows 7 Starter x64, Windows 7 Ultimate, Windows 7 Ultimate x64, Windows 8, Windows 8 Enterprise, Windows 8 Enterprise x64, Windows 8 Pro, Windows 8 Pro x64, Windows 8 x64, Windows 8.1, Windows 8.1 Enterprise, Windows 8.1 Enterprise x64, Windows 8.1 Pro, Windows 8.1 Pro x64, Windows RT, Windows Vista Business, Windows Vista Business x64, Windows Vista Enterprise, Windows Vista Enterprise x64, Windows Vista Home Basic, Windows Vista Home Basic x64, Windows Vista Home Premium, Windows Vista Home Premium x64, Windows Vista Ultimate, Windows Vista Ultimate x64, Windows XP Home, Windows XP Home x64, Windows XP Professional, Windows XP Professional x64 |
| AC input voltage | 100 - 240 V |
| AC input frequency | 50 - 60 Hz |
| Power consumption (off) | 0.2 W |
| Power consumption (standby) | 1.8 W |
| Power consumption (printing) | 10 W |
| Operating temperature (T-T) | 15 - 30 °C |
| Operating relative humidity (H-H) | 10 - 80 % |
| Bundled software | Printer Driver My Image Garden Quick Menu Easy-WebPrint EX |
| Harmonized System (HS) code | 84433210 |
| Depth | 185 mm |
|---|---|
| Width | 322 mm |
| Height | 62 mm |