The Cantaloupe Engage Combo is a payment device designed for vending equipment, facilitating credit card transactions through tap, insert, or swipe methods. This installation guide provides comprehensive instructions for both new installations and replacements of prior generation Engage Combo devices, along with operational details and troubleshooting tips.
Function Description
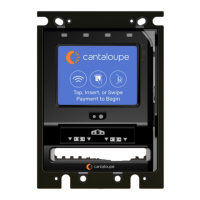
The Engage Combo serves as a complete payment solution for vending machines, enabling customers to make purchases using various credit card methods. It integrates with the vending equipment to process transactions and communicate with Cantaloupe's system for authorization and reporting. The device is designed to be user-friendly, with clear on-screen prompts guiding customers through the payment process. It supports chip, tap (NFC), and swipe payments, offering flexibility for different card types and customer preferences. The device also includes a bill acceptor interface, allowing for a comprehensive payment experience.
Usage Features
The Engage Combo offers several key usage features that enhance the customer experience and streamline operations for vending machine owners:
- Multiple Payment Options: The device accepts chip, tap, and swipe credit card payments, catering to a wide range of customer preferences and card technologies. This versatility ensures that most modern payment cards can be used.
- Clear On-Screen Guidance: During a transaction, the device displays clear messages on its screen, such as "Tap, Insert, or Swipe Payment to Begin," "Please wait," "Processing," "Authorizing," and "Approved." These prompts guide the user through each step of the payment process, minimizing confusion and errors.
- Transaction Feedback: The device provides audible beeps and visual cues (LEDs lighting up) to indicate the status of the card reading process and transaction authorization. This immediate feedback assures customers that their payment is being processed.
- Start-Up Sequence: Upon power-up, the Engage Combo undergoes a start-up sequence that can take up to 20 minutes. During this time, it initializes the system, connects to the cellular network, and downloads any necessary software updates. The screen displays progress indicators like "System Initializing," "Loading...," and "Please wait..." before showing "Not ready" and eventually "Ready" when it's prepared to accept transactions.
- Payment Acceptance Sequences:
- Chip Payment: When a chip card is inserted, the device beeps, reads the card information, sends it for authorization, and then displays "Approved" once the transaction is successful. It then prompts the user to "Select item."
- Tap Payment: For tap payments, the LEDs on the top of the screen light up from left to right as the card information is read. The device beeps, sends the information for authorization, and then displays "Approved" and "Select item." A "cancel" button is available on the touchscreen if the user wishes to cancel the authorization.
- Swipe Payment: Swiping a card initiates a similar sequence, with the device authorizing the transaction and then displaying "Approved" and "Select item."
- Single and Multi-Vending Modes: The device supports both single and multi-vending transactions. In single vending, after a selection is made and vended, it displays "Thank you" and the amount spent. In multi-vending mode, the device allows for multiple item selections within a single authorization, accumulating the total spent and displaying messages like "Thank you" and "N items vended ($x.xx)" at the end of the transaction or when the credit is exhausted.
- Technical Screen Access: A hidden technical screen can be accessed by pressing the Cantaloupe symbol on the upper left of the screen four times in a row. This screen provides crucial diagnostic information.
Maintenance Features
The Engage Combo includes features and guidelines to assist with installation, troubleshooting, and ongoing maintenance:
- Installation Kit Contents: The device comes with a comprehensive installation kit, including the Engage Combo Device, bill acceptor guides, an antenna, MDB cable, DEX AB cable (to machine), and decals. This ensures that installers have all the necessary components for a successful setup.
- Pre-Installation Information: The manual emphasizes the importance of reading instructions thoroughly and planning the installation to ensure ease of access and avoid interference with moving parts of the vending equipment. It also highlights the requirement for a signed ePort Connect Services Contract and a bank account assigned to the device for credit card transactions.
- Software Updates: The device is designed to download and process software updates automatically upon initial power-up. Users are advised to allow these updates to complete fully before attempting test transactions and to avoid powering down the unit during this process to prevent unexpected behavior.
- Antenna Setup: Detailed instructions are provided for mounting the antenna on top of the vending equipment, including drilling a 1/2" hole and securely fastening the nut. This ensures optimal cellular signal reception for reliable communication.
- Cable Connections: The guide provides clear instructions for connecting the MDB and DEX cables. It specifies connecting the DEX cable to the DEX port on the vending equipment and the MDB cable directly to the main board, emphasizing that the Engage should be "first in line" for MDB connections to prevent reporting or communication errors.
- Power-Up and Reboot: After connecting the cables, users are instructed to power the vending equipment back on and verify that the Engage device is booting up correctly. A note advises that it may take several minutes for the machine to fully reboot, gather its IP address, and load additional files.
- Test Transactions: Before leaving the device, it is recommended to perform a test swipe using a pass card to confirm that the device is ready for use. If errors occur, reattempting the swipe or power cycling the machine is suggested.
- Technical Screen Diagnostics: The technical screen provides valuable information for troubleshooting:
- Serial Number: Identifies the device.
- Fill DEX Button: Allows for a DEX audit, creating a DEX file without a fill marker.
- Signal Information: Displays RSSI (current signal strength), RSRP (typical range -44 to -140), and RSRQ (typical range -3 to -19.5), indicating signal strength and quality over time. An RSSI reading of 35 or above is considered good.
- Cellular Connection Status: Indicates whether the cellular connection is active.
- "More" Option: Reveals IMEI and SIM card numbers, carrier information, and the date and time of the last DEX transmission and transaction.
- Device Management: Allows checking for device updates, uploading logs, saving information to a USB, adjusting brightness, or rebooting the device.
- Accessories Information: The manual directs users to the Cantaloupe website for information on required accessories and a compatibility chart for different machine makes and models, especially for older machines that might need firmware updates or additional components.
- Customer Support: Contact information for Cantaloupe's Customer Care is provided for activation documents, technical issues, and further assistance. Instructional videos and installation tips are also available online via a QR code.