This document describes the E02GR001 Gas Grill, an outdoor cooking appliance designed for household use. It is not intended for commercial applications. The grill is built from durable materials and engineered for robust performance, emphasizing craftsmanship, endurance, and versatility.
Function Description:
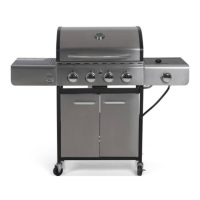
The E02GR001 Gas Grill is an outdoor cooking appliance that uses LP gas as its fuel source. It features multiple main burners and a side burner, allowing for diverse cooking methods. The grill is equipped with a lid, cooking grates, warming rack, and flame tamers to facilitate grilling. It includes a grease box for easy cleaning and a thermometer for monitoring internal temperatures. The appliance is designed for safe and efficient outdoor grilling, with specific instructions for assembly, operation, and maintenance to ensure user safety and product longevity.
Important Technical Specifications:
- Model Number: E02GR001
- Fuel Type: LP Gas (Propane)
- LP Cylinder Compatibility: Standard 20-lb., 12 1/4"-diameter, 18"-tall cylinder with right-handed connection threads. Must be equipped with an Overfill Prevention Device (OPD).
- LP Cylinder Dimensions (recommended): Height: 18.11 inches, Tank Diameter: 9.84 inches, Foot Diameter: 8.03 inches.
- Minimum Clearances to Combustible Construction: 40 inches from sides, 40 inches from back.
- Ignition System: Electronic ignition requiring one 1.5V AA alkaline battery (not included).
- Burner Flame Characteristics: For maximum fuel efficiency and cooking performance, the flame should be a blue-yellow color and be between 1-2 inches high.
- Materials: Constructed from lasting materials designed to withstand harsh testing. Porcelain grates have an enamel finish.
- Assembly Time: Approximately 50 minutes with two people.
- Tools Required for Assembly (not included): Phillips screwdriver, spray bottle, pliers, adjustable wrench.
- Warranty: One (1) year for original owners for single-family/residential use, covering defects in material and workmanship. Does not cover discoloration, surface rust, or rust unless structural integrity is lost.
Usage Features:
- Outdoor Use Only: This grill is strictly for outdoor use and must not be operated in buildings, garages, under overhangs, or any other enclosed areas to prevent carbon monoxide buildup.
- Preheating: The grill should be preheated with main burners on high for 10-15 minutes before cooking. For first-time use, burn off any foreign matter and odors by running main burners on Max with the lid down for about 10 minutes.
- Lighting Procedure: Always read instructions before lighting. Open the lid during lighting. If ignition does not occur within 5 seconds, turn off burner controls, wait 5 minutes, and repeat. For manual lighting, use the provided lighting wand and exercise caution, keeping hands, arms, and head away from burners.
- Control Knobs: Push in and turn the control knob to Max for lighting. Ensure all control knobs are in the OFF position when connecting or disconnecting the LP tank.
- LP Tank Connection: The LP tank knob must be closed (clockwise to a full stop). The regulator nipple should be centered in the valve outlet and hand-tightened firmly. Do not use tools.
- Safety Warnings: Includes warnings regarding Prop 65 chemicals, proper installation by qualified technicians, fuel concerns (no flammable liquids near the grill), explosion hazards, and the importance of not leaving a lit grill unattended. Children and pets should be kept away.
- Wind Conditions: Avoid using the grill in windy conditions. A windbreak may be required in consistently windy areas to prevent poor performance and overheating of the control panel.
- Accessories: Only manufacturer-recommended accessories, regulators, or components should be used to prevent injuries and voiding the warranty.
Maintenance Features:
- Leak Testing: Critical before each use and after any connections are made. Use a 50/50 soap-and-water solution in a spray bottle. Apply to all gas-carrying connections; bubbles indicate a leak. All control knobs must be in the OFF position during testing. Never use an open flame for leak detection.
- Burner Tube Inspection: Burner tubes must be inspected and cleaned before each use to prevent obstructions from spiders or insects, which can cause "flash-back" fires.
- Cleaning Grates: "Burn-off" cooking grates after each use (approx. 15 minutes on high with lid closed), then clean with a wire brush to remove food residue. Porcelain grates should be handled with care to avoid chipping.
- General Cleaning: Ensure the grill is cool and the gas supply is turned off at the LP-Gas Cylinder before cleaning. Use mild liquid dish soap, warm water, and a nylon cleaning pad or wire brush. Avoid cleaners with acid, mineral spirits, or abrasive substances.
- Inside Bottom Pan: Clean regularly to prevent flare-ups. Remove residue with a brush, scraper, or cleaning pad. Avoid splashing water into burner vent tubes.
- Heat Tents: Clean residue with a wire brush and wash with mild dish soap and warm water.
- Grease Cup: Empty and clean regularly with mild dish soap and warm water.
- Burner Assembly Cleaning: Disconnect gas supply, remove warming rack, cooking grates, heat tents, and then detach burners. Clean burner ports with a pin or paper clip. Ensure the burner end and primary air screen are clear of debris.
- Air Shutter Adjustment: If burners produce a yellow flame or flames lift away, air shutter adjustment may be needed (by a qualified gas installer).
- Ignition System Maintenance: Clean piezo ignition with a soft bristle brush or sandpaper if main burners do not light with the igniter but do with a match.
- Hose Inspection: Visually inspect the gas supply hose for cracks, cuts, or excessive wear before each use. Replace if necessary.
- Ventilation: Ensure the outdoor cooking gas appliance area is clear of combustible materials, and that combustion and ventilation air flow are not obstructed. Keep cylinder enclosure ventilation openings free of debris.
- Regular Maintenance: Half-year maintenance is recommended.