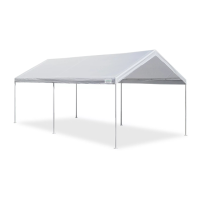
10ft x 20ft
3m x 6m
INSTALLATION INSTRUCTIONS
WARNING!
Please read instructions COMPLETELY before assembly.
DO NOT RETURN PRODUCT TO THE STORE
714-367-3000 or 877-922-6679
Missing parts, replacement parts, or assembly
help, please contact customer service:
WAIT
6 LEG FRAME
Use Caution during installation. Safety goggles are
recommended. Please read the instructions carefully before
installation. This is only a TEMPORARY shelter and is not
recommended for permanent use.
Keep all flame and heat sources away from this canopy top
fabric.
Do not set-up or leave the canopy unattended in the
following conditions: gusty wind, rain, hail, sleet, snow,
drizzle, or any other harsh weather conditions. Doing so may
cause damage to the entire canopy and will void the
warranty. Please call Caravan® Canopy for any questions
or inquiries
14600 Alondra Blvd La Mirada, CA 90638
877-9-CANOPY • 714-367-3000
Fax 714-367-3050 • www.caravancanopy.com
14600 Alondra Blvd La Mirada, CA 90638
877-9-CANOPY • 714-367-3000
Fax 714-367-3050 • www.caravancanopy.com
LIMITED WARRANTY
Caravan® Canopy Int’l warrants that each part of this product will be
free from defects in material and workmanship for a
1 year limited period from date of purchase.
This warranty is void:
• If product is used under other than normal use and
maintenance conditions.
• If the product is modified or altered.
• If product is subject to abuse or neglect.
• If product damage is accidental or deliberate or caused
by rain, wind, snow/ice or other forces of nature.
• If product use does not conform to product instructions.
• If product is repaired by someone other than Caravan®
Canopy Int’l or its authorized representative.
The sole obligation of Caravan® Canopy Int’l under this warranty or any
other legal obligation, with respect to the product, is repair or
replacement, by Caravan® Canopy Int’l or its authorized representative,
of the missing or defective parts causing malfunction with new parts
after review and examination by Caravan® Canopy Int’l.
Under no circumstances will the retail customer, user, authorized
representative or other person be entitled to any direct, special,
indirect, consequential or exemplary damages for breach of contract
or otherwise. Under no circumstances will any person be entitled to a
sum greater than purchase price of the malfunctioning part.
No Caravan® Canopy Int’l authorized representative or person other
than an officer of Caravan® Canopy Int’l may extend or modify this
warranty. There are no other warranties from either Caravan® Canopy
Int’l or its representatives which extend the face of this warranty. All
other warranties, expressed or implied, including the warranties of
merchantability, fitness for a particular purpose and fitness for use are
excluded.
Please contact Caravan® Canopy Int’l for specific shipping instructions
before returning any part. All shipping costs must be prepaid. Caravan®
Canopy Int’l will not be responsible for any products damaged in
transit.
This product is covered under one or more of the following patents:
US 7,207,344; US 6,868,858; US 7,240,686; US 7,395,830; US 7,240,685;
US 7,380,563; US 7,360,549; US 5,794,640; US 5,944,040; US 6,152,157;
US 6,478,039; US 6,575,656; US 7,308,901; US 7,025,075;
US 7,311,113; CA 2455021; GB 2398346; AU 2004203308; CA 2475232;
CN 10070286; GB 2404932; CA 2441567; AU 2002247358;
CA 2447952; GB 2392459; GB 2406107; GB 241004; GB 2410962; MX
258677; MX 253095; MX 255037; MX 257982; MX 260203.
Other US and foreign patents pending.
Manufactured under license to U.S. Patent No. 5,244,001
Copyright © 2009 Caravan® Int’l, Inc. All Rights Reserved.
rev.03.09
WARNING
Use caution during installation. The user assumes all risk of
injury during setup and use. Please follow the following safety
precautions to avoid injury.
1. Never set-up or continue to use the product in rainy, windy
or stormy conditions, especially lightning storms. Please
remove your canopy top before a storm.
2. Keep your canopy off of steep slopes and inclines
3. Have at least two adults during installation. Read all
instructions carefully and follow accordingly. Failure to do so
may result to injury or damage to the canopy.
4. Always inspect the canopy and each part before use. Make
sure that everything is tightly secured. Replace any worn,
defective or missing parts.
5. After installation, the canopy should be anchored to prevent
damage and possible injury. It is the user’s responsibility to
properly anchor the product.
6. Do not set-up or use the product in close distance to fire or
any heat source. Do not use a barbecue grill under the canopy.
7. Do not use the canopy as a permanent shelter. It is designed
for temporary use only!
8. Do not bleach canopy cover, dry clean or wash in the
washing machine or dry in the dryer. Use only mild soap and
water.
To enhance your experience with your Caravan® Canopy,
optional accesories are available.
• Full enclosure with dual-zipper front wall.
• Heavy-duty anchor system.
* Must be purchased separately.
ACCESSORIES