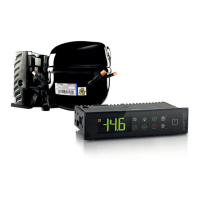
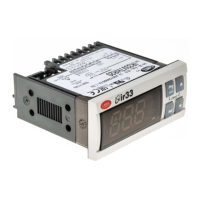
ir33+ Electronic controller for stand-alone refrigerating units
+05Z0028EN- rel. 1.0 - 13.03.2014
Dimensions (mm)
Panel mounting
Rear (with 2 quick-fi t side brackets)
Technical characteristics
power supply:
Model Voltage Power
IREVxxExxxx 230 V~, 50/60 Hz 3 VA, 25 mA~ max.
IREVxxHxxxx 115...230 V~, 50/60 Hz 6 VA, 50 mA~ max.
IREVxxLxxxx 12...24 V~, 50/60 Hz, 12...30 Vdc 3 VA, 300 mA~ /mAdc max.
Insulation guaranteed by the power supply:
IREVxxExxxx
IREVxxHxxxx
insulation in reference to very low
voltage parts
reinforced, 6 mm clearance, 8 mm
creepage, 3750 V insulation
insulation from relay outputs basic, 3 mm clearance, 4 mm creepage,
1250 V insulation
IREVxxLxxxx insulation in reference to very low
voltage parts
externally guaranteed by safety transfor-
mer (SELV power supply)
insulation from relay outputs reinforced, 6 mm clearance, 8 mm
creepage, 3750 V insulation
Inputs
S1 (probe 1) NTC
S2 (probe 2) NTC
DI1
S3 (probe 3)
free contact, contact resistance < 10 Ω, closing current 6 mA
NTC
DI2
S4 (probe 4)
free contact, contact resistance < 10 Ω, closing current 6 mA
NTC
Maximum distance of probes and digital inputs less than 10 m. Note: During installation
keep the power and loads connection separate from probe cables, digital inputs, repeater
display and supervisory system
Probe type
NTC std.
CAREL
10 kΩ a 25 °C, range –50T90 °C
measurement error 1 °C range –50T50 °C
3 °C range 50T90 °C
Relay outputs (depending on the model)
EN60730-1 UL873
model relay 250 V~ operat.
cycles
250 V~ operat.cycles
IRxxxx(E,A)(P,Q,S,U,V,X,Y,Z)xxx R2 (*) 5(1) A 100000 5 A res. 1 FLA
6 LRA C300
30000
IRxxxx(E,A)(N,R,C,B,A,M,L,T)xxx R3 (*) 5(1) A 100000 5 A res. 1 FLA
6 LRA C300
30000
IRxxxx(E,A)(N,R,C,B,A,M,L,T)xxx
IRxxxx(0,L,H)(N,R,C,B,A,M,L,T)xxx
R1, R2
R2, R3,
R4 (*)
8(4)A N.O.
6(4)A N.C.
2(2)A N.O./N.C.
100000 8 A res. 2 FLA
12 LRA C300
30000
IRxxxx(E,A)(P,Q,S,U,V,X,Y,Z)xxx
IRxxxx(0,L,H)(N,R,C,B,A,M,L,T)xxx
R1 12(2)A
N.O./N.C.
100000 12 A res. 5 FLA
30 LRA C300
30000
insulation in reference to very low
voltage parts
reinforced, 6 mm clearance, 8 mm creepage, 3750 V
insulation
insulation between the relay outputs
indipendent
basic, 3 mm clearance, 4 mm creepage, 1250 V
insulation
Connections wire section 0.5 - 2.5 mq max current 12A
(*): Relay not suitable for fl uorescent loads (neon lights, ...) that use starters (ballasts) with
phase-shift capacitors. Fluorescent lamps with electronic control devices or without phase-
shift capacitors can be used, within the operating limits specifi ed for each type of relay.
The installer has to provide the correct dimensioning of the power supply and cable con-
nection between the instruments and the loads. Depending on the model, the maximum
current in the common terminals 1, 3 or 5 is 12 A. When using the controller at maximum
operating temperature and full load, use cables featuring a maximum operating tempera-
ture of 105 °C at least.
Clock error at 25 °C ±10 ppm (±5.3 min/year)
error in the temperature range -10T60 °C
-50 ppm (-27 min/year)
Operating temperature -10T60 °C for all versions
Operating humidity <90% r.H. non-condensing
Storage temperature -20T70 °C
Storage humidity <90% r.H. non-condensing
Front panel degree of protection smooth and stiff panel installation with
gasket IP65
Control pollution status 2 (normal situation)
PTI of the insulating material printed circuit board 250, insulation 175
Period of electric stress across insulating parts long
Heat and fi re resistance category category D and category B (UL 94-V0)
Class of protection against voltage surges category II
Type of disconnection or interruption 1.B relay contacts (micro-disconnection)
Construction of control incorporated control, electronically
Classifi cation according to protection against
electric shock
Class II, by appropriate incorporation
Max. distance between interface and display 10 m
Programming key available on all models
Safety standards: compliant with the European
reference standards.
Signals on the display
Icon Function Normal operation Startup
ON OFF blink
COMPRESSOR compressor ON compressor OFF compressor
required
FAN fan ON fan OFF fan required
DEFROST defrost in progress defrost not
required
defrost required
AUX auxiliary output AUX
active
auxiliary output
AUX not active
anti-sweat heater
function active
ALARM delayed external alarm
(before the expiry of
the time ‘A7’)
no alarm present alarms and
malfunctions
CLOCK at least one timed
defrost has been set
no timed defrost
is present
clock alarm ON if RTC
present
LIGHT auxiliary output
LIGHT active
auxiliary output
LIGHT not active
anti-sweat heater
function active
SERVICE no malfunctions malfunction (es.
EEPROM error or
probe fault)
HACCP function not enabled function enabled
(HA and/or HF)
HACCP alarm
enabled
CONTINUOUS
CYCLE
function enabled function not
enabled
function required
Optional connections
1
2
IROPZDSP00
Display interface option
IROPZ48500
Serial board interface RS485
IROPZKEY**
Programming key
Option codes
Code Description
IROPZDSP00 remote display interface
IREVXGD000 remote repeater dispaly
IROPZ485S0 RS485 serial board interface with automatic recognition of the polarity +/-
PSOPZPRG00 programming key kit
PSOPZKEY00 parameter programmin key with 12 V batteries
PSOPZKEYA0 parameter programming key external 230 Vac power supply
IROPZKEY00 parameter programming key, extended memory with 12 V batteries
PSTCON0*B0 repeater display connection cables (*: 1= 1,5 m; 3= 3 m; 5= 5m)
NO POWER
& SIGNAL
CABLES
TOGETHER
READ CAREFULLY IN THE TEXT!
Description: ir33+* represent a range of electronic microprocessor controllers with LED
display developed for the management of stand-alone refrigerating units.
Part number list:
IREVM0LN0U, IREVM0EN0U
IREVS0LN0U, IREVS0EA0U,
IREVC0LN0U, IREVC0LC0U
IREVC0HN0U, IREVC0HC0U, IREVF0EN0U
drilling template
71x29 mm
34.7
79.5
82
76.2
80.6
38.6
60
64
E, A Version
65
69
Buttons on the keypad
Button Normal function Start-up Autom.address
assignment
Pressing the button alone Pressing together with other buttons
PRG /
MUTE
- if pressed for more than
3 s accesses the menu
for setting the password
to access the type “F”
(frequent) parameters or
“C” (Confi guration)
- in the event of alarm:
silences the audible alarm
(buzzer) and disables the
alarm relay
PRG+ON-OFF/UP:
if pressed together
for more than 3
s reset any alarm
with manual reset
if pressed for
more than 5
s at start-up,
starts the
default
parameter
setting
if pressed for 1
s enters the au-
tomatic serial ad-
dress assigning
procedure
ON-OFF/
UP
- if pressed for more than 3s
disables the regulation / if
pressed for more than 1s,
enables the regulation
- during the parameters
modifi cation increase the
value displayed move to-
wards the next paramenter
ON-OFF/UP+AUX/DOWN: if pressed together for
more than 3 s enable/disable the continuous cycle
operation
ON- OFF/UP+ SET/DEF: if pressed together for
more than 3 s display the temperature read by the
defrost probe no 1
ON-OFF/UP+ PRG/MUTE: if pressed together for
more than 3 s reset any alarm with manual reset
AUX/
DOWN
- if pressed for more than
1 s, enables/disables the
auxiliary output
- during the parameters
modifi cation decrease the
value displayed or move
towards the previous param.
AUX/DOWN + ON-OFF/UP: if pressed together for
more than 3 s enable/disable the continuous cycle
operation
AUX/DOWN + SET/DEF: if pressed together for more
than 1 s display a submenu with the HACCP alarm
parameters (HA, HAn, HF, HFn)
SET/DEF
- if pressed for more than 1s,
enables/displays and/or
set the set point
- if pressed for more than 5 s,
enables a manual defrost
SET/DEF+ AUX/DOWN: if pressed together for more
than 1 s display a submenu with the HACCP alarm
parameters (HA, HAn, HF, HFn)
SET/DEF+ ON-OFF/UP: if pressed together for
more than 3 s display the temperature read by the
defrost probe no 1
Table of alarms and signals: display, buzzer and relay
Code Display icon Alarm
relay
Buzzer Reset Description
‘rE’
+ fl ashing
ON ON automatic virtual control probe fault
‘E0’
+ fl ashing
OFF OFF automatic room probe S1 fault
‘E1’
+ fl ashing
OFF OFF automatic defrost probe S2 fault
‘E2’-3-4
+ fl ashing
OFF OFF automatic probe S3-4-5 fault
‘___’ no OFF OFF automatic probe not enabled
‘LO’
fl ashing
ON ON automatic low temperature alarm
‘HI’
fl ashing
ON ON automatic high temperature alarm
‘AFr’
fl ashing
ON ON manual antifreeze alarm
‘IA’
fl ashing
ON ON automatic immediate alarm from external
contact
‘dA’
fl ashing
ON ON automatic delayed alarm from external contact
‘dEF’
ON
OFF OFF automatic defrost running
‘Ed1’-2 no OFF OFF automatic/
manual
defrost on evaporator 1-2 ended by
timeout
‘Pd’
+ fl ashing
ON ON automatic/
manual
maximum time pump-down alarm
‘LP’
+ fl ashing
ON ON automatic/
manual
low pressure alarm
‘AtS’
+ fl ashing
ON ON automatic/
manual
autostart in pump-down
‘cht’ no OFF OFF automatic/
manual
high condenser temperature pre-
alarm
‘CHT’
+ fl ashing
ON ON manual high condenser temperature alarm
‘dor’
fl ashing
ON ON automatic door open for too long alarm
‘Etc’
fl ashing
OFF OFF real time claock fault
‘EE’
+ fl ashing
OFF OFF automatic EEPROM error, unit parameters
‘EF’
+ fl ashing
OFF OFF automatic EEPROM error, operating parameters
‘HA’
fl ashing
OFF OFF manual HACCP alarm, type ‘HA’
‘HF’
fl ashing
OFF OFF manual HACCP alarm, type ‘HF’
‘rCt’ signal Instrument enabled for program-
ming from the remote control (not
available on ir33+)
‘Add’ signal Automatic address assignment
procedure in progress
‘ccb’ signal Request to start continuous cycle
‘ccE’ signal Request to end continuous cycle
‘dFb’ signal Request to start defrost
‘dFE’ signal Request to end defrost
‘On’ signal Switch ON
‘OFF’ signal Switch OFF
‘rES’ signal Reset alarms with manual reset;
Reset HACCP alarms; Reset tempera-
ture monitoring
‘n1’...‘n6’
fl ashing
ON ON automatic Indicates an alarm on unit 1 to 6
present in the network
‘dnL’ signal Download in progress
‘d1’...‘d6’
fl ashing
OFF OFF Download with errors on unit 1 to 6
Note: the buzzer is disabled if parameter ‘H4 =1
Fig. 1
Fig. 2
How to set the set point (desired temperature value)
Step Action Eff ect Meaning
1
Press
for 1 second
After 1 second the display will
show the current set point
This the currently active
control set point
2
Press
or
The value on the display will
increase or decrease
Set the desired value
3
Press
The controller will show the tem-
perat. read by the probes again
The set point is modi-
fi ed and saved
Another way of changing the set point is to set parameter “St” (see the tables below)
How to access and set parameters
type “F” (FREQUENT, not protected by password)
type “C” (CONFIGURATION, password protected)
Step Action Eff ect Meaning
1
Press
for 3 seconds
After 3s the display will
show the 1st parameter, “0”
(password)
Access to type “F” param. is
direct without password
2
Press or
The value on the display will
increase or decrease.
Enter the password “22” to
access the type “C” param.
or whatever diff erent value
for the type “F” parameters.
3
Press
The display will show “St”
(Setpoint)
This is the current value of
the Setpoint
4
Press
or
If the password set is 22 the
display will scroll the list of type
“C” parameters (CONFIGURA-
TION) otherwise the list of type
“F” parameters (FREQUENT)
Set the desired value
5
Press
The display will show the
parameter name
This is the current value of
the parameter
6
Press
or
The value on the display will
increase or decrease
Set the desired value
7
Press
The display will show the
parameter name again
Important: parameters not
yet saved
8
Repeat steps 2, 3, 4 &
5 for all parameters
required
9
Press
for 5
seconds
The controller will display
the temperature read by the
probes again
Important: only now have
all the parameters been
updated
For both types of access (type “F” and type “C”) there is a timeout (no button on the keypad
pressed for 1 min), the procedure is ended without saving the parameter.
Accessing the parameters divided by functional blocks (allows the user to scroll
the list of parameters in blocks)
Once having accessed the type “F” or “C” parameters (see tables above)
Step Action Eff ect Meaning
1
Press
The display will show the name
of the functional block that the
parameter belongs to
Example ‘CMP’ for the com-
pressor parameters, ‘dEF’ for
the defrost parameters
2
Press
or
The display will show the name
of the other functional blocks
Example ‘Fan’ for the fan
parameters
3
Press
The display will show the name
of the fi rst parameter in the
functional block selected
Example “F0” for ‘Fan’
Alarms with manual reset:
the alarms with manual reset can be reset by pressing the and for more than 3 s.
Manual defrost:
as well as the automatic defrost function, a manual defrost can be enabled, if the tempera-
ture conditions allow, by pressing the
button for more than 5 s.
HACCP function:
ir33+ is compliant with the HACCP standards in force since it allows the monitoring of the
temperature of the stored food.
“HA” alarm = exceeded maximum threshold: up to three HA events are saved (HA, HA1,
HA2) respectively from the more recent (HA) to the oldest (HA2) and a HAn signal that di-
splays the number of occurred HA events.
“HF” alarm = power failure lasting over a minute and exceeded AH maximum threshold:
up to three HF events are saved (HF, HF1, HF2) respectively from the more recent (HF) to the
oldest (HF2) and a HFn signal that displays the number of occurred HF events.
HA/HF alarm setting: AH parameter (high temp. threshold); Ad and Htd (Ad+Htd = HACCP
alarm activation delay).
Display of the details:
access to HA or HF parameters pressing the button and use or buttons to
glance over.
HACCP alarm erasing:
press the and buttons for more than 5 seconds, the message ‘res’ indicates that the
alarm have been deleted. To cancel the saved alarms press the
+ + buttons for
more than 5 seconds.
Continuous cycle:
Pressing the buttons and simultaneously for more than 3 s enables the continuous
cycle function. During operation in continuous cycle, the compressor continues to operate
for the time ‘cc’ and it stops when reaches the ‘cc’ time out or the minimum temperature
envisaged (AL = minimum temperature alarm threshold).
Continuous cycle setting: “cc” parameter (continuous cycle duration): “cc” = 0 never acti-
ve; “c6” parameter (bypassing the alarm after the continuous cycle): “cc” = 0 never active; it
avoids or delays the low temperature alarm after the continuous cycle.
Procedure for setting the default parameter values
To set the default parameter values on the controller, proceed as follows:
1: switch the instrument off ;
2: switch the instrument back on, holding the
button until the message “Std” is shown
on the display.
Note: the default values are only set for the visible parameters (C and F). For further details
see table “Summary of operating parameters”.
Fig. 3