EasyManua.ls Logo

Carlson 0934 PW User Manual

Carlson 0934 PW
14 pages
To Next Page IconTo Next Page
Page #1 background imageLoading...
Page #1 background image
Carlson Pet Products, Inc.
www.carlsonpetproducts.com
3200 Corporate Center Drive, Suite 100 / Burnsville, MN 55306, USA / , É.-U. / , EE. UU.
952.435.1084
Made in China/Fabriqué en Chine/Hecha en China
Extra Wide Walk-Through Gate with Small Pet Door
Barrière Avec Passage Extra Large avec Petite Chatière
Valla de Acceso Extra Ancha con Puerta para Mascotas
Pequeñas
LEA TODAS LAS INSTRUCCIONES ANTES DE MONTAR Y USAR LAREJA.
GUÁRDELAS PARA UTILIZARLAS COMO REFERENCIA.
READ ALL INSTRUCTIONS BEFORE ASSEMBLY AND USE OF GATE.
KEEP INSTRUCTIONS FOR FUTURE USE.
LIRE TOUTES LES INSTRUCTIONS AVANT D’ASSEMBLER ET D’UTILISER LA BARRIÈRE.
CONSERVER CES INSTRUCTIONS POUR UNE UTILISATION ULTÉRIEURE.
Models / Modèles / Modelos: 0934 PW, 0937 PW
Question and Answer IconNeed help?

Do you have a question about the Carlson 0934 PW and is the answer not in the manual?

Carlson 0934 PW Specifications

General IconGeneral
BrandCarlson
Model0934 PW
CategoryFencing & Gates
LanguageEnglish

Summary

Before Assembly

Before Using Product

Ensure gate and extensions are properly installed for safety and stability.

Important Usage Guidelines

Key usage guidelines, including extension limits and mounting surfaces.

Removing Your Gate from the Wall

Steps to safely detach the gate from its installed position.

Care and Maintenance

Guidance on inspecting, cleaning, and maintaining the gate.

Assembling and Installing Your Gate

Step 1: Adjust Spindle Rods

Locate and begin adjusting spindle rods by rotating wheels to remove initial gap.

Step 2: Insert Spindle Rods

Insert threaded spindle rods into the gate frame corners without resistance.

Step 3: Position and Expand Rods

Position the gate, expand spindle rods to contact the opening, but do not fully tighten yet.

Operating the Door Latch

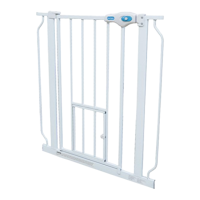
How to open and close the gate's main door using the latch mechanism.

Step 1: Disengage Latch

Operate the secure slide latch by pushing the button and pulling back to disengage.

Step 2: Adjust Base Lock

Adjust the base lock to control the direction the gate door can swing open.

Positioning and Attaching Wall Cups

Step 1: Mark Wall for Cups

Mark the wall around the gate's rubber feet after positioning to guide wall cup placement.

Step 2: Attach Wall Cups

Remove the gate and use marked circles to attach wall cups with screws.

Step 3: Reinstall Gate with Cups

Reinstall the gate, using the attached wall cups as anchor points for the spindle rods.

Adding a Gate Extension

Step 1: Assemble Extension

Remove spindle rods, then assemble the gate and extension as shown.

Extensions List and Parts

Replacement Parts

Details the components included in the hardware box for installation.

Limited Warranty Information

Details the limited warranty coverage for the product.

Important Safety Warnings

General Safety Instructions

Crucial safety guidelines for installation and use to prevent injury or death.