The M550 is congured using the IR programmer. The lantern’s
mating IR receiver is on an energy-saving sleep cycle.
Press and hold for 2 seconds to awaken the IR
receiver and begin communication with the lantern:
The lantern is now ready to accept programming. Note that the lantern will quickly ash
after every key it receives. All programming codes follow the same sequence:
The number symbol # represents 0 - 9. Commands can be rejected if they are
unsupported, contain an incorrect key sequence, or have an effective intensity too high
for the programmed ash code.
M550
USER MANUAL
INTRODUCTION 2-HOLE FLANGE MOUNT
SETTING THE FLASHPOLE MOUNT OPERATION
Install the Pole Mount
1. Apply a thin coating of
silicone lubricant to the pole-
mount o-ring
2. Use the alignment keys to
align the top cover and pole
mount.
3. Attach the mount to the top
cover using the provided 6
1. Insert a mounting screw through the bird deterrent
2. Install the screw. Do not over tighten!
3. Bend bird deterrent as needed
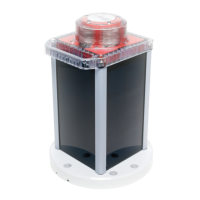
1. If required, insert the reducing sleeve into the pole
mount. Note that it aligns only one way.
2. Slide the lantern and sleeve over the pole; press down
to ensure lantern is well seated.
3. Secure with the provided 3 screws; if required, drill
1/8 - 9/64 in. [3.2 - 3.6 mm] pilot holes and then install
the screws.
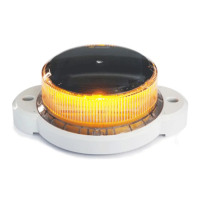
The M550 Solar Marine Lantern is:
• Self-contained and solar-powered
• Easy-to-install and low-maintenance with a long-life LED
• Available in red, green, white, yellow and blue
• Easy-to-maintain with replaceable AA NiMH batteries
APPLICATIONS
The M550 can be used for:
• 1-3 NM marine aid-to-navigation (ATON)
• Private aid-to-navigation (PATON)
• Dock & marina light
• General purpose marking light
Year-round, unrestricted solar exposure is critical to long-
term performance. Shade dramatically reduces the ability
of the light to charge its battery.
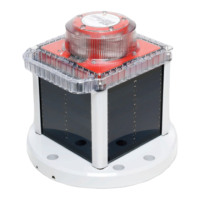
The M550 has changeable mounts. Ensure either the
2-hole ange mount or pole mount is attached before
lantern installation.
INSTALLATION
2-Hole Flange
Mount
Pole Mount
X
Up to 4 bird deterrents can be installed:
1. Insert the provided screw through the bird deterrent
2. Drive the screw into one of the 4 small holes on the
top of the mount. Do not over tighten!
3. Bend the bird deterrent as required.
Fix in place with 2x bolts, studs & nuts, nails or screws.
Recommended bolt size is 1/4-20 UNC or M6.
To attach the 2-hole ange mount
Alignment Keys
In daylight, the solar panel charges the battery using the Energy Management System
(EMS). The capacity of the battery ensures that even with poor levels of sunlight over an
extended period, the lantern has enough reserve power to continue to perform reliably.
Stored battery energy then powers the LED during the night.
The change from night-to-day or day-to-night is called a transition. To avoid false
transitions and ensure stable operation, the transition time is 2 minutes. For example, 2
minutes of dark is needed for the lantern to switch to night operation.
PROGRAMMING
To set the ash pattern, enter its ash code using the IR programmer. Flash codes are
listed in a table at the end of this document.
To install the lantern:
#
#
#
3 quick ashes
Command accepted
2 slow ashes
Command rejected
6
0
5
SETTING THE INTENSITY
The M550 is programmed using Effective Intensity. Effective Intensity is the brightness
of a ashing light as perceived by the human eye (as opposed to Peak Intensity which
is the actual intensity of a light during a ash). Effective Intensity is calcluated using the
following equation:
Effective Intensity (cd) =
Peak Intensity (cd) x Flash Duration (sec)
0.2 (sec) + Flash Duration (sec)
The M550 makes this calculation automatically based on your programmed ash code
and Effective Intensity selected. Note that for a xed/steady-burning light (code 001),
effective intensity equals peak intensity. The range of intensity codes are:
1
2
9
Product performance varies by installation location. Go to carmanahmarine.com/
selector to determine the recommended intensity for your location.
Example: Enter
for quick ash Q 1s 0.3, (ash code 129)
Example: Enter
for intensity of 5 effective cd
Nominal range of a lantern depends on its effective intensity and environmental condi-
tions. For details on how to calculate range, see www.carmanahmarine.com.
2. Attach the mount to the top
cover using the provided 3 screws
( ). Do not over tighten!
3. Apply a thin coat of silicone
lubricant to the bottom cover o-ring.
4. Align the bottom cover and press
into the top cover. It only ts one way.
5. Secure the bottom cover with the
provided 3 screws ( ) . Do not over tighten!
1. Use the alignment keys to
align the top cover and ange
mount. Press together.
Alignment Keys
Up to 6 bird deterrents can be installed:
To install the lantern:
600 0.1 - 0.4 effective cd
601 1 effective cd
602 2 effective cd
...
6## Maximum values vary by ash code and LED colour