EasyManua.ls Logo

Carrier HUMCCLFP1025-A Series User Manual

Carrier HUMCCLFP1025-A Series
12 pages
To Next Page IconTo Next Page
Page #1 background imageLoading...
Page #1 background image
Humidifiers and
Humidistat
Installation, Start-Up, and Operating Instructions
NOTE: Read the entire instruction in manual applicable to
specific unit before starting the installation.
This symbol indicates a change since the last issue.
SAFETY CONSIDERATIONS
Improper installation, adjustment, alteration, service, maintenance,
or use can cause explosion, fire, electrical shock, or other
conditions which may cause personal injury or property damage.
Consult a qualified installer, service agency, distributor, or branch
for information or assistance. The qualified installer or agency
must use factory-authorized kits or accessories when modifying
this product. Refer to the individual instructions packaged with the
kits or accessories when installing.
Follow all safety codes. Wear safety glasses and work gloves. Use
quenching cloth for brazing operations. Have fire extinguisher
available. Read these instructions thoroughly and follow all
warnings or cautions attached to the unit. Consult local building
codes and National Electrical Code (NEC) for special require-
ments.
Recognize safety information. This is the safety-alert symbol
.
When you see this symbol on the unit and in instructions or
manuals, be alert to the potential for personal injury.
Understand the signal words DANGER, WARNING, and CAU-
TION. These words are used with the safety-alert symbol. DAN-
GER identifies the most serious hazards which will result in severe
personal injury or death. WARNING signifies hazards which
could result in personal injury or death. CAUTION is used to
identify unsafe practices which would result in minor personal
injury or product and property damage.
Before installing or servicing system, always turn off main
power to system. There may be more than 1 disconnect
switch. Turn off accessory heater power if applicable. Elec-
trical shock can cause personal injury or death.
Unit must not be installed where freezing temperatures could
occur. Do not install unit on the furnace or fan coil jacket. Do
not install unit where ends of cooling coil could restrict
airflow to the humidifier. Condensation damage could occur
if home has closed-off, unheated rooms.
INSTALLATION OF HUMCCLBP2018-A--
BYPASS HUMIDIFIER
Carrier’s HUMCCLBP2018-A-- bypass humidifier can be in-
stalled on either the supply or return plenum of a forced-air system.
This unit requires an external bypass duct between the supply- and
return-air ductwork.
It is recommended to install the humidifier where it can be easily
serviced. If this humidifier is installed with a central cooling
system the bypass duct must have a shutoff damper to close during
the cooling season. Always install humidifier downstream of an
electronic air cleaner.
Humidifiers
A98362
MODEL HUMCCLFP1025-A--
FAN-POWERED
HUMIDIFIER
MODEL HUMCCSFP1016-A--
FAN-POWERED
HUMIDIFIER
MODEL HUMCCWTR2019-A--
WATER-SAVER
BYPASS HUMIDIFIER
MODEL HUMCCLBP2018-A--
BYPASS HUMIDIFIER
MODEL HUMCCSBP2017-A--
Visit www.carrier.com
Manufacturer reserves the right to discontinue, or change at any time, specifications or designs without notice and without incurring obligations.
Book 1 4
Tab 7a 9a
PC 101 Catalog No. 03HU-MC1 Printed in U.S.A. Form HUM-1SI Pg 1 7-98 Replaces: 49-4SI

Other manuals for Carrier HUMCCLFP1025-A Series

Question and Answer IconNeed help?

Do you have a question about the Carrier HUMCCLFP1025-A Series and is the answer not in the manual?

Carrier HUMCCLFP1025-A Series Specifications

General IconGeneral
BrandCarrier
ModelHUMCCLFP1025-A Series
CategoryHumidifier
LanguageEnglish

Summary

Humidifier and Humidistat Installation Guide

Safety Considerations

Important safety warnings and guidelines for installation and operation of humidifiers.

Electrical Shock Warning

Warning about electrical shock hazard during installation and servicing. Always turn off main power.

Installation Environment Caution

Caution regarding installation in areas with freezing temperatures or potential condensation damage.

Installation of HUMCCLBP2018-A Bypass Humidifier

Instructions for installing the HUMCCLBP2018-A bypass type humidifier on forced-air systems.

Inspect Package and Equipment

Verify all humidifier components are present and undamaged before installation.

Select Installation Location

Choosing the optimal location for the humidifier on the furnace plenum for proper function.

Prepare Plenum Opening

Steps to mark and cut the opening in the plenum for humidifier mounting.

Mount the Humidifier

Procedure for attaching the humidifier unit to the prepared plenum opening.

Install Bypass Duct

Connecting the bypass ductwork between the supply and return air ducts.

Install Drain Line

Connecting the drain line from the humidifier to an open drain properly.

Make Water Connection

Connecting the water supply line to the humidifier's solenoid valve.

Install Humidistat and Wiring

Mounting the humidistat and completing the electrical wiring for the system.

Start-Up Procedures

Steps to follow for initial system startup and testing after installation.

Final Installation Steps

Informing the homeowner about operation and maintenance after installation.

Installation of HUMCCLFP1025-A Fan-Powered Humidifier

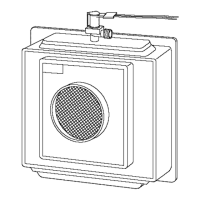
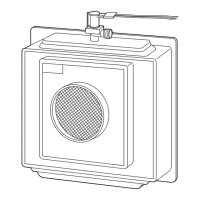
Guide for installing the HUMCCLFP1025-A fan-powered humidifier on supply plenum.

Inspect HUMCCLFP1025-A Package

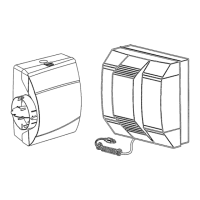
Verify all components for the HUMCCLFP1025-A humidifier are present and undamaged.

Select HUMCCLFP1025-A Location

Choosing the optimal location for the HUMCCLFP1025-A humidifier on the supply plenum.

Prepare Plenum Opening for HUMCCLFP1025-A

Steps to mark and cut the opening in the supply plenum for the HUMCCLFP1025-A.

Mount HUMCCLFP1025-A Humidifier

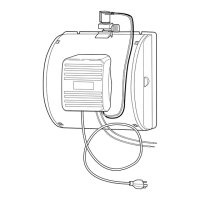
Procedure for attaching the HUMCCLFP1025-A humidifier to the plenum.

Install Drain Line for HUMCCLFP1025-A

Connecting the drain line from the HUMCCLFP1025-A humidifier to an open drain.

Make Water Connection for HUMCCLFP1025-A

Connecting the water supply line to the solenoid valve of the HUMCCLFP1025-A.

Install Humidistat and Wiring for HUMCCLFP1025-A

Mounting the humidistat and wiring the HUMCCLFP1025-A humidifier.

Start-Up HUMCCLFP1025-A

Initial startup and testing procedures for the HUMCCLFP1025-A humidifier.

Final Steps for HUMCCLFP1025-A

Informing the homeowner about operation and maintenance for the HUMCCLFP1025-A.

Installation of HUMCCSFP1016-A Fan-Powered Humidifier

Guide for installing the HUMCCSFP1016-A fan-powered humidifier on supply plenum.

Inspect HUMCCSFP1016-A Package

Verify all components for the HUMCCSFP1016-A humidifier are present and undamaged.

Select HUMCCSFP1016-A Location

Choosing the optimal location for the HUMCCSFP1016-A humidifier on the supply plenum.

Reverse Door Access on HUMCCSFP1016-A

Instructions for reversing the side access door on the HUMCCSFP1016-A humidifier.

Prepare Plenum Opening for HUMCCSFP1016-A

Steps to mark and cut the opening in the supply plenum for the HUMCCSFP1016-A.

Mount HUMCCSFP1016-A Humidifier

Procedure for attaching the HUMCCSFP1016-A humidifier to the plenum.

Install Drain Line for HUMCCSFP1016-A

Connecting the drain line from the HUMCCSFP1016-A humidifier to an open drain.

Mount Solenoid Valve for HUMCCSFP1016-A

Mounting the solenoid valve on the HUMCCSFP1016-A humidifier enclosure.

Make Water Connection for HUMCCSFP1016-A

Connecting water supply to the solenoid valve for the HUMCCSFP1016-A.

Install Humidistat and Wiring for HUMCCSFP1016-A

Mounting the humidistat and completing wiring for the HUMCCSFP1016-A.

Start-Up HUMCCSFP1016-A

Initial startup and testing procedures for the HUMCCSFP1016-A humidifier.

Final Steps for HUMCCSFP1016-A

Informing the homeowner about operation and maintenance for the HUMCCSFP1016-A.

Installation of HUMCCSBP2017-A Bypass Humidifier

Instructions for installing the HUMCCSBP2017-A bypass type humidifier on forced-air systems.

Inspect HUMCCSBP2017-A Package

Verify all components for the HUMCCSBP2017-A humidifier are present and undamaged.

Select HUMCCSBP2017-A Location

Choosing the optimal location for the HUMCCSBP2017-A humidifier on the furnace plenum.

Prepare Plenum Opening for HUMCCSBP2017-A

Steps to mark and cut the opening in the plenum for the HUMCCSBP2017-A.

Mount Humidifier for HUMCCSBP2017-A

Procedure for attaching the HUMCCSBP2017-A humidifier to the plenum and solenoid valve.

Install Bypass Duct for HUMCCSBP2017-A

Connecting the bypass ductwork for the HUMCCSBP2017-A humidifier.

Install Drain Line for HUMCCSBP2017-A

Connecting the drain line from the HUMCCSBP2017-A humidifier to an open drain.

Make Water Connection for HUMCCSBP2017-A

Connecting water supply to the solenoid valve for the HUMCCSBP2017-A.

Install Humidistat and Wiring for HUMCCSBP2017-A

Mounting the humidistat and completing wiring for the HUMCCSBP2017-A.

Start-Up HUMCCSBP2017-A

Initial startup and testing procedures for the HUMCCSBP2017-A humidifier.

Final Steps for HUMCCSBP2017-A

Informing the homeowner about operation and maintenance for the HUMCCSBP2017-A.

Installation of HUMCCWTR2019-A Water Saver Humidifier

Guide for installing the HUMCCWTR2019-A water saver bypass humidifier.

Inspect HUMCCWTR2019-A Package

Verify all components for the HUMCCWTR2019-A humidifier are present and undamaged.

Prepare Plenum Opening for HUMCCWTR2019-A

Steps to mark and cut the opening in the plenum for the HUMCCWTR2019-A.

Mount Humidifier for HUMCCWTR2019-A

Procedure for mounting the HUMCCWTR2019-A humidifier to the duct and attaching components.

Install Bypass Duct for HUMCCWTR2019-A

Connecting the bypass ductwork for the HUMCCWTR2019-A humidifier.

Install Drain Line for HUMCCWTR2019-A

Connecting the drain line from the HUMCCWTR2019-A humidifier to an open drain.

Make Water Connection for HUMCCWTR2019-A

Connecting water supply to the float valve for the HUMCCWTR2019-A.

Install Humidistat and Complete Wiring

Mounting the humidistat and completing the low-voltage wiring for the system.

Start-Up Procedures

Steps to follow for initial system startup and testing after installation.

Final Steps

Informing the homeowner about operation and maintenance after installation.

Humidistat Installation

Details on installing and wiring a humidistat for automatic humidifier control.

Wall Mounting Humidistat

Instructions for mounting the humidistat on an inside wall.

Humidistat Wiring

Ensuring all humidistat wiring complies with local codes and ordinances.

Duct Mounting Humidistat

Instructions for mounting the humidistat on a return-air duct.

Humidistat Adjustment

Recommended humidistat settings and how to adjust for optimal humidity.

Humidistat Operation

How the humidistat controls the humidifier based on relative humidity levels.

Humidistat Checkout

Observing system operation to ensure all components are functioning properly.

Related product manuals