IM-40MBDQ-05 Specifications subject to change without notice. 19
Step 7 - Setting Static Pressure or Automatic Airflow
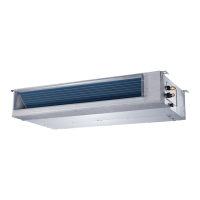
The indoor ducted units can be programmed for different static
pressures settings or airflows and the factory default setting is
SP1. Use the following steps to set the static pressure or
Automatic Airflow
using the Wired Remote Controller or the
Wireless Remote Controller according to the installation
conditions.
WHEN USING THE KSACN0501AAA WIRED
CONTROLLER:
• The external static pressure can be manually changed to the fan
curves SP1, SP2, SP3, SP4.
• Use the Automatic Airflow “AF” Adjustment function to
automatically identify the static pressure and regulate the airflow
amount.
Follow these instructions to configure:
1. Ensure the test run is done with a dry coil. If the coil is not dry, run
the unit for 2 hours in the FAN ONLY mode to dry the coil.
2. Check that both the power supply wiring and the duct installation
have been completed. Check that dampers are properly positioned.
Check that the air filter is properly attached to the air inlet side
passage of the unit.
3. If there is more than one air inlet and/or outlet, adjust the dampers
so that the airflow rate of each air inlet and outlet conforms to the
designed airflow rate. Ensure the unit is in FAN ONLY mode.
Press and set the Airflow Adjustment “AF” on the remote
controller to adjust the airflow rate from H to L. Turn the indoor
unit OFF with the Wired Controller.
4. Set the parameters for airflow adjustment. When the system is
OFF, perform the following steps:
a. Press and hold COPY for approximately 4 seconds
b. Press “+” or “-” to scroll through the menu and make a
selection, either SP or AF.
NOTE: T1, T2, T2b, T3, T4 are sub-menus for thermistors.
DO NOT select to set the external static pressure.
Fig. 53 — Wired Controller Menu Selection
1. If setting the external static pressure manually, select SP and press
CONFIRM. Select the SP number (SP1, SP2, SP3, SP4 − see
static pressure Table 13 and curves (Figs. 55 through 61)). Power
down the unit to lock in the selection.
2. If choosing the AUTOMATIC AIRFLOW ADJUSTMENT
function, select AF and press CONFIRM. The system starts the
fan for the airflow automatic adjustment. The ON indicator flashes
when the fan runs during the AUTOMATIC AIRFLOW
ADJUSTMENT. After 3 to 6 minutes, the system stops operating
once the AUTOMATIC AIRFLOW ADJUSTMENT is
complete.
Fig. 54 — Automatic Airflow ON signal
NOTE: The external static pressure can also be selected using
the wireless remote controller (RG57F3(B)/BGEFU1),
included with the indoor unit, by pointing it toward the indoor
unit’s Infrared Receiver typically located inside the control
box. Refer to the wireless remote controller service manual for
further instructions.
WHEN USING THE 24V INTERFACE KSAIC**
The wireless remote controller, wired controllers KSACN**
and Wi-Fi kits would be disabled. Since a wired controller is
required to setup the static pressure of the indoor ducted units,
the 24V interface must be temporarily bypassed using the steps
below:
1. Turn off the power to the unit
2. On the 24V interface, disconnect the plugs from the CN11 (to
Outdoor) and CN12 (to Indoor) connections.
3. Sizes:
a. For sizes 9K-24K only: Add a jumper between the indoor
S terminal to the outdoor S terminal.
b. For sizes 36K-58K only: Disconnect S1 and S2 from the
24V interface (CN8 and CN9) and splice together S1 from
outdoor to S1 from indoor and S2 from outdoor to S2 from
indoor.
4. Connect the Wired Controller (KSACN0501AAA) and follow the
external static pressure setup.
5. Once the static pressure is adjusted, disconnect the wired controller
6. Sizes:
a. For sizes 9K-24K only: Remove the S jumper from the
terminal block.
b. For sizes 36K-58K only: Remove the splice and reconnect
S1 and S2 back to the 24V interface accordingly.
7. Reconnect the plugs back to CN11 (to outdoor) and CN12 (to
indoor) accordingly.
8. Restore power to the unit.
NOTE: When a system uses the 24V interface, the indoor
unit’s fan speed defaults to AUTO with the indoor unit’s
default logic.
ON
is running during the
AUTOMATIC AIRFLOW ADJUSTMENT
Do not use the
AUTOMATIC AIRFLOW ADJUSTMENT
with the
remote control if using booster fans, an outdoor air processing unit, or a
HRV via duct.
If the ductwork or static pressure have been changed, reset the
AUTOMATIC AIRFLOW ADJUSTMENT
following steps 3 and 4.
CAUTION
DUCT SIZING
Duct work must be properly sized using the standard duct sizing
program practices. Failure to do so could result in inadequate
airflow to the target area. It is recommended to follow the
standard practices listed on the ACCA Manual D for designing
Duct Systems.
CAUTION
 Loading...