EasyManua.ls Logo

CASAINC CS3523 - User Manual

CASAINC CS3523
2 pages
Print Icon
To Next Page IconTo Next Page
Loading...
Pressure balanced diverter valve
Valve
Face plate with sealjoint
Diverter knob kit
Trim cap
Allen screw
Handheld Shower Kit with Flexible Hose
Flexible hose
Hand shower holder
Hand shower
Shower head
Shower arm and flange kit
Bathtub spout waterfall
CARE INSTRUCTIONS
DO NOT:
CS3523
A
A-1
B
C
A-2
A-3
A-4
A-5
B-1
B-2
B-3
No.
Description
D
B1
B2
B3
A1
A2
A3
A3
A4
A5
A5
A4
* Apply plumber's
putty under the plastic
cover deck plcta to seal
your installation.
*The model shown in
the installation steps
may differ from the one
in box however
connection type and
installation steps are
the same.
Firmly hand tighten the hose
to the valve and add a quarter
turn using the proper wrench
Tighten more if needed
CONNECTION ADVICE
A
B
1. When you open the product packaging, please check the product and accessories at first.
If there are any discrepancies, please contact us promptly. We will provide you with a
satisfactory solution.
2. The hot and cold water supply pipe of the valve must be properly connected. When facing the
front of the valve, the hot water supply is on the left and cold water supply is on the right.
Incorrect connection will cause permanent damage to the cartridge.
3. If the accessories to be changed without affecting the use, we will not make a prior notice.
4. The impurities in the water supply pipe must be cleared before installation to avoid blockage.
5. The water pressure of the faucet is 0.05MPa-1.0MPa(including cold water and hot water
Pressure). Applicable water temperature range:39°F-194°F.
Plumber's
putty
Thread seal
tape
Included
2PREPARATION BEFORE INSTALLATION
1INSTALLATION PRECAUTIONS
3 CONCEALED FAUCET ACCESSORIES LIST
4TECHNICAL DRAWING OF DRILING SIZE
Wall
2.2"
1.8-2"
C
HEAD SHOWER
COLD WATERHOT WATER
D
1. The size of the valve that needs to be drilled is 5.3" x 6.7".
2. The depth of the valve is 1.8"-2.2". It's better to drill the depth of 1.8" for blank wall.
E
E
BATHTUB SPOUT
HAND SHOWER
5.3"
6.7"
2.68"2.8"
SHOWER SYSTEM FAUCET
Installation instruction
CH/BN/MB/BG/ORB
Website: www.casainc.com
( )
Contact phone number: 303 747-4321
Service contact: service@casainc.com
Question and Answer IconNeed help?

Do you have a question about the CASAINC CS3523 and is the answer not in the manual?

Summary

Installation Precautions

Product and Accessory Check

Verify all products and accessories upon packaging. Contact for discrepancies.

Hot and Cold Water Supply Connection

Ensure correct hot (left) and cold (right) water supply connection to prevent damage.

Water Pressure and Temperature Range

Faucet operates at 0.05MPa-1.0MPa with applicable temperatures from 39°F-194°F.

Pipeline Impurity Clearing

Clear impurities from water supply pipes before installation to prevent blockage.

Preparation Before Installation

Connection Advice for Hose Tightening

Firmly hand-tighten the hose to the valve and add a quarter turn using a wrench.

Plumbers Putty Application

Apply plumber's putty under the plastic cover deck to seal the installation.

Model and Installation Step Variations

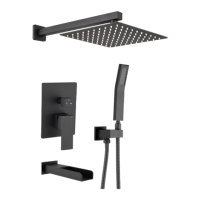
Note that the model shown may differ, but connection types and steps remain consistent.

Concealed Faucet Accessories List

Pressure Balanced Diverter Valve Components

Includes valve, face plate with seal joint, diverter knob kit, trim cap, and Allen screw.

Handheld Shower Kit Components

Includes flexible hose, hand shower holder, and hand shower.

Shower Head and Arm Kit

Includes shower head and shower arm with flange kit.

Bathtub Spout Waterfall

The accessory list includes a bathtub spout waterfall.

Care Instructions

Rinse with clear water and dry with a soft cloth. Avoid harsh chemical cleansers.

Technical Drawing of Drilling Size

Valve Drilling Dimensions

The valve requires drilling of 5.3" x 6.7" with a depth of 1.8"-2.2".

Pipe Connection

Drilling for Main Body and Pipes

Drill wall holes for main body, hot/cold inlet pipes, and shower arm pipes per dimensions.

Connecting Inlet Pipes to Control Valve

Connect hot/cold water inlet pipes and mixed water outlet pipe to the control valve.

Water Testing and Sealing

Pipeline Flush and Pressure Check

Flush pipeline, check pressure resistance, and sealing performance after connection.

Outlet Pipe Sealing Test

Block outlets and open cartridge to check pipe joint sealing under pressure.

Procedure of Sealing the Wall

Wall Flatness and Angle Measurement

Measure wall flatness and ensure valve/wall angle is near 90° before tiling.

Installation of Control Valve

Remove Protective Panel and Cover

Take off the protective panel and cover before proceeding.

Connect Decorative Panel and Handle

Connect the decorative panel and handle to the control valve as shown.

Adjust Water Separator Handle Direction

Correctly adjust the direction of the water separator handle.

Product Reparation

Cartridge Replacement for Leakage

Turn off water, remove components, and replace worn cartridge to fix leakage.

Clearance and Maintenance

Basic Cleaning Procedure

Clean with water and dry with a soft cloth. Use mild liquid cleaner for dirt/scale.

Prohibited Cleaning Agents

Do not use abrasive tools, paper towels, acid cleaners, or harsh chemical cleansers.

Overview

This document outlines the installation, usage, and maintenance instructions for the CASAINC CS3523 Shower System Faucet. This product is available in CH/BN/MB/BG/ORB finishes.

Function Description:

The CASAINC CS3523 is a concealed shower system faucet designed to provide a comprehensive showering experience. It integrates a pressure-balanced diverter valve, a handheld shower kit with a flexible hose, a shower head, and a bathtub spout waterfall. The system allows users to switch between different water outlets (shower head, handheld shower, bathtub spout) using a diverter knob. The pressure-balanced valve ensures consistent water temperature, preventing sudden changes due to pressure fluctuations in the hot or cold water supply.

Important Technical Specifications:

  • Valve Drilling Size: The required drilling size for the valve is 5.3" x 6.7".
  • Valve Depth: The recommended depth for the valve is 1.8"-2.2", with 1.8" being ideal for a blank wall.
  • Water Pressure Range: The faucet operates efficiently within a water pressure range of 0.05MPa to 1.0MPa, which includes both cold and hot water pressure.
  • Applicable Water Temperature Range: The system is designed to handle water temperatures from 39°F to 194°F.
  • Components:
    • A: Pressure balanced diverter valve: Includes the valve (A-1), face plate with sealjoint (A-2), diverter knob kit (A-3), trim cap (A-4), and Allen screw (A-5).
    • B: Handheld Shower Kit with Flexible Hose: Comprises a flexible hose (B-1), hand shower holder (B-2), and hand shower (B-3).
    • C: Shower head
    • D: Shower arm and flange kit
    • E: Bathtub spout waterfall

Usage Features:

  • Installation Precautions:
    • Upon opening the package, users should inspect the product and accessories for discrepancies and contact customer service if any are found.
    • Crucially, the hot and cold water supply pipes must be connected correctly: hot water on the left and cold water on the right when facing the valve. Incorrect connection will permanently damage the cartridge.
    • Impurities in the water supply pipe must be cleared before installation to prevent blockage.
  • Pipe Connection:
    • Holes for the main body, hot and cold water inlet pipes, and shower arm connection pipes must be drilled according to the product dimension drawing.
    • The hot and cold water inlet pipes and the mixed water outlet pipe should be connected to the control valve and tightened with a wrench.
  • Water Testing and Sealing Testing:
    • After pipe connection, the protective panel and cover should be opened, the cartridge opened to flush the pipeline, then closed to check pressure resistance and sealing performance for leaks.
    • Each outlet pipe should be blocked with a stopper, and the cartridge opened to check for well-sealed pipe joints and no leakage under pressure. This process also flushes impurities and sludge to prevent clogging.
  • Wall Sealing:
    • A parallel ruler should be used to measure the flatness of the valve and the vertical wall surface. If the wall is not flat, it should be patched to ensure a 90-degree angle for the valve and vertical wall, followed by tile decoration.
  • Control Valve Installation:
    • The protective panel and cover should be removed.
    • The decorative panel and handle are connected to the control valve.
    • The direction of the water separator handle must be correctly adjusted as per the provided figure.
  • Shower Sets/Handle Shower Installation: The manual provides visual steps for installing the shower sets and handle shower.
  • Connection Advice: Hoses should be hand-tightened to the valve, followed by a quarter turn with a wrench. Further tightening may be needed. Plumber's putty should be applied under the plastic cover deck plate for sealing. Thread seal tape is included.

Maintenance Features:

  • Product Reparation:
    • If the cartridge wears out and causes leakage, the water source must be turned off.
    • The handle, panel, and decorative cover should be removed in sequence.
    • The gland should be removed with a wrench, and the cartridge and copper sleeve taken out.
    • The new cartridge should be repaired or replaced, then reinstalled.
  • Cleaning and Maintenance:
    • To maintain the faucet's smooth appearance and good performance, clean it with water and dry with a soft cotton cloth.
    • A mild liquid and a colorless glass cleaner can be used to remove surface dirt and scale, especially those without grinding function.
    • DO NOT use:
      • Detergents, polishing tools, abrasive cloth, paper towels, or scrapers.
      • Acid cleaners, insoluble granular detergents, or soaps.
      • Abrasive cleansers, cloths, or paper towels.
      • Any cleaning agents containing acid, polish, wax, alcohol, ammonia, bleach, solvent, or any other corrosive or harsh chemical cleansers.
    • The care instructions emphasize rinsing the product with clear water and drying with a soft cloth.

CASAINC CS3523 Specifications

General IconGeneral
BrandCASAINC
ModelCS3523
CategoryPlumbing Product
LanguageEnglish