1840-6
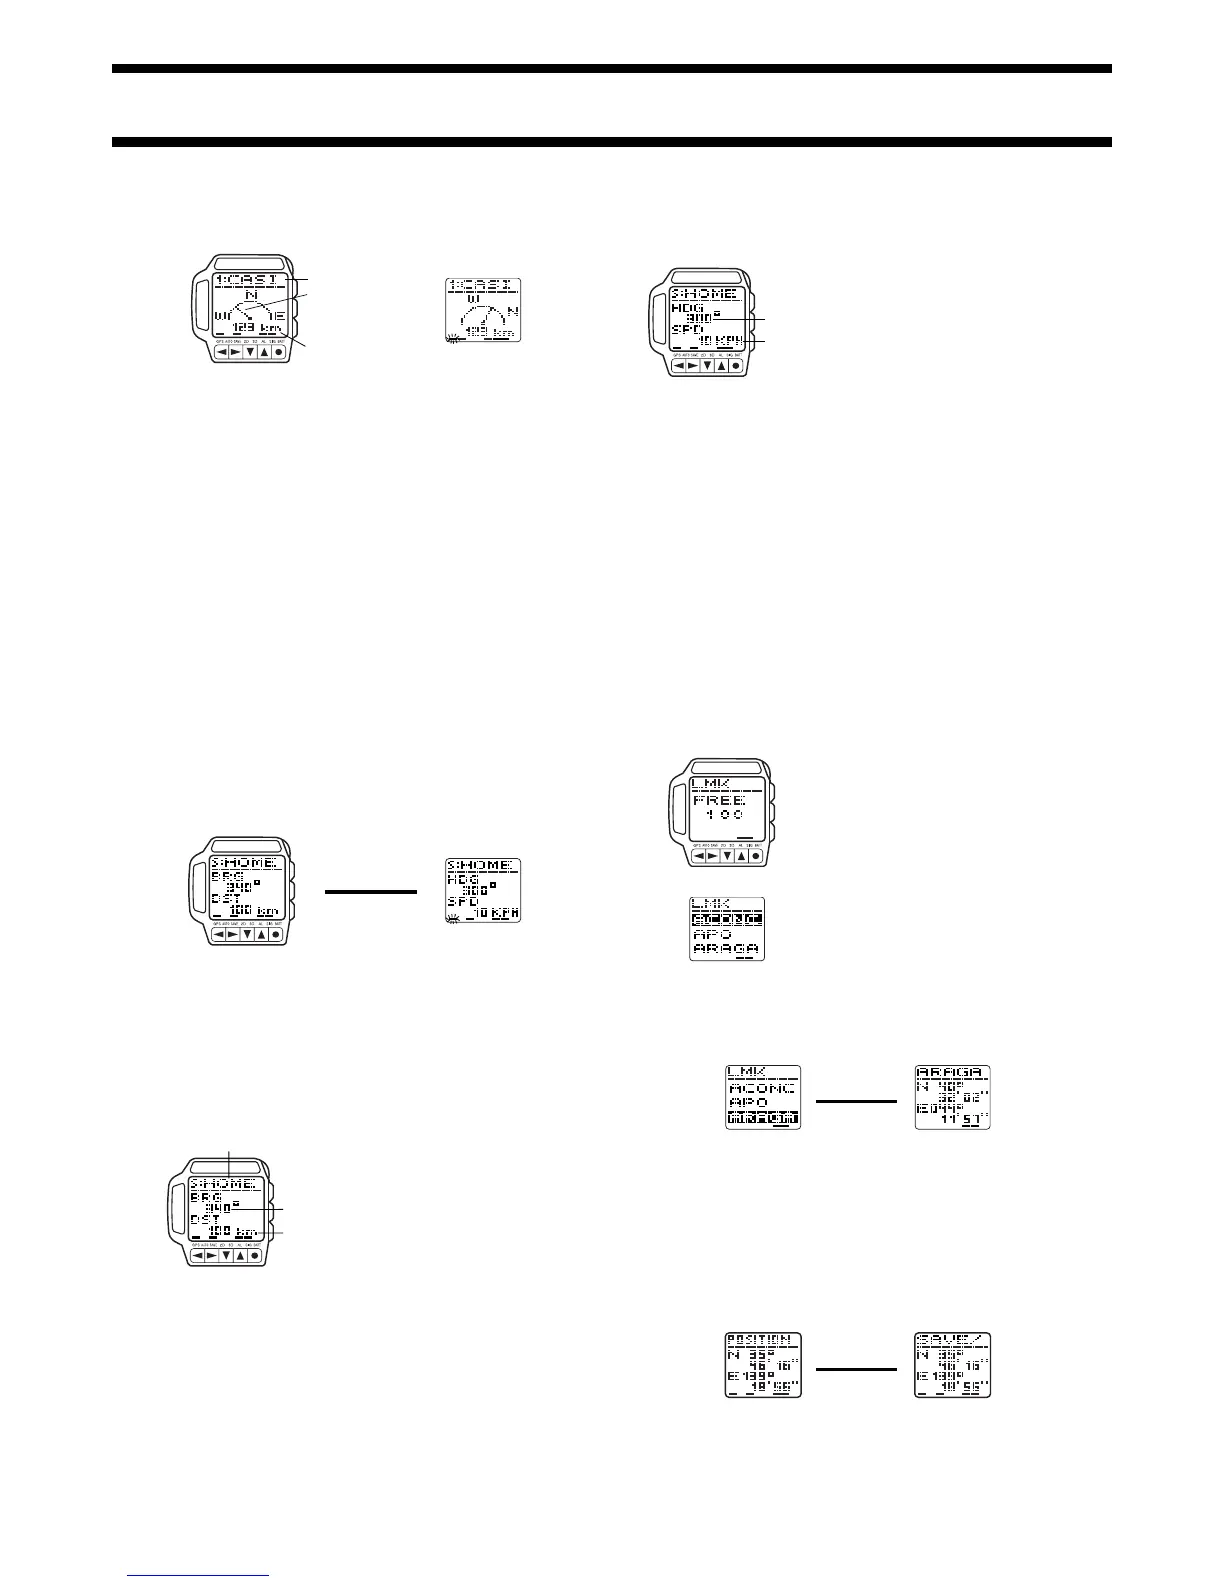
GPS Measurement with a Graphical Navigation Screen
After successful measurement is achieved, the display shows a pointer to
your destination waypoint along with the distance to the destination.
• See “Taking a GPS Measurement” for full details about GPS
measurements.
• When you plan to use the GPS Continuous Mode while in motion, wait until
the watch is able to obtain its first successful position measurement before
you start moving.
• See “Graphical Navigation Screen” for other important information about
these screens.
To change the destination waypoint
1. While the Fixed Direction Screen or Current Direction Screen is on the
display, press H to display the next waypoint.
2. The Graphical Navigation Screen points to the direction of the new
waypoint and displays the distance to it.
• See “Using Waypoints” for information about defining and managing
waypoints.
Distance to destination
waypoint
Fixed Direction Screen Current Direction Screen
Destination
waypoint name
Destination
pointer
Destination waypoint name
Bearing
Distance
J
H
Press J.
Direction and Speed Screens
The Direction and Speed Screens provide you with numeric information about
the bearing and distance to your destination waypoint, and your current
heading and speed. You can specify kilometers, miles, or nautical miles as the
unit of measurement for the distance, and kilometers per hour, miles per hour,
or knots for the speed.
• See “To set the distance unit” and “To set the speed unit” for information
about how to set the units of measurement.
Direction and Speed Screen Formats
There are two Direction and Speed Screen formats: a Bearing and Distance
Screen, and a Heading and Speed Screen.
• Press J to toggle between screen formats.
Important!
• The Bearing and Distance Screen will not work properly unless you have
defined waypoints already. See “Using Waypoints” for information about
defining and managing waypoints.
GPS Measurement with the Bearing and Distance Screen
After successful measurement is achieved, the Bearing and Distance Screen
shows the bearing and distance from your current position to your destination
waypoint.
• See “Taking a GPS Measurement” for full
details about GPS measurements.
• See “Bearing and Direction Values” for
information about how to interpret the
bearing value.
To change the destination waypoint
1. While the Bearing and Distance Screen or Heading and Speed Screen is
on the display, press H to display the next waypoint.
2. The Bearing and Distance Screen shows the bearing of the new waypoint
and the distance to it.
Heading and Speed Screen
Bearing and Distance Screen
Heading
Speed
GPS Measurement with the Heading and Speed Screen
After successful measurement is achieved, the Heading and Speed Screen
shows your current direction of travel (heading) and speed.
Important!
• Heading and speed can be displayed
only when you are using the GPS
Continuous Mode.
• When you plan to use the GPS
Continuous Mode while in motion, wait
until the watch is able to obtain its first
successful position measurement before
you start moving.
Using the Landmark List
The LMK (landmark) list is like a data bank of locations from which you can
select your waypoints. You can store up to 200 locations in the LMK list for
instant recall when defining your waypoints.
Preset Data
Your GPS watch comes pre-programmed with landmark list data for the
latitudes and longitudes of the world’s major mountains. See “LANDMARK
LIST”. You can use this data as it is, or you can edit or delete it to suit your
own needs.
• Note that once you edit or delete the preset data it cannot be recovered.
• Use the procedures under “Editing and Deleting Landmarks” to change the
preset data.
• Local names for mountains may differ from those pre-programmed in the
“LANDMARK LIST”.
• As described under “Datums”, latitude and longitude may differ according to
the map datum being employed to produce them. Because of this, the
latitudes and longitudes pre-programmed in the “LANDMARK LIST” may
differ from positions plotted on maps used by you.
To display the LMK list
1. In any mode, press the MENU button to
display the Menu Screen.
2. Use L and K to highlight LAND MK.,
and then press ●.
• A screen showing how many more
landmarks can still be stored in memory
appears for about one second, followed
by the actual LMK list.
• If there are no landmarks currently stored
in memory, the New Landmark Input
Screen appears in place of the list.
3. To exit the LMK list, press MENU to
return to the Menu Screen.
To display the location of a landmark
1. On the LMK list, use L and K to move the highlighting to the landmark
whose location (latitude and longitude) you want to display.
2. Press J to display the Location Screen.
3. Press H to return to the LMK list.
Landmark List Location
Adding Landmarks to the LMK List
You can store up to 200 landmarks in the LMK list for later recall when you
need them. There are two methods you can use to add a landmark to the
LMK list: registering your current location and manually entering position data.
To add a landmark by registering your current location
While the GPS Mode Position Screen is on the display with the latitude and
longitude of a successful GPS measurement, hold down H for about one
second until the watch beeps and the message SAVE appears at the top of
the screen.
Position Screen
The position is saved as a landmark, with the current date (month – day) and
time (hour : minutes) as its name.
• See “Taking a GPS Measurement” for full details about GPS
measurements.
J
Press Jor H.
J
J
Hold down H.
 Loading...