Operation Guide 5479
E-19
(space)
A to Z
@
to —
0 to 9
DDD
B
D
BBB
x You can input spaces, alpha characters, symbols, and numbers in a name. For
details, see the “Character List” at the back of this manual.
4. When the character you want is at the cursor position, press C to move the
cursor to the right.
5. Repeat steps 3 and 4 until the name is complete.
x You can input up to eight characters for the name.
6. After you input the name, press C as many times as
necessary to move the cursor to the number fi eld.
x You tell when you are in the name fi
eld because of
the long cursor (
—
). The number fi
eld has a short
cursor (
–
).
E-18
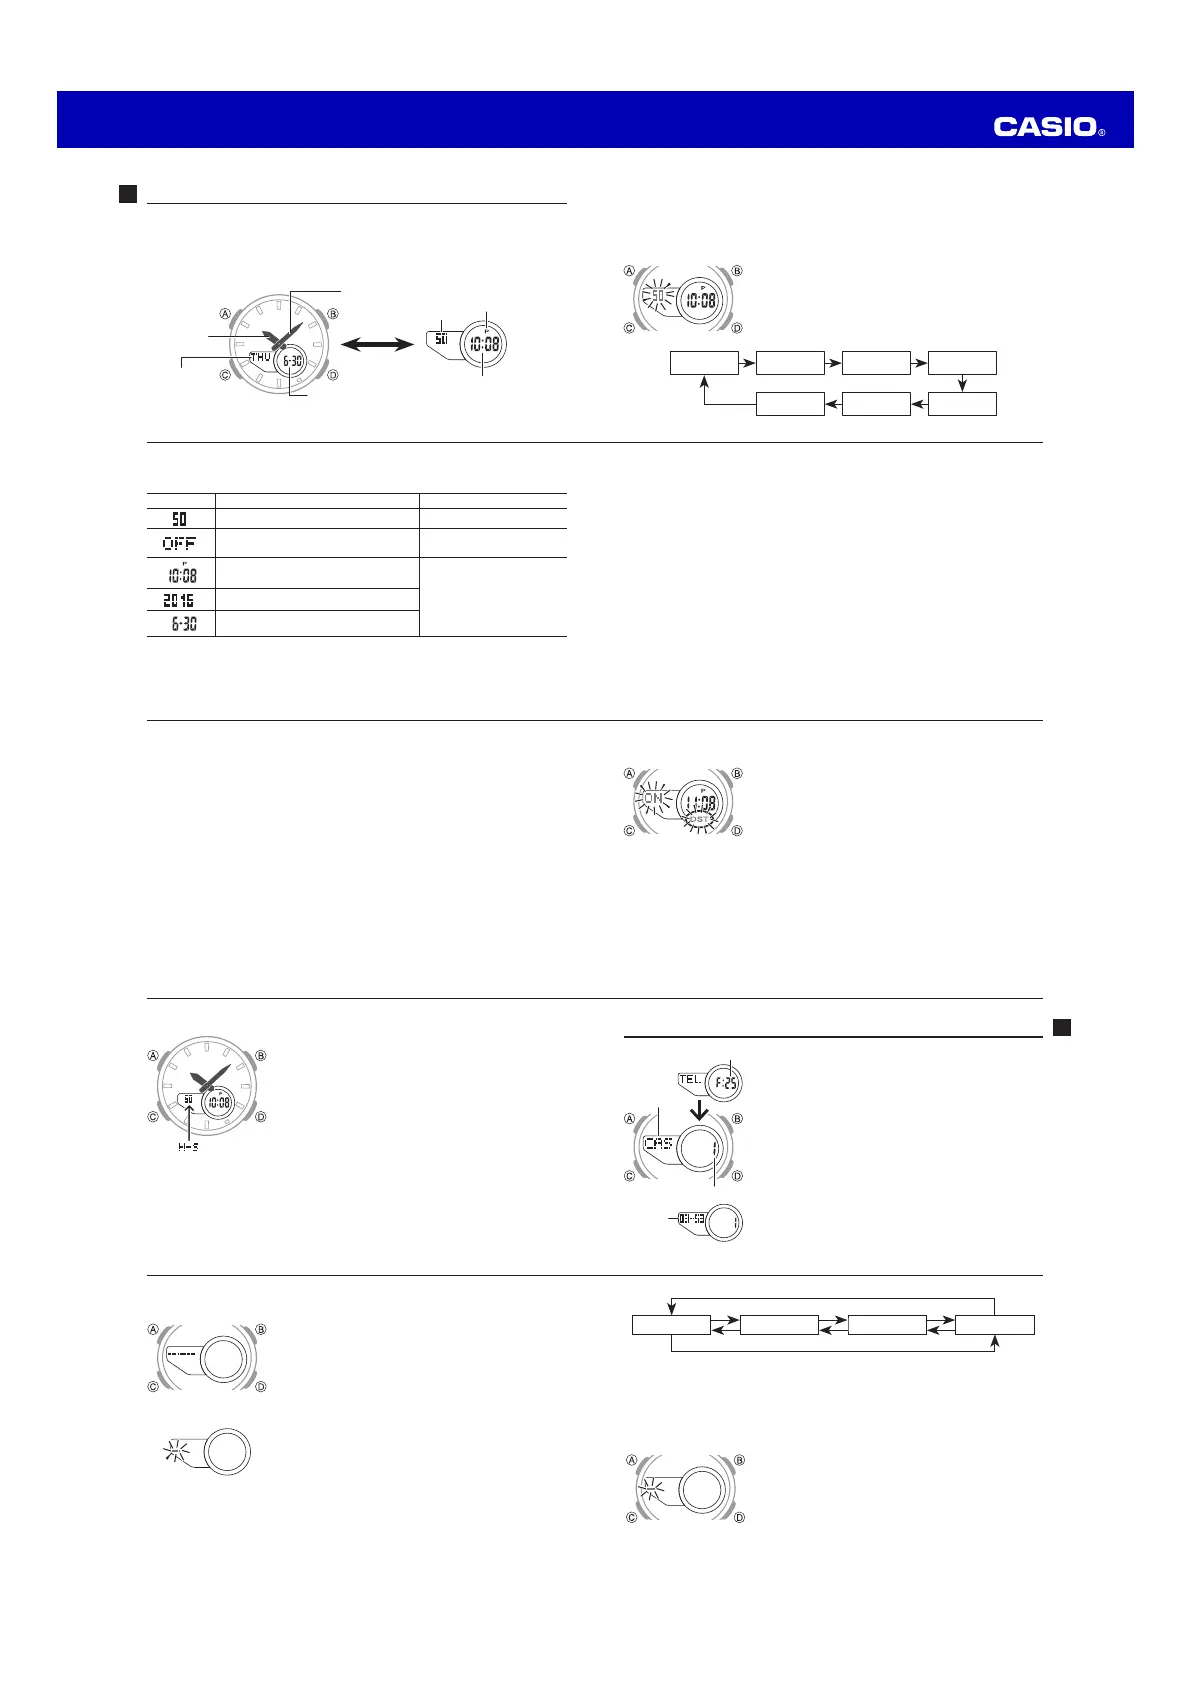
To create a new Telememo record
1. In the Telememo Mode, press B and D at the same
time to display the new data screen.
x The new data screen shows ———, which indicates
that there is no text in the name fi eld.
x If the new data screen does not appear, it means that
memory is full. To store another record, you will fi
rst
have to delete some of the records stored in memory.
2. Hold down A until the fl ashing cursor (
—
) appears
in the name fi eld of the display, which indicates the
setting screen.
3. Use D and B to change the character at the cursor
position in the name fi eld. The character changes in
the following sequence.
New Data Screen
E-17
Telememo
Telememo lets you store up to 30records, each
containing name and telephone number data. Records
are automatically sorted based on the characters of the
name. You can recall records by scrolling through them
on the display.
x A Telememo Mode record has a name fi eld and a
number fi
eld.
x See “Character List” at the back of this manual for
details on how the watch sorts records.
x All of the operations in this section are performed in
the Telememo Mode, which you enter by pressing C
(page E-6).
Name
Remaining memory
Record number
Number
E-16
To adjust the analog time
1. In the Timekeeping Mode, press C six times to enter
the Hand Setting Mode (page E-7).
2. Hold down A until the current digital time starts to
fl ash, which indicates the analog setting screen.
3. Press D to advance the analog time setting by
20seconds.
x Holding down D advances the analog time setting
at high speed.
x If you need to advance the analog time a long way, press D and
B at the
same time. This locks the high speed hand movement, so you can release the
two buttons. High-speed hand movement continues until you press any button.
It will also stop automatically after the time advances 12hours or if an alarm
(daily alarm, Hourly Time Signal, or countdown alarm) starts to sound.
4. Press A to exit the setting screen.
x To return to the Timekeeping Mode, press C.
E-15
To toggle the Timekeeping Mode digital time between DST and Standard Time
1. In the Timekeeping Mode, hold down A until the
seconds start to fl ash, which indicates the setting
screen.
2. Press C once to display the DST setting screen.
3. Press D to toggle between Daylight Saving Time
(ONdisplayed) and Standard Time (OFF displayed).
4. Press A to exit the setting screen.
x The DST indicator appears on the Timekeeping,
Alarm, and Hand Setting Mode to indicate that
Daylight Saving Time is turned on.
Setting the Analog Time
Perform the procedure below when the time indicated by the analog hands does
not match the time of the digital display.
E-14
To toggle between 12-hour and 24-hour timekeeping
In the Timekeeping Mode, press D to toggle between 12-hour timekeeping
(indicated by A or P on the display), or 24-hour timekeeping.
x With the 12-hour format, the P (PM) indicator appears on the display for times in
the range of noon to 11:59 p.m. and the A (AM) indicator appears for times in the
range of midnight to 11:59 a.m.
x With the 24-hour format, times are displayed in the range of 0:00 to 23:59, without
any indicator.
x The 12-hour/24-hour timekeeping format you select in the Timekeeping Mode is
applied in all modes.
Digital Time Daylight Saving Time (DST) Setting
Daylight Saving Time (summer time) advances the digital time setting by one hour
from Standard Time. Remember that not all countries or even local areas use
Daylight Saving Time.
E-13
4. Press A to exit the setting screen.
x Resetting the seconds only (without changing the hour, minute, or DST setting)
causes the analog minute hand setting to be adjusted automatically. If you
change the hour, minute, or DST setting, you should also use the procedure
under “To adjust the analog time” (page E-16) to adjust the analog hands
accordingly.
x See “Digital Time Daylight Saving Time (DST) Setting” (page E-14) for details about
the DST setting.
x Resetting the seconds to 00 while the current count is in the range of 30 to
59causes the minutes to be increased by 1. In the range of 00 to 29, the
seconds are reset to 00 without changing the minutes.
x The day of the week is automatically displayed in accordance with the date
(year, month, and day) settings.
x The year can be set in the range of 2000 to 2099.
x The watch’s built-in full automatic calendar makes allowances for different
month lengths and leap years. Once you set the date, there should be no reason
to change it except after you have the watch’s battery replaced.
E-12
3. When the setting you want to change is fl ashing, use B and D to change it as
described below.
Screen To do this: Do this:
Reset the seconds to 00.
Press D.
Toggle between Daylight Saving Time (ON)
and Standard Time (OFF).
Press D.
Change the hour or minute.
Use D (+) and B (–).
Change the year.
Change the month or day.
E-11
Digital Time and Date
Use the Timekeeping Mode to set and view a digital display of the current time and
date. When setting the digital time, you can also confi gure settings for summer time
(Daylight Saving time or DST).
To set the digital time and date
1. In the Timekeeping Mode, hold down A until the
seconds start to fl ash, which indicates the setting
screen.
2. Press C to move the fl ashing in the sequence shown
below to select the other settings.
C
C
Seconds
DST
Day
Hour
Month
Minutes
Year
C C C
CC
E-10
Timekeeping
This watch features separate digital and analog timekeeping. The procedures for
setting the digital time (page E-11) and analog time (page E-15) are different.
x In the Timekeeping Mode, press A to toggle the display between the date screen
and the time screen.
Seconds
Date Screen
Time Screen
A
Hour
Day of week
Month – Day
PM indicator
Hour : Minutes
Minutes

 Loading...