23
SECURING THE CHILD WITHOUT THE IMPACT SHIELD
– ECE GROUP 2/3 (15-36 KG)
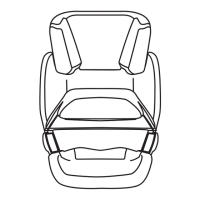
1. Place your child in the child car seat. Pull the three-point belt right out and
feed it along the belt buckle (19) in front of your child.
2. Insert the belt tongue (20) into the belt buckle (19). It must lock into place with
an audible “CLICK”.
3. Next, place the lap belt (17) in the lower belt guides (21) of the child car seat.
4. Now pull the diagonal belt (6) rmly to tighten the lap belt (17). The tighter
the belt sits, the better it provides protection from injury. On the side of the
belt buckle (19), the diagonal belt (6) and the lap belt (17) must be inserted
together in the lower belt guide (21).
WARNING! Never twist the belt.
!
WARNING! The lap belt (17) must run as low as possible on both sides
along your child’s groin to have optimum effect in the event of an accident.
!
WARNING! The vehicle belt buckle (19) must never cross the arm rest. If
the belt system is too long, the child car seat is not suitable for use in this
position in the vehicle. In case of doubt, please consult the manufacturer of
your vehicle.
!
5. The lap belt (17) should have been fed through the lower belt guides (21) on
both sides of the seat cushion (1).
NOTE! Teach your child from the start to always ensure that the belt is tight and,
if necessary, how to tighten the belt themselves.
6. Now feed the diagonal belt (6) through the upper belt guide (22) in the headrest
(13) until it is inside the belt guide.
Ensure that the diagonal belt (6) runs between the outside of the shoulder and
the neck of your child. If necessary, adjust the height of the headrest to change
the position of the belt. The height of the headrest (13) can still be adjusted while
in the car.
WARNING! Do not use any load bearing contact points other than those
described in the instructions and marked in the child restraint.
!