Do you have a question about the CEN-TECH 62453 and is the answer not in the manual?
Read all safety warnings and instructions. Failure to follow may result in shock, fire, or injury.
Keep work area clean and well lit. Avoid explosive atmospheres. Keep children away.
Do not drop tools on battery, operate damaged unit, leave unattended, or expose to water.
Wear PPE, avoid fatigue/intoxication, no smoking near battery, wash acid spills immediately.
Warnings regarding hydrogen gas, jump starting procedures, and California Proposition 65.
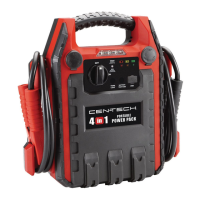
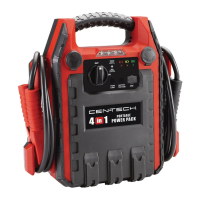
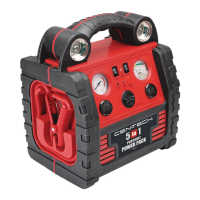
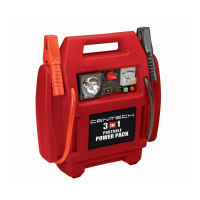
Identifies key components like cables, switches, outlets, and ports shown in Figure A.
Procedure for charging, indicator lights, and recommended recharge schedule.
Information on running/charging 12VDC appliances and calculating power needs.
Instructions for turning the work light on, off, and setting flashing mode.
Step-by-step guide for jump starting a vehicle safely and correctly.
Instructions for operating the air compressor and inflating tires using the unit.
Guide on attaching and using hose adapters for various inflation tasks.
How to power or charge external DC appliances and USB devices from the unit.
Procedures for general upkeep, cleaning, and servicing by qualified technicians.
Instructions for replacing the battery and proper disposal of lead-acid batteries.
Detailed list and diagram of all parts included in the Power Pack for identification.
Details on warranty coverage, exclusions, and the process for making a claim.
The CENTECH 4-in-1 Portable Power Pack, model 62453, is a versatile device designed for various automotive and portable power needs. It functions as a 12 Volt Jump-Starter, an Air Compressor, a 12VDC Power Supply, and features a 3 LED Work Light. This comprehensive tool is intended for emergency use and portable power applications, emphasizing safety and proper maintenance for optimal performance and longevity.
The primary function of the Power Pack is jump-starting vehicles with lead-acid batteries. It provides a quick and convenient solution for dead car batteries, eliminating the need for another vehicle. The jump-start system requires careful adherence to safety instructions, including ensuring a well-ventilated area and proper cable connections to avoid explosive gases and short circuits. It is designed for emergency use only and should not replace a vehicle battery.
Secondly, the integrated air compressor allows for inflating tires and other objects. It includes three different adapters that can be attached to the tire inflator for various inflation needs. Users can monitor the air pressure using the built-in gauge to prevent over-inflation.
Thirdly, the Power Pack serves as a 12VDC power supply, capable of running or charging 12VDC auto, RV, marine, or other portable appliances that draw 10 amps or less (up to 120 Watts). This feature is useful for powering various devices on the go, with the duration of power supply depending on the appliance's wattage.
Lastly, it includes a 3 LED work light, offering illumination for various tasks, especially in low-light conditions. The work light can also be set to a flashing mode for increased visibility or signaling.
The device contains a non-spillable, sealed lead-acid battery, which must be recycled at the end of its life.
The unit must be fully charged immediately after purchase (initial charge of 48 hours) and after each jump-start. Regular monthly recharging (30 hours) is recommended to ensure long battery life. Failure to recharge the Power Pack will void the warranty. Charging should always be done on a non-flammable surface.
Before jump-starting, the Power Pack's battery level should be checked and recharged if necessary. The vehicle's ignition and accessories must be turned off. The Clamp Power Switch on the Power Pack should be in the OFF position. The red Positive Battery Cable connects to the vehicle's positive battery terminal, and the black Negative Battery Cable connects to a non-moving metal part of the vehicle. It is crucial not to touch the positive and negative battery clamps together. After connecting, the Clamp Power Switch is turned ON, and a five-minute wait is required before attempting to start the vehicle. If the vehicle does not start, an additional three-minute wait is recommended before trying again. After starting, the Clamp Power Switch is turned OFF, and the cables are removed, starting with the black Negative Battery Cable.
To use the air compressor, the Power Pack should be fully charged. The air hose is pulled from its compartment, and the appropriate adapter is attached to the tire inflator if needed. The tire inflator is positioned firmly over the valve stem, and the lever is pressed down. The Air Compressor Switch is then turned on, and the air pressure gauge is monitored to prevent over-inflation. Once the desired pressure is reached, the compressor is switched off, the lever is lifted, and the hose is removed.
Ensure the Power Pack is fully charged and the appliance's wattage is within the unit's capacity (10 amps or less). The Clamp Power Switch and the appliance should be off before plugging the appliance into the 12VDC Outlet. The appliance can then be turned on.
Verify the Power Pack is fully charged. Plug the device into the USB Port.
The manual strongly advises reading all safety warnings and instructions before use, as failure to do so can result in serious injury. It also contains warnings regarding lead and other chemicals known to cause cancer and birth defects, requiring users to wash hands after handling. The manufacturer provides a 90-day limited warranty covering defects in materials and workmanship, but it does not cover damage due to misuse, abuse, negligence, or lack of maintenance.
| Brand | CEN-TECH |
|---|---|
| Model | 62453 |
| Category | Power Pack |
| Language | English |