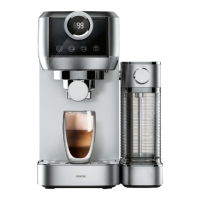
The CENTEK CT-1170 is a versatile coffee maker designed for preparing various coffee beverages, including espresso, cappuccino, and latte, from ground coffee. It is suitable for use in domestic settings, offices, and other commercial environments, excluding industrial or agricultural use.
Technical Specifications:
- Rated Voltage: 220-240 V ~ 50/60 Hz
- Water Tank Capacity: 1300 ml
- Milk Tank Volume: 700 ml
- Nominal Power Rating: 1150-1350 W
- Pressure: 20 Bar
Usage Features:
The coffee maker features a digital display that shows time or temperature values and a control panel with several buttons for different functions:
- ON/OFF Button: Turns the coffee maker on or off.
- ESPRESSO Button:
- Press once to make a single espresso (20-50 ml).
- Press twice to make a double espresso (50-90 ml).
- Press and hold for 3 seconds to start continuous coffee making. Press again to stop coffee making.
- CAPPUCCINO Button:
- Press once to make a small cup of cappuccino (110-230 ml).
- Press twice to make a large cup of cappuccino (215-355 ml).
- Press and hold for 3 seconds to manually make milk foam.
- LATTE Button:
- Press once to make a small cup of latte (260-420 ml).
- Press twice to make a large cup of latte (335-515 ml).
- Press and hold for 3 seconds to start the milk foaming system cleaning cycle.
Coffee Temperature Adjustment:
The appliance allows for adjustment of the coffee temperature.
- Press and hold the ON/OFF button for 3 seconds. The display will show the current temperature setting.
- The display will indicate "001" for low temperature, "002" for medium temperature, and "003" for high temperature.
- Press the ON/OFF button again to select the desired temperature. After 3 seconds, the cappuccino indicator will blink 3 times, and the temperature will be successfully set.
Volume Adjustment:
The volume of each beverage can be adjusted.
- For espresso, cappuccino, and latte, press and hold the respective button for 3 seconds. The appliance will start dispensing, and the indicators will flash with a blue light.
- Press the button again when the desired volume is reached. The appliance will return to standby mode.
- The adjustable volume range for espresso is 25 to 200 ml, and for cappuccino and latte, it is 25 to 700 ml.
Milk Foam Adjustment:
The milk foam can be manually adjusted by pressing and holding the CAPPUCCINO button for 3 seconds.
First Use:
Before first use, remove all packaging materials. Wash the water tank, milk tank, filter holder, and drip tray with warm water and mild detergent, then rinse with clean water and dry. Ensure the milk tank is assembled correctly. Do not wash the coffee filter and filter holder in a dishwasher.
Making Espresso:
- Fill the water tank with cold water to the MAX level.
- Insert the power plug into a suitable electrical socket.
- Press the ON/OFF button. The power indicator will light up, and the coffee maker will automatically start to heat up. When the process is over, all button indicators will light continuously.
- Place a cup under the boiler head. Turn the milk supply selector dial counterclockwise. Press and hold the LATTE button for 3 seconds. The appliance will start discharging hot water through the milk supply pipe. Allow the hot water to flow from the milk tube for approx. 8 seconds, then press the LATTE button once again to stop the process. This will allow water to fill the empty pump for the first use.
- Install the filter in the filter holder.
- Insert the filter holder without any ground coffee into the boiler head, holding the handle at 45° to the right, and then turn it to the left to lock it in place. The filter holder should stick straight ahead from the coffee maker body or be slightly turned to the right.
- Place an empty cup under the filter holder and press the ESPRESSO button once.
- After boiling cycle completion, discard the water. Your coffee maker is now ready for use.
Maintenance Features:
Regular Cleaning:
Regular cleaning and maintenance will keep the coffee maker in good operating order and ensure the ideal taste of the coffee, as well as reliable coffee making and milk foaming for a prolonged period of time.
Cleaning the Milk Tank and Supply Tube:
When you have finished making coffee with milk, you must either directly store the removed milk tank in a refrigerator, or completely clean the milk tank and milk supply tube.
- Place a large empty cup under the milk supply tube and ensure that the water tank is filled with water.
- Direct the milk supply tube into the empty cup.
- Press and hold the LATTE button for 3 seconds. The appliance will start discharging hot water from the milk supply tube. This cleaning cycle will be performed for 35 seconds and then stop automatically.
Cleaning the Filter Holder and Filters:
The filter holder and filters should be kept clean in order to guarantee excellent coffee making results.
- Pull the filter from the filter holder and rinse it with warm water.
- If you encounter a malfunction during coffee making, put the filter in boiling water for 10 minutes, then rinse under a tap.
Boiler Head Cleaning:
Regularly remove ground coffee residue from the boiler head with a brush and rinse them with hot water.
- Insert the empty filter holder into the boiler head, do not use any ground coffee.
- Place an empty cup under the boiler head.
- Press the double cup button and fill the cup with water and fill the cup with water.
- Remove the filter holder from the boiler head and wipe the boiler head with a dry cloth.
Do not attempt to disassemble the boiler head. This will damage the head and cause a leak.
Cleaning the Water Tank:
Drain the remaining water by removing the water tank and turning it upside down over a sink. It is recommended to always drain the water tank when the coffee maker is not in use. Wash the water tank with soap water, rinse well, and wipe dry. Do not wash the water tank in a dishwasher.
Scale Removal:
In order to ensure effective coffee maker operation, clean the inner tubing and retain the taste of coffee, regular scale removal and maintenance is required.
The ON/OFF button will blink 5 times indicating that the appliance requires scale removal. The scale removal warning will appear each time the unit is turned on, unless the scale removal cycle is started. The frequency of scale removal depends on the hardness of the water used.
- Mix water and a scale removal product (4 parts of water for 1 part of scale remover) and fill it into the water tank to the MAX level mark.
- Place an empty cup or any other suitable vessel on the drip tray.
- Simultaneously press and hold the CAPPUCCINO and LATTE buttons for 5 minutes. The appliance will start the scale removal cycle with a duration of 4 minutes and then will stop automatically.
- Repeat the previous steps until the water tank is empty.
- Then repeat the whole procedure two more times using ONLY PURE TAP WATER without any scale removal chemicals.
Troubleshooting:
The manual includes a comprehensive troubleshooting table to address common issues such as the appliance not turning on, no coffee from the filter holder, slow coffee flow, cold coffee, bad coffee taste, water pooling, milk not foaming, and unpleasant smells. Solutions range from checking power supply and water tank levels to cleaning filters, descaling, and ensuring proper coffee grind and quantity.