EasyManua.ls Logo

Cequent Performance Products PRO Series User Manual

Cequent Performance Products PRO Series
6 pages
To Next Page IconTo Next Page
Page #1 background imageLoading...
Page #1 background image
ITEM:
DESCRIPTION:
63125
4 PLACE TOWING BIKE CARRIER
ASSEMBLY INSTRUCTIONS:
1. Position the “Bike Cradles” onto the top plate of carrier as shown in Diagram 1.
Attach “Bike Cradles” to top plate with the ¼” x ½” Lg. Screws using the Allen
Wrench supplied.
2. Assemble both tubular sections together as shown in Diagram 1 and fasten
together with two 5/16” x 2-1/2” Lg. Carriage Bolts and Lock Nuts. Tighten
5/16-18 Gr5 bolts to 17 ft-lb.
3. Insert the hitch ball through bike carrier and ballmount and install the lock
washer and hex nut onto the hitch ball.
NOTE: A ball with ¾” diameter X 3-1/8” long shank is required for towing
sold separately.
4. Tighten hitch ball to 160 ft-lb.
5. Place the bike rack receiver into your receiver hitch. Secure rack with hitch
pin and clip. (See Diagram 2)
LOADING BIKES ONTO CARRIER:
1. Load one bike onto the first “Bike Cradle” (closest to vehicle) so the horizontal
seat tube of the bike rests on the rubber lined “Cradle”. Adjust position of
bike to find its center or gravity. Secure bike to “Cradle” using both Hook-N-
Loop Straps on the “Cradle” as shown in Diagram 3. Velcro straps must be
fully engaged and wrapped tight against bike tube.
2. Position the next bikes onto “Cradle” so the handle bars face in opposite
direction and secure using both Hook-N-Loop Straps (See Diagram 3)
The series of slots in the Top Plate have been provided to allow use of a
cable and padlock to protect bikes from theft. (sold separately)
5/16 x 2-1/2” Lg.
Carriage Bolt
Locknut
(2) Places
¼ x ½” Lg. Screw
(8) Places
Bike Cradle
ITEM:
DESCRIPTION:
Hitch Ball
Cequent Performance Products
47774 Anchor Court
Plymouth, MI 48170
Technical Service: (888) 521-0510
63125N Rev C 4-29-13
Printed in Taiwan
Diagram 1
Diagram 3
Pin & Clip
Hook-N-Loop Strap
Hitch Ball
Lock Washer
Hex Nut
INSTRUCTIONS FOR FOLDING THE RACK:
Remove the “Bail Lock Pin” from the bike carrier.
WARNING: Removal of this pin will allow the bike carrier to pivot rearward or forward.
Be certain to hold the bike carrier securely when removing the locking pin to prevent the bike
carrier from falling suddenly, Causing personal injury or vehicle damage. To remove the
“Bail Lock Pin” simply deflect the bail wire away from the small end of the pin and pull the pin
free of the carrier.
NOTE: Do not drop or let the support tube fall freely. Make sure that your hands and fingers
are clear of the hinging area during this operation. DO NOT attempt to move the vehicle
unless the Bike Carrier is in the upright position and securely locked.
Diagram 2
Diagram 4
Question and Answer IconNeed help?

Do you have a question about the Cequent Performance Products PRO Series and is the answer not in the manual?

Cequent Performance Products PRO Series Specifications

General IconGeneral
BrandCequent Performance Products
ModelPRO Series
CategoryAutomobile Accessories
LanguageEnglish

Summary

Assembly Instructions

Mount Bike Cradles

Attach bike cradles to the top plate using screws and Allen wrench.

Assemble Carrier Sections

Connect tubular sections with carriage bolts and lock nuts, tighten to torque.

Install Hitch Ball

Insert hitch ball through carrier and ballmount, secure with lock washer and hex nut.

Mount Rack to Vehicle

Place receiver into hitch and secure with hitch pin and clip.

Loading Bikes Onto Carrier

Load First Bike

Rest bike seat tube on cradle, adjust for balance, secure with hook-n-loop straps.

Load Subsequent Bikes

Position next bikes with handlebars opposite, secure with hook-n-loop straps.

Folding the Rack

Remove Bail Lock Pin

Remove pin to pivot carrier; hold securely to prevent sudden movement or injury.

Safe Folding Procedure

Keep hands clear of hinging area; ensure carrier is upright and locked before moving vehicle.

Important Notes and Warnings

Capacity and Weight Limits

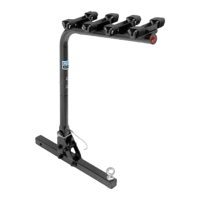
Rack designed for four bikes, max 100 lb. Observe trailer and tongue weight limits.

Usage and Road Conditions

Use on paved/smooth gravel roads. Avoid rough roads or vehicles with stiff springs.

Installation and Responsibility

Proper fitting and installation is critical and the owner's sole responsibility.

Product Care and Storage

Keep rack clean, remove salt/debris. Store indoors for extended periods.

Bike Fit and Frame Compatibility

Rack may not carry bikes with oblong frame tubes or unusually large frame sizes.

Loading Precautions and Padding

Add padding where bikes touch; improper loading can cause damage to bikes or vehicle.

Tire Clearance from Exhaust

Keep bicycle tires at least 6" away from vehicle exhaust pipes to prevent tire damage.

Wind Resistance and Accessories

Large accessories increase wind resistance; reduce speed to mitigate potential issues.

Mounting and Warranty

Improper mounting will void the rack warranty.

Ground Clearance Requirements

Minimum ground clearance is 14"; damage due to clearance issues is not covered by warranty.