Kink pullwire to keep spacer
independent of bolt
Scan for step by step
PHOTO installation
instruction or visit
http://www.cequentgro
up.com/qr-product.aspx
©2015 Cequent™ Performance Products, Inc. - Printed in Mexico Sheet 3 of 15 75234NP 10-21-15 Rev. A
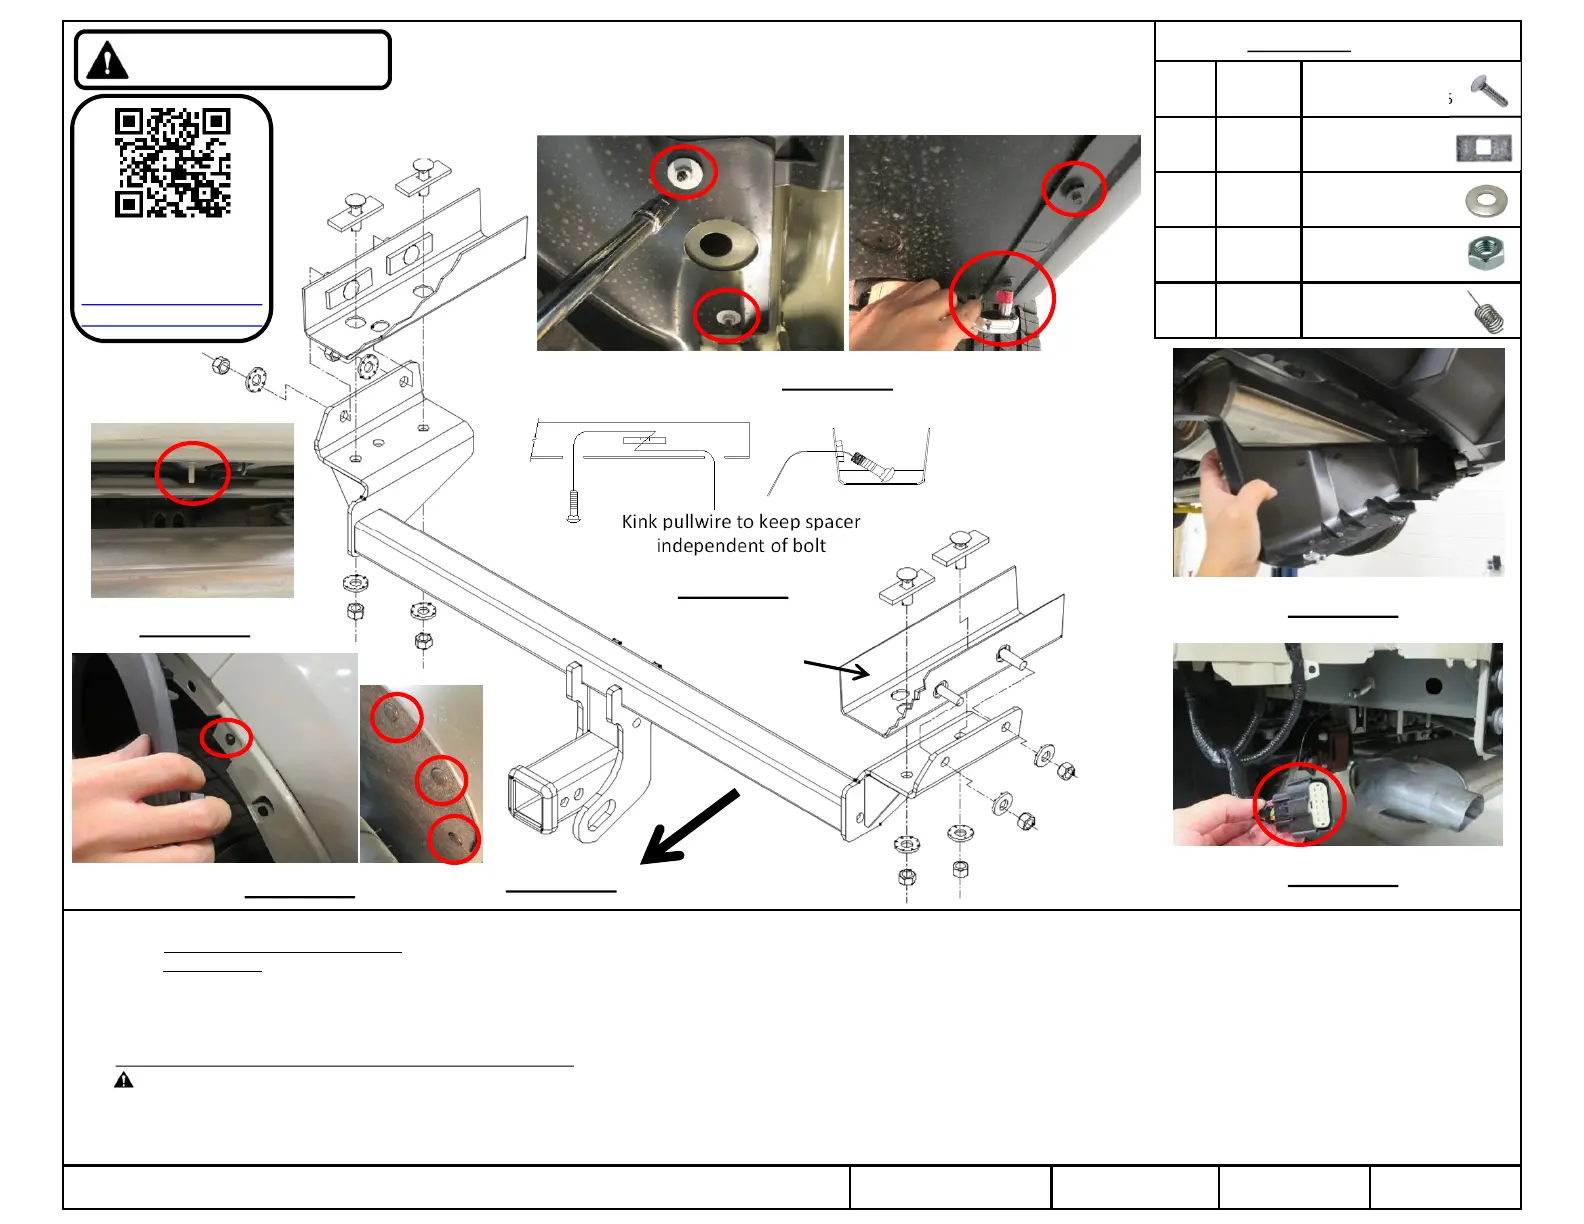
1. Bottom side plastic panels removal – use 5.5 mm and 10 mm socket to remove (2) bolts and (2) flange nuts attached on panel each side, see Figure 2.
Remove panels and keep them for reinstallation.
NOTE: for Edge Sport and MKX AWD model, remove (6) bolts and (1) flange nut attached on center plastic panel with heat shields, see Figure 3, and then remove the panel. Return to owner.
NOTE: for MKX model, bumper fascia removal is recommended for easier installation. Use flat head and CR-VT 20 screwdriver to remove (3) rivets and (1) bolt attached on fascia each side, see Figure 4. Open the
trunk, gently pull the fascia away from car and disconnect electrical connector on driver side, see Figure 5.
2. Lower muffler– remove exhaust hanger rod from rubber isolator both sides. Use stand to support and prevent from damaging muffler. NOTE: If bumper fascia is removed already, skip this step.
3. Hitch installation – feed the carriage bolt ① and spacer ② into frame by pull wires ⑤, see Figure 6. Leave pull wires attached. Use die grinder to cut off the stud which is above the center of muffler, see Figure 7.
Raise hitch into position and slide it over passenger side exhaust first. Feed pull wires previously installed through bracket holes. Remove pull wires and loosely install conical washer ③ and hex nut ④ to the hitch.
4. Tighten all 7/16’’ fasteners with torque wrench to 50 Lb.-Ft. (68 N*M).
5. Reinstall all fasteners, fascia, muffler, and side plastic panels removed in Step 1-2.
Note: check hitch frequently, making sure all fasteners and ball are properly tightened. If hitch is removed, plug all holes in trunk pan or other body panels to prevent entry of water and exhaust fumes. A hitch or ball which has been
damaged should be removed and replaced. Observe safety precautions when working beneath a vehicle and wear eye protection. Do not cut access or attachment holes with a torch.
This product complies with safety specifications and requirements for connecting devices and towing systems of the state of New York, V.E.S.C. Regulation V-5 and SAE J684.
Fastener Kit: 75234F
① Qty. (8) Carriage bolt
7/16’’x14x1.75, GR5
② Qty. (8) Spacer
.188x1x2
③ Qty. (8) Conical washer
7/16’’
④ Qty. (8) Hex nut
7/16‘’, GR2
⑤ Qty. (8) Pull wire
7/16‘’– 13
②
①
③
④
Installation Instructions
PART NUMBERS: 75234, 87696, 44784
Proper torque is needed to keep the hitch secure to the vehicle when towing.
Always wear SAFETY GLASSES
when installing hitch
Rear
Frame rail
Figure 1
Figure 2
Figure 3
Figure 6
Figure 7
Figure 4
Figure 5
⑤
Fasteners
typical
both sides
①②
③④


 To Next Page
 Loading...