Electrical devices always need a short time to heat up until they reach full performance and
the solder starts to melt.
The soldering tip must be tin-coated during the first heating-up (appx. 240°C) by adding flux
and tin-solder (e.g. CFH No. 52323/52325 solder for electronic components filled with flux,
No. 52328/52330 solder for hobby workers filled with flux, No. 52333/52335 solder for radio
connections filled with flux). To do so follow these steps:
- Preheat soldering tip up to appx. 240°C
- Put some tin-solder on the tip
- Let the fluid solder coat the soldering tip all over
Replacing the soldering tip (14):
Before replacing the soldering tip (14) unplug the device and let the device, the soldering iron
and the soldering tip cool down completely. Otherwise risk of burns!
- Now loosen the fastening screw according to picture III, remove the metal cover and pull out
the soldering tip (see picture IV).
- Afterwards insert the new soldering tip (see picture V), put over the metal cover and fasten
the fastening screw with your hand (see picture VI).
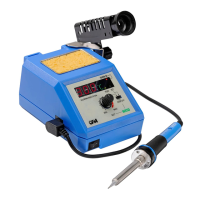
Assembly of the Soldering station:
- With help of the fixing screw (16) screw together the angle-shaped holder (3) and the safety
holder (1).
- Afterwards stick the angle-shaped holder (3) into the provided slot (6) on the soldering station.
Check afterwards if this connection is secure and firm! The angle-shaped holder can be
adjusted both at the left and at the right back side of the soldering station. To do so it is
necessary to turn the holder by 180°.
- The safety holder for the soldering iron (1) can be tilted upwards up to 45° continuously.
- Place the soldering iron (2) into the safety holder (1) and via soldering iron port connect
afterwards the connecting cable of the soldering iron (8) with the soldering station.
- Check that the temperature regulation button (10) is on MIN (minimum) and the ON/OFF
switch (9) is in position OFF (on 0).
- After checking that your electrical source is laid out for a voltage of 230 V, you can plug in
the soldering station.
Start of operation:
Before use check each time if the Soldering station, the soldering iron and the connecting
cables are not damaged. If damaged do not use it! Use the device solely on a stable and even
surface.
- Switch on Soldering station. (Put the ON/OFF switch to position ON -).
- Temperature regulation button (10) is on MIN.
- Put the change-over switch (15) to position SET. The LED temperature display DESIRED
VALUE (12) lights up.
- Now set the desired temperature through turning the temperature regulation button (10). It
will show on the display.
- Afterwards slide the change-over switch (15) to the left to the position READ. The LED
temperature display ACTUAL VALUE (11) lights up. On the display (7) you can see how
the temperature changes.
- The LED display HEATER ON (13) lights up always when the Soldering station heats up.
When the formerly set DESIRED VALUE is reached, the LED display HEATER
ON goes out. The DESIRED TEMPERATURE is reached and shows on the display (7).
Now you can start working.
Shutdown:
After the end of work coat the soldering tip (14) with some solder. Thus you can avoid corrosion.
- Switch off the ON/OFF switch (9) (put the ON/OFF switch to position 0).
- Place the soldering iron (2) into the safety holder (1).
- Disconnect the plug.
 Loading...