Do you have a question about the Chad Valley 367/5511 and is the answer not in the manual?
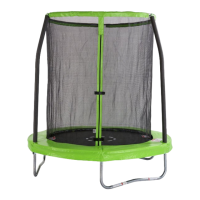
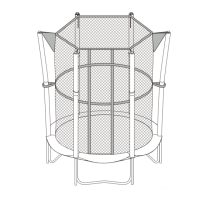
Assemble the frame by connecting tubing parts using slide-in joints.
Connect Top Rail with Leg Socket to support assemblies and install Top Rail sections.
Lay out the trampoline mat inside the frame and attach springs using the spring loading tool.
Select a starting point on the Top Rail Frame to begin spring attachment, identified as 'ZERO'.
Use the spring loading tool to attach the first spring to the frame at the 'ZERO' point.
Attach the next spring at point 18, 18 holes away from the starting point.
Attach a spring at point 9, counting back 9 holes from point 36.
Attach another spring at point 27 to ensure even tension distribution across the mat.
Attach springs every 3 holes on opposite sides for even tension distribution.
Attach the remaining springs by following the pattern of equal hole spacing.
Attach the Safety Instruction Placard to the vertical frame joint and top rail using a tie wrap.
Lay the frame pad over the trampoline, covering springs and frame, and tie down elastic straps.
Tie the elastic straps of the frame pad securely around each leg socket.
Attach End Caps to the Lower Frame Tubes, ensuring they are inserted into the holes.
Attach plastic caps to upper frame tubes using screws and allen wrench, then reposition foam.
Connect lower frame tubes to leg base using U-screws, clamps, spacers, lock nuts and covers.
Connect the thread to the nut of the cable wires using a wrench to ensure secure fastening.
Insert cable wires into enclosure netting sleeve and connect wire ends securely.
Attach cable wire/netting rings to plastic caps on upper frame tubes, then place onto trampoline mat.
Connect the assembled enclosure ring to the lower frame tubes, squeezing foam to locate holes.
Tie cords through the mat ring and enclosure netting edge, repeating until all cords are secured.
Zip the enclosure netting door and attach the sewn buckle to the trampoline leg base.
Attach safety placard, review all safety rules, and read care instructions before use.
Follow safety rules, supervision guidelines, and avoid advanced maneuvers like somersaults.
Familiarize with bounce, master brake bounce, start/finish in center, look forward, avoid fatigue.
Learn basic bounce techniques including starting position, arm swings, and landing.
Learn the seat bounce by landing in a flat sitting position and pushing up with hands.
Perform a low bounce, land prone, push off with arms to return to standing.
Start in front bounce position, push off with hands to return to standing or prone.
Regularly check nuts, bolts, parts, and frame for wear, damage, or corrosion.
Secure or disassemble the trampoline in windy conditions to prevent damage or movement.
Move the trampoline by at least 2 people, do not drag it to avoid damage.
Follow assembly instructions, check for wear, ensure security, and discontinue use if damaged.
| Brand | Chad Valley |
|---|---|
| Model | 367/5511 |
| Category | Accessories |
| Language | English |