This document provides operating instructions for the Challenge Xtreme Cordless Grass Trimmer, model NOE-5ET-230. It is designed for trimming light foliage and is intended for DIY use only.
Function Description:
The Cordless Grass Trimmer is a portable, battery-powered tool used for cutting grass and similar soft vegetation, as well as for trimming grass edges. It operates using a nylon line cutting system.
Important Technical Specifications:
- Model No.: NOE-5ET-230
- Voltage: 18VDC
- Battery Type: Ni-Cd (Nickel-Cadmium)
- No-load Speed: 8000/min
- Cutting Width: 230 mm
- Battery Capacity: 1.7Ah
- Battery Charging Time: 3-5 hours
- A-weighted Sound Pressure: 80dB(A) KPA: 3dB(A)
- A-weighted Sound Power: 96dB(A) KPA: 3dB(A)
- Typical Weighted Vibration: 2.3m/s² K=1.5m/s²
Usage Features:
The trimmer is designed for ease of use with several adjustable features:
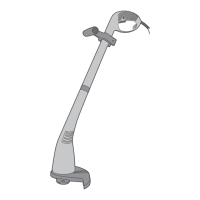
- Switch Lock (1) and On/Off Switch (2): For safe operation, requiring the lock-off button to be pressed before pulling the trigger.
- Front Handle (4) and Handle Knob (5): The front handle can be adjusted to a desired angle for comfortable use.
- Extension Adjust Bolt (6) and Angle Adjust Knob (7): Allows for infinite variation in the length of the grass trimmer and adjustment of the handle to suit individual height.
- Trimmer Head (8) and Guard (9): The guard protects the user from debris during operation.
- Battery (10): The unit is powered by an 18V Ni-Cd battery pack, which is removable for charging.
- Blade (11): A wire cutting blade is fitted for automatically trimming the filament line length.
- Charger (12) and Charger Seat (13): The battery pack is charged by inserting it into the charger seat, which is connected to a transformer.
- LED Indicators (14, 15): A green LED indicates power on (charger ready), and a red LED indicates that the tool is charging.
Starting the Trimmer:
To start, grip the rear handle, press the trigger lock-off button with your thumb, then pull the trigger switch. Before starting, ensure the nylon lines touch or pass over the wire cutting blade. If not, press the button and pull more nylon wire to lengthen. The lengthened line will be automatically cut to size by the wire cutting blade once the trimmer is turned on. During use, the nylon line can be advanced by lightly tapping the spool button on the ground while the unit is running.
Battery Charging:
The battery needs to be charged before first use and whenever power is insufficient. The charger and battery pack are designed to work together; do not use other devices.
- Connect the transformer to the charger base.
- Plug the transformer into an AC power outlet; the green LED (POWER) will light.
- Insert the battery pack into the charger; the red LED (CHARGE) will light.
- A full charge takes approximately 3-5 hours, after which the red LED will turn off.
It is recommended to charge the battery pack at air temperatures between 18-24°C for optimal life and performance. Avoid charging in very low or very high temperatures, direct sunlight, or near heat sources. Do not leave the battery on charge continuously after it is finished, as this may damage the battery cells. Allow at least 15 minutes rest between battery pack charging if charging a second battery pack immediately.
Battery Installation/Removal:
To fit the battery pack, align the raised rib on the battery pack with the groove inside the grass trimmer and ensure the latches snap into place. To remove, locate and depress the latches on the end of the battery pack, then remove it from the trimmer.
Nylon Line Spool Replacement:
- Switch off the trimmer and remove the battery.
- Remove the spool assembly by holding the outer ribbed part, pushing down, and turning the spool head to unlock it.
- Choose to use a replacement spool (Option 1) or rewind the spool using new line (Option 2).
- Rewinding Spool (Option 2): Insert one end of 1.6mm diameter round nylon line into the hole in the spool (about 3 mm). Snugly and evenly wind the line onto the spool in the direction of the arrow until it builds up to the notches in the spool rim (approximately 6.5 m of line). Do not overfill.
- Insert the line through the eyelet in the spool carrier and slide the spool into it.
- Assemble the spool and spool carrier back onto the trimmer, ensuring the spring is inserted. Push the head on and turn it clockwise until it locks.
- Test line advancement by pushing the button with thumbs while pulling the wire with fingers.
Maintenance Features:
- After Use: Remove the battery pack from the trimmer.
- Storage: Store the machine out of reach of children when not in use.
- Replacement Parts: Use only manufacturer-recommended replacement parts and accessories.
- Line Storage: To keep trimmer line in top condition, store spare pre-wound spools or bulk line in a plastic, sealable bag with a tablespoon of water.
- Cleaning: Remove the battery pack. Use only mild soap and a damp cloth to clean the tool. Do not immerse the tool in water, squirt it with a hose, or use a pressure washer. Do not allow any liquid to get inside.
- Line Cutter: The line cutter on the edge of the guard can dull over time. It is recommended to periodically touch-up its sharpness with a file.
- Damaged Parts: Before further use, carefully check the tool for damage, including alignment of moving parts, binding, breakage, and mounting. Do not use if any parts are damaged or defective. Have damaged parts repaired or replaced by an authorized service agent. Never attempt repairs yourself.
- Ventilation Openings: Always ensure ventilation openings are kept clear of debris.
- General Maintenance: Keep tools clean and in good condition for better and safer performance. Follow instructions for maintenance and changing accessories. Keep handles and switches dry, clean, and free from oil and grease.
- Authorized Service: Have your tool repaired by an authorized service agent. Electrical appliances must only be repaired by qualified technicians.
Safety Instructions:
The manual emphasizes general safety instructions, additional safety instructions for batteries and chargers, and specific safety instructions for grass trimmers. Key points include:
- Read all instructions carefully before use.
- Wear safety glasses, gloves, and ear protection. Use a face or dust mask if operations produce dust or flying particles.
- Keep bystanders, children, and pets away (at least 15 feet).
- Do not overreach; maintain proper footing and balance.
- Stay alert and use common sense; do not operate when tired.
- Grip the tool securely.
- Remove adjusting keys and wrenches before operating.
- Disconnect the battery when not in use or when servicing/cleaning.
- Do not expose the tool or charger to water, rain, or high humidity.
- Do not incinerate battery packs; they can explode in a fire.
- Do not store batteries in locations where the temperature exceeds 40°C.
- Do not leave the battery pack in the charger when charging is finished.
- Do not attempt to charge non-rechargeable batteries.
- Never attempt to open the battery pack or charger.
- Avoid short-circuiting battery terminals with rings or other metallic objects.
- Do not touch or try to stop the nylon line when it is rotating.
- Keep hands and feet away from cutting means, especially when switching on the motor.
- Never fit metal cutting elements.
- Do not use the trimmer to cut grass not in contact with the ground (e.g., on walls or rocks).
- Do not cross roads or gravel paths with the trimmer still running.
- Be aware that cutting elements continue to rotate after the motor is switched off.
- This tool may cause hand vibration syndrome if not adequately managed. Help minimize risk by maintaining the tool, using anti-vibration accessories, and planning work schedules.
Environmental Protection:
Waste electrical products and exhausted batteries should not be disposed of with household waste. They should be recycled where facilities exist. Check with local authorities or retailers for recycling advice. Ni-Cd batteries must be recycled or disposed of properly due to cadmium being a toxic material.
Guarantee:
The product is guaranteed against manufacturing defects for 12 months for domestic use only. The guarantee does not cover misuse, abuse, use in contravention of instructions, unauthorized modifications, alterations, or commercial use. In case of a problem within the guarantee period, return the item to an Argos store for a replacement if an inherent defect is present at the time of sale.