EasyManua.ls Logo

Char-Broil 463241414 - User Manual

Char-Broil 463241414
36 pages
Print Icon
To Next Page IconTo Next Page
Loading...
463241414
08/06/13 • G527-001-030801
during assembly, please call 1-888-430-7870.
durante el Ensamblado, llámenos Al 1-888-430-7870
Char-Broil Commercial T-47D
#4984619

Questions and Answers

  • S
    Suzanne LandryAug 14, 2025
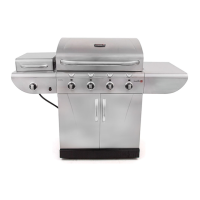
    Why no sparks when pressing ignition button on Char-Broil 463241414 Char-broiler?
    • C
      Christopher HarrisAug 14, 2025
      If no sparks appear at any electrodes when the Electronic Ignition Button is pressed on your Char-Broil Char-broiler, and no noise can be heard from the spark module, it could be due to several reasons: the battery not being installed properly, a dead battery, the button assembly not being installed properly, or a faulty spark module. Ensure the battery is installed correctly, with the “+” and “–” connectors oriented correctly, with “+” on the cap end. If the battery is correctly installed, replace it with a new alkaline battery. If that doesn't work, unscrew the button cap assembly and reinstall it, ensuring the threads are aligned and engaged fully. If the problem persists, replace the spark module assembly.
  • C
    Crystal HardyAug 18, 2025
    Why won't one burner light on my Char-Broil 463241414?
    • T
      Terry KellerAug 18, 2025
      If one burner does not light from other burners on your Char-Broil Char-broiler, it is likely due to grease buildup or food particles in the end(s) of the carryover tube(s). To resolve this, clean the carry-over tube(s) with a wire brush.
  • D
    Derrick HallAug 21, 2025
    Why is my Char-Broil 463241414 flaring up?
    • D
      Dylan RubioAug 21, 2025
      Flare-ups on your Char-Broil Char-broiler are often due to grease buildup, excessive fat in the meat, or cooking at excessively high temperatures. To resolve this, clean the burners and the inside of the grill/firebox. Trim excess fat from meat before grilling, and adjust the cooking temperature to a lower setting.
  • P
    Paula JensenAug 25, 2025
    How to fix sudden drop in gas flow in Char-Broil 463241414?
    • S
      Steven JohnsonAug 25, 2025
      A sudden drop in gas flow or low flame in your Char-Broil Char-broiler can be caused by several factors: being out of gas, the excess flow valve being tripped, or a vapor lock at the coupling nut/LP cylinder connection. First, check if there is gas in the LP cylinder. If that's not the issue, turn off the knobs, wait 30 seconds, and relight the grill. If the flames are still low, turn off the knobs and LP cylinder valve, disconnect the regulator, reconnect it, perform a leak test, turn on the LP cylinder valve, wait 30 seconds, and then light the grill. Alternatively, turn off the knobs and LP cylinder valve, disconnect the coupling nut from the cylinder, reconnect it, and try again.
  • H
    hamiltonchadAug 27, 2025
    What to do if flames blow out on Char-Broil 463241414 Char-broiler?
    • J
      James ReedAug 27, 2025
      If the flames on your Char-Broil Char-broiler are blowing out, it could be due to high or gusting winds, low LP gas, or a tripped excess flow valve. To address this, turn the front of the grill to face the wind or increase the flame height. If that doesn't work, refill the LP cylinder. For issues with the excess flow valve, refer to the troubleshooting steps for a sudden drop in gas flow.
  • W
    wendy66Aug 31, 2025
    How to stop a grease fire in Char-Broil Char-broiler?
    • D
      Danielle MaloneAug 31, 2025
      If you have a persistent grease fire in your Char-Broil Char-broiler, it's likely due to grease being trapped by food buildup around the burner system. To handle this, turn the knobs to the OFF position and turn off the gas at the LP cylinder. Leave the lid in position and let the fire burn out. After the grill cools, remove and clean all parts.
  • G
    Gerald EvansSep 3, 2025
    Why are sparks weak on my Char-Broil 463241414 Char-broiler electrodes?
    • K
      katherine31Sep 3, 2025
      If you observe sparks present but not at all electrodes and/or not at full strength on your Char-Broil Char-broiler, it could be due to several reasons: output lead connections not connected, arcing to the grill away from the burner(s), a weak battery, wet electrodes or cracked or broken electrodes. Remove and reconnect all output connections at the module and electrodes. If sparks are observed other than from burner(s), the wire insulation may be damaged; replace the wires. Replace the battery with a new alkaline battery. Use a paper towel to remove moisture from the electrodes. Replace cracked or broken electrodes.
  • P
    Paul HolmesSep 7, 2025
    What causes flashback in Char-Broil 463241414 burner tubes?
    • S
      Sarah VillarrealSep 7, 2025
      If you're experiencing flashback (fire in burner tube(s)) with your Char-Broil Char-broiler, it's likely because the burner and/or burner tubes are blocked. Turn the knobs to the OFF position and clean the burner and/or burner tubes. Consult the burner cleaning section of the Use and Care instructions for detailed guidance.
  • G
    gregorysmithSep 9, 2025
    What if there are no sparks but noise from module on Char-Broil 463241414?
    • B
      Bonnie CarrSep 10, 2025
      If no sparks appear at any electrodes when the Electronic Ignition Button is pressed on your Char-Broil Char-broiler, but noise can be heard from the spark module, the output lead connections may not be connected. To solve this, remove and reconnect all output connections at the module and electrodes.

Summary

Use and Care

LP Cylinder Removal, Transport and Storage

Procedures for safely removing, transporting, and storing LP cylinders.

LP Cylinder Filling

Guidelines for safely filling LP cylinders at licensed dealers.

LP Cylinder Exchange

Information on exchanging LP cylinders and safety features.

LP Cylinder Leak Test

Instructions for performing a leak test on LP cylinders before use.

Connecting Regulator to the LP Cylinder

Step-by-step guide to connecting the regulator to the LP cylinder.

Leak Testing Valves, Hose and Regulator

Detailed steps for leak testing grill components.

Ignitor Lighting

How to safely light the grill using the electronic ignitor.

Match-Lighting

Instructions for lighting the grill using a match.

Safety Tips

General safety advice for using the grill, including placement and cleaning.

For Safe Use of Your Grill and to Avoid Serious Injury

Critical safety precautions for grill operation and environment.

Sideburner Ignitor Lighting

How to light the sideburner using the ignitor.

Sideburner Match Lighting

How to light the sideburner using a match.

Burner Flame Check

How to check burner flame for proper operation.

Turning Grill Off

Proper procedure to turn off the grill and LP cylinder.

Ignitor Check

How to test the electronic ignitor system.

Valve Check

How to check the functionality of control valves.

Hose Check

How to inspect hoses for damage before each use.

SPIDER ALERT!

Warning about spiders obstructing burners and causing flashbacks.

General Grill Cleaning

Guidelines for cleaning different grill surfaces.

Storing Your Grill

Proper procedures for storing the grill, with or without LP cylinder.

Cleaning the Burner Assembly

Detailed steps for cleaning the burner assembly for optimal performance.

Limited Warranty

Scope of Coverage

Details the parts covered and the duration of the warranty.

Items Manufacturer Will Not Pay For

Lists costs not covered by the limited warranty.

Disclaimer of Implied Warranties and Limitation of Remedies

Legal disclaimers regarding warranties and remedies.

Parts Diagram

Assembly

Step 1: Install Casters

Instructions for attaching casters to the grill base.

Step 2: Attach Side Panels

Instructions for attaching the side panels to the base.

Step 3: Attach Front Panel

Instructions for attaching the front panel to the base assembly.

Step 4: Attach Side Panels to Main Body

Instructions for connecting side panels to the main grill body.

Step 5: Attach Front Panel Components

Instructions for attaching components to the front panel.

Step 6: Install Control Panel Components

Instructions for installing components related to the control panel.

Step 7: Install Warming Rack Support

Instructions for installing the warming rack support structure.

Step 8: Install Side Shelves and Brackets

Instructions for attaching side shelves and their supporting brackets.

Step 9: Install Control Knobs and Fascia

Instructions for mounting control knobs and the front fascia.

Step 10: Connect Gas Tubes and Valves

Instructions for connecting gas tubes and valves to the burners.

Step 11: Attach Side Panels to Top Assembly

Instructions for attaching side panels to the upper grill structure.

Step 12: Install Heat Tents

Instructions for placing heat tents over the burners.

Step 13: Install Ignition System Components

Instructions for wiring the electronic ignition system.

Step 14: Attach Bottom Brackets

Instructions for attaching brackets to the bottom of the grill.

Step 15: Install Internal Shelf

Instructions for installing the internal storage shelf.

Step 16: Attach Doors

Instructions for mounting the grill doors.

Step 17: Install Handle for Doors

Instructions for attaching handles to the grill doors.

Step 18: Install Grates

Instructions for placing the cooking grates onto the grill.

Step 19: Install Infrared Emitters

Instructions for positioning infrared emitters correctly.

Step 20: Install Flavorizer Bars

Instructions for installing flavorizer bars over the burners.

Step 21: Install Warming Rack

Instructions for installing the warming rack.

Step 22: Attach Side Shelves

Instructions for attaching the side shelves to the grill body.

Emergencies

Gas Leaks and Fires

Actions to take in case of gas leaks or fires.

Troubleshooting

Gas Issues

Common gas-related problems and their solutions.

Electrical Issues

Common electrical problems and their solutions.

Electronic Ignition Troubleshooting

Specific troubleshooting for the electronic ignition system.

Sudden Drop in Gas Flow or Low Flame

Causes and solutions for reduced gas flow or flame.

Flames Blow Out

Reasons why flames might extinguish and how to prevent it.

Flare-up

Causes and solutions for sudden flare-ups during cooking.

Persistent Grease Fire

How to manage and prevent persistent grease fires.

Flashback

What to do if fire occurs in burner tubes and causes.

One Burner Does Not Light

Troubleshooting for a single burner not lighting from others.

Emergencies - Gas Leaks

Specific emergency procedures for gas leaks.

Troubleshooting Gas Issues

Detailed solutions for gas flow and ignition problems.

Sudden Gas Flow Reduction

More on causes and solutions for reduced gas flow.

Flames Go Out

Further troubleshooting for flames extinguishing.

Flashbacks

Additional information on flashback causes and prevention.

Troubleshooting - Electronic Ignition

Detailed troubleshooting for electronic ignition sections I, II, and III.

Register Your Product

Online Registration

Instructions for registering the product online.

QR Code Registration

Instructions for registering via QR code scan.

Mail-in Registration

Instructions for registering the product by mail.

Char-Broil 463241414 Specifications

General IconGeneral
BrandChar-Broil
Model Number463241414
Product TypeGas Grill
TypeChar-Broiler
Burners4
Cooking Area280 sq. in.
MaterialStainless Steel
Burner MaterialStainless Steel
Primary Cooking Surface MaterialPorcelain-coated cast iron
Fuel TypeLiquid Propane
Wheels IncludedYes
Side ShelvesYes
Ignition SystemElectronic
WarrantyLimited