Do you have a question about the Checchi & Magli TRIUM and is the answer not in the manual?
Ensure consistent soil preparation with a cultivated depth of 4"-6" for optimal transplanting success.
Use healthy, mature plugs that pull cleanly from the tray and are consistent in size for proper machine operation.
Select the appropriate shoe size that tightly fits your plugs/clones to ensure straight planting.
Set the plant-to-plant sprocket for correct spacing, consulting the drive wheel charts for guidance.
Ensure correct setup of the 3-point linkage, drive wheels, and packing wheel springs for optimal performance.
Adjust carousel timing to ensure plants are kicked out of the shoe immediately upon arrival for straight planting.
Adjust packing wheels' position and notch settings for proper soil contact and furrow closure.
Use the depth gauge to control packing wheel height, ensuring optimal planting depth for various plugs.
Adjust front press wheels to make ground contact and provide necessary soil compaction.
Connect and set water valves for plant hydration and to maintain clean shoes, preventing soil clogging.
Adjust the plastic guillotine to guide plants straight down the throat, preventing them from falling over.
Adjust the spring to balance operator weight on rows, preventing uneven trench depth and ensuring consistent planting.
Perform regular greasing and daily oiling of kicker bearings and springs to ensure peak transplanter performance.
Addresses common problems like stuck plants, soil accumulation, timing issues, and furrow closure.
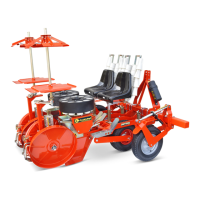
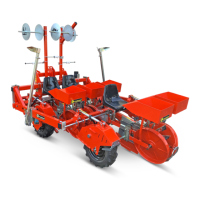
The TRIUM or UniTRIUM Model is a transplanter designed for efficient and precise planting of seedlings, plugs, and clones. It is a world leader in transplanting technology, developed by Checchi & Magli. The manual emphasizes the importance of having a trained C&M EXPERT on the farm to maximize success.
The primary function of the TRIUM or UniTRIUM transplanter is to automate the process of planting seedlings, plugs, or clones into prepared ground. It is designed to ensure consistent plant-to-plant spacing, proper planting depth, and secure packing of the plants in the soil. The machine creates a furrow, deposits the plant, and then closes the furrow while compacting the soil around the plant. It can be adapted for various plant sizes and soil conditions through a series of adjustable settings.
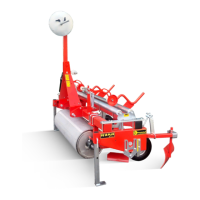
Ground Preparation: Requires well-prepared/tilled ground with a consistent cultivated depth of 4"-6" for optimal performance. An optional "no-till package" is available for non-prepared ground.
Seedling/Plug/Clone Preparation: Critical for success is using healthy, mature plugs that are well-rooted and consistent in size. The plug must pull out of the tray completely and fall straight down the machine's throat into the shoe. The ideal plant size range is approximately 8" to 16" (top to bottom). Plugs must be grown in trays, not SOLO cups. Maximum plug/clone width is 2" on top and 1 3/4" on the bottom.
Shoe Size: A crucial pre-field decision. The machine comes standard with #2 (standard, 14mm bottom size) and #3 (middle, 24mm bottom size) shoes for hemp machines. Other sizes are available: #1 (narrow, 8mm), #4 (medium, 33mm), and #5 (large, 43mm). The correct shoe size ensures the plug fits snugly and is kicked out perfectly straight. A loose plug will not work properly.
In-Row Spacing (Plant-to-Plant): Achieved by setting the correct sprocket on each drive wheel. Charts are provided for UniTRIUM and TRIUM 10 models, showing various plant-to-plant spacings in centimeters and inches, corresponding to different sprocket combinations (A, B, C, D, Z values). For wide spacing, such as for hemp (e.g., 5' plant-to-plant), growers can use every other cup by inserting cup covers. A "15" sprocket under the carousel is used for closer vegetable spacing.
Machine Setup and Adjustment:
Timing (Critical Adjustment): Located on top/center of the carousel. This is perhaps the most important adjustment. It ensures the plant arrives at the bottom of the shoe and is kicked out at the precise moment. If plants are laying on top of the ground or leaning, timing is off. Adjustment involves loosening two nuts, rotating the carousel slightly toward the plus or minus signs, and re-tightening. Speed (approx. 1-2 mph, commonly 1.2 mph for hemp) should be comfortable for operators before adjusting timing. Once set, it's best to start quickly to the set speed.
Packing Wheels:
Plant Depth: Adjusted via the depth gauge, which lowers or raises the packing wheels. A common starting depth for hemp is 5 to 6, depending on plug size. Plants laying on top of the soil are a timing issue, not a depth issue.
Front Press Wheels: Adjusted to touch the ground and provide compaction. A common setting is around 3.
Water System: If equipped, water valves should be hooked up and set correctly. Watering helps clean the shoes and prevents clogging. The factory sets water timing to release when the kicker moves forward. Slight adjustments to 2 bearings may be needed if water consistently misses the plant.
Plastic Guillotine: A clear plastic piece that moves up and down, guiding the plant straight down the throat into the shoe. For tall plants (12"+), slight lowering may be needed. For short plants (4"-10"), lowering it most of the way down helps. It does not go into the soil. When changing shoe size, the guillotine and kicker size also change (included in the new shoe kit).
Operator Weight Adjustment Spring: Less critical. If one row digs a deeper trench, tightening the spring wing nut behind the seat (near the tool bar) can relieve operator weight on that row. For more down pressure on hard ground, the spring can be reversed (rarely utilized).
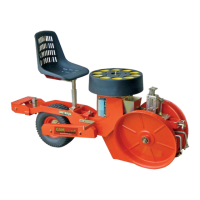
Key components include horizontal tray racks, carousel with cup extenders/reducers, depth gauge, coulter disc, packing wheels, operator weight adjustment spring, tool bar, down pressure spring for packing wheels, press wheels, drive wheels, and support wheels.
| Brand | Checchi & Magli |
|---|---|
| Model | TRIUM |
| Category | Farm Equipment |
| Language | English |