7
12
13
1
•
888
•
557
•
3848
Wards.com
Canning/Preserving Guide (cont’d)
Processing Time
The following chart demonstrates proper processing time for canning one pint of
various foods using your pressure cooker. At up to 2,000 ft. above sea level, the
pressure cooker will produce sufficient pressure and heat to safely process certain
fruits and vegetables for canning.
The pressure cooker has preset menu buttons, as described in a previous section.
Pressing a preset menu button once will automatically program the default cook time.
Each additional push of the preset button will increase the cooking time in one minute
increments. The chart below shows you which preset button to use and how many
additional pushes of the button are needed to achieve proper cooking time.
Food Type of
Canning
Preset Menu
Button
Additional Number
of
Button Pushes
Asparagus Hot & Raw Soup/Stew 0
Beans (green) Hot & Raw Meat/Poultry 0
Beans (lima, pinto, but-
ter or soy) Hot & Raw Beans/Potatoes 5
Beets Hot Soup/Stew 0
Carrots Hot & Raw Meat/Poultry 5
Corn, whole-kernel Hot & Raw Beans/Potatoes 20
Greens Hot Beans/Potatoes 35
Mushrooms Hot Beans/Potatoes 10
Okra Hot Meat/Poultry 5
Peas, green or english Hot & Raw Pork/Ribs 5
Peppers, hot or sweet Hot Beans/Potatoes 0
Potatoes, sweet Hot Beans/Potatoes 30
Potatoes, white Hot Beans/Potatoes 0
Pumpkin Hot Beans/Potatoes 20
Meat strips, cubes or
chunks Hot & Raw Beans/Potatoes 40
Ground or chopped meat Hot & Raw Beans/Potatoes 40
Poultry, without bones Hot & Raw Beans/Potatoes 40
Poultry, with bones Hot & Raw Beans/Potatoes 30
Canning/Preserving Guide (cont’d)
Getting Started
Your pressure cooker is designed to accommodate 5 (8-oz.) wide mouth (jelly) jars
per canning session. It’s suggested that you use jars with self-sealing lids.
Cleaning the Jars
Always wash empty jars in hot water according to manufacturer’s instructions. Rinse
thoroughly. Scale or hard-water films on jars are easily removed by soaking jars
several hours in a solution of 1 cup of vinegar (5% acidity) per gallon of water.
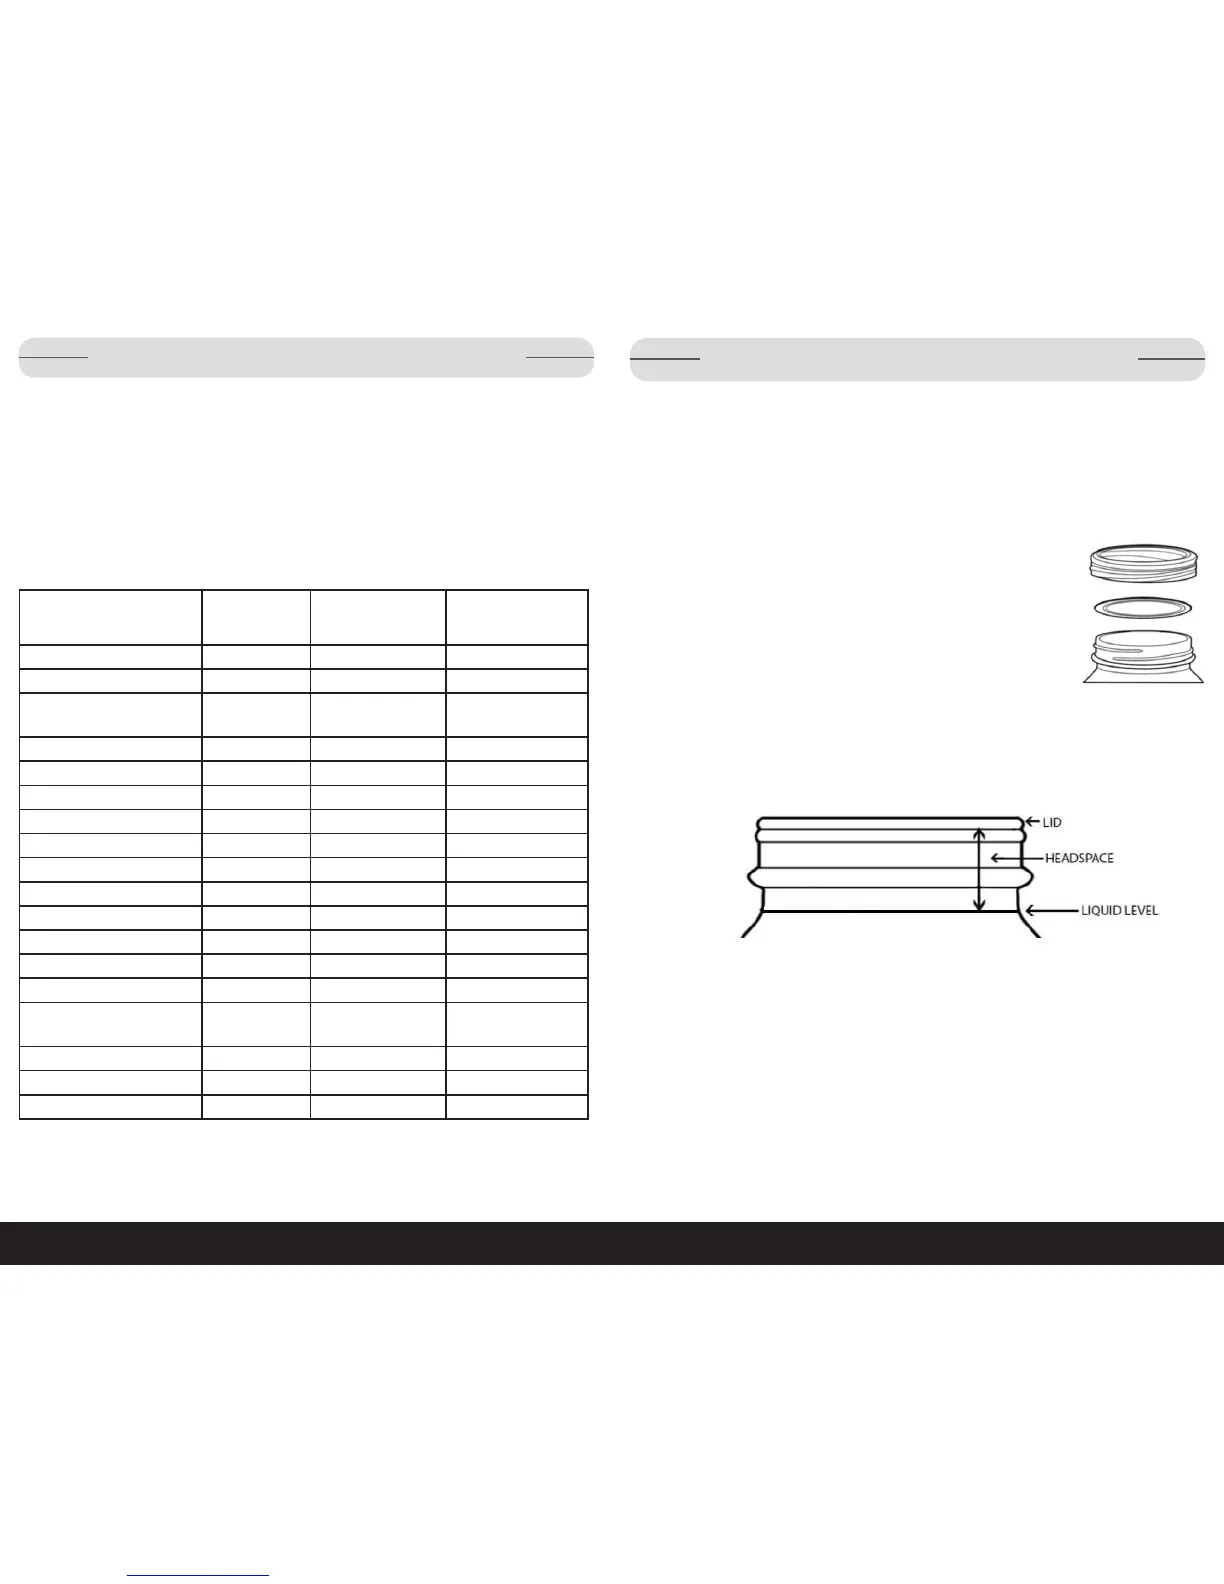
Preparing the Lids
The self-sealing lid (Fig. A) consists of a flat metal lid
held in place during processing by a metal screw band
(Fig. B). When jars are processed, the lid gasket softens
to form an airtight seal with the jar. To ensure a good
seal, carefully follow the manufacturer’s directions in pre-
paring lids for use. Examine all metal lids carefully. Do
not use old, dented or deformed lids, or lids with gaps
or other defects in the sealing gasket.
Fig. B
Fig. A
The Canning Process
1. To begin, select a pre-tested pressure canning recipe.
Though ingredients may vary, generally you will be processing the food as dem-
onstrated in this guide. Choosing only the freshest ingredients, prepare food as
instructed. Vegetables and fruits should be at peak of fresh picked ripeness.
2. Fill clean canning jars to the level shown in Fig. C. Liquid should not exceed the
level shown in Fig. C, to allow for 1-inch of headspace at the top of the jars.
Fig. C
3. Use a thin utensil to release any trapped air between the food and the jar by
pressing food firmly to the sides to dislodge air bubbles.
4. Place a clean lid on top of the jar and then add a screw band. Turn clockwise
and hand tighten in place.
NOTES:
• Never retighten lids after processing jars. As jars cool, the contents contract, pulling
the self-sealing lid firmly against the jar to form a high vacuum.
• If screw bands are too loose, liquid may escape from jars during processing and
seals may fail.
• If screw bands are too tight, air cannot vent during processing and food will
discolor during storage. Over tightening also may cause lids to buckle and jars to
break, especially with raw-packed, pressure processed food. Screw bands are not
needed on stored jars. They should be removed after jars are cooled.
• When removed, washed, dried and stored, screw bands may be used many
times. If left on stored jars, they become difficult to remove, often rust and may
not work properly again.
 Loading...