Do you have a question about the Chicago Electric 61969 and is the answer not in the manual?
Defines the danger symbol and its consequence, indicating potential death or serious injury.
Defines the warning symbol and its consequence, indicating potential death or serious injury.
Defines the caution symbol and its consequence, indicating potential minor or moderate injury.
Defines notice caution for practices not related to personal injury.
Provides essential safety precautions for operating the tool, covering guards, work area, and apparel.
Explains how polarized plugs and outlets work for double insulated tools to prevent electric shock.
Lists critical safety actions before operating the miter saw, including guards and adjustments.
Details safety requirements for blades and guards during operation, including usage and inspection.
Covers safe practices for handling materials and workpieces, including support and securing.
Provides guidelines to minimize risks from tool vibration exposure, including health checks and work practices.
Details electrical rating, motor speed, accessory size, arbor size, and cutting capacities of the saw.
Warns about radiation exposure from controls and increased eye hazard with optical instruments.
Guides through assembling table extensions and dust collection bag for the miter saw.
Provides instructions for securely mounting the miter saw to a stable support.
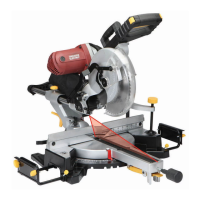
Identifies and labels key components and controls of the miter saw for user familiarization.
Explains how to lock and unlock the cutting head using the alignment pin and grooves.
Details the automatic guard operation and how to use the slide lock knob for chopping cuts.
Guides on preparing the tool and the procedure for safely replacing the saw blade.
Details how to use table extensions to provide wider support for workpieces during cutting.
Explains procedures for setting the miter and bevel angles for precise cuts.
Guides on adjusting the depth stop bolt to control cut depth for kerfing or rabbet cuts.
Provides guidance on setting up a clean, well-lit work area and securing workpieces safely.
Covers essential checks before cutting, including knob tightness, debris removal, and mark alignment.
Details techniques for making cuts on narrow and wide materials, including trigger and head movement.
Explains actions after cutting, including stopping the blade, releasing workpiece, and tool storage.
Outlines daily checks for tool condition, loose hardware, and general maintenance procedures.
Provides steps to check and adjust the fence to be perpendicular to the saw blade for accurate cuts.
Details how to check and adjust the miter table angle indicator for accurate readings.
Explains how to ensure the saw blade is vertical and calibrate the bevel angle stops.
Guides on adjusting or replacing the kerf board for proper blade clearance and support.
Addresses common problems like the tool not starting or operating sporadically with low power.
Helps diagnose issues like wood burning, material fraying, binding, or incomplete cuts.
Provides a comprehensive list of all parts with their corresponding numbers and quantities.
Illustrates the assembly of the miter saw with numbered parts for reference.
Details the 90-day warranty, exclusions, limitations, and procedures for claims.
| Blade Size | 10 inches |
|---|---|
| Amperage | 15 amps |
| Maximum RPM | 5000 RPM |
| Blade Diameter | 10 inches |
| No Load Speed | 5000 RPM |
| Bevel Range | 0 - 45 degrees |
| Dust Collection | Yes |
| Arbor Size | 5/8 inch |
| Motor | 15 amp |