EasyManua.ls Logo

Chicago Electric 64056 User Manual

Chicago Electric 64056
12 pages
To Next Page IconTo Next Page
Page #1 background imageLoading...
Page #1 background image
!"#"$%&'(%)*+#"$*%,$-%.$$/-00)))1.,(+&(2(*"3.$14&5
65,"7%&'(%$*4.8"4,7%#'//&($%,$-%/(&9'4$#'//&($:.,(+&(2(*"3.$14&5
;<=>;
Owners Manual & Safety Instructions
Save This Manual Keep this manual for the safety warnings and precautions, assembly,
operating, inspection, maintenance and cleaning procedures. Write the product’s serial number in the
back of the manual near the assembly diagram (or month and year of purchase if product has no number).
Keep this manual and the receipt in a safe and dry place for future reference. 18i
When unpacking, make sure that the product is intact
and undamaged. If any parts are missing or broken,
please call 1-888-866-5797 as soon as possible.
Copyright
©
2017 by Harbor Freight Tools
®
. All rights reserved.
No portion of this manual or any artwork contained herein may be reproduced in
any shape or form without the express written consent of Harbor Freight Tools.
Diagrams within this manual may not be drawn proportionally. Due to continuing
improvements, actual product may differ slightly from the product described herein.
Tools required for assembly and service may not be included.
Read this material before using this product.
Failure to do so can result in serious injury.
SAVE THIS MANUAL.
Question and Answer IconNeed help?

Do you have a question about the Chicago Electric 64056 and is the answer not in the manual?

Chicago Electric 64056 Specifications

General IconGeneral
BrandChicago Electric
Model64056
CategorySoldering Gun
LanguageEnglish

Summary

Warning Symbols and Definitions

DANGER Symbol

Indicates a hazardous situation resulting in death or serious injury.

WARNING Symbol

Indicates a hazardous situation resulting in death or serious injury.

CAUTION Symbol

Indicates a hazardous situation resulting in minor or moderate injury.

NOTICE CAUTION Symbol

Addresses practices not related to personal injury.

Important Safety Information

General Power Tool Safety

Read all safety warnings and instructions for future reference.

Work Area Safety Practices

Keep work area clean, well-lit, and free of hazards.

Electrical Safety

Electrical Connection Safety

Proper plug matching, grounding, and GFCI use reduce shock risk.

Personal Safety

Operator Awareness and Attire

Stay alert, use PPE, dress properly, and maintain balance for safe operation.

Tool Handling Precautions

Prevent unintentional starting and ensure proper tool control.

Power Tool Use and Care

Tool Application and Maintenance

Use the correct tool, maintain it, and follow instructions for safe operation.

Service

Qualified Repair and Servicing

Ensure tool is serviced by qualified technicians using identical parts.

Specific Safety Rules

Handling and Burn Prevention

Avoid burns; do not point gun at self/others, keep heated parts away from flammables.

Electrical and Fume Safety

De-energize circuits, ensure ventilation, and be aware of fume exposure risks.

General Tool Usage Precautions

Do not open tool, keep away from children, maintain labels, do not leave unattended.

Grounding

Preventing Electric Shock

Ensure proper grounding and consult electrician if in doubt.

Double Insulated Tools

Two Prong Plugs

Understand polarized plugs and outlets for two-prong tools.

Extension Cords

Extension Cord Selection

Use correct gauge and type of extension cord based on distance and load.

Extension Cord Usage

Ensure cords are properly wired, in good condition, and protected from damage.

Symbology

Electrical Symbols

Explains Double Insulated, Volts, Alternating Current, Amperes, RPM symbols.

Safety Symbols

Explains warning symbols for Eye Injury, Fire Risk, and Electric Shock.

Specifications

Electrical and Temperature Ratings

Lists Electrical Rating (120VAC/60Hz/100W) and Max Temperature (1000°F).

Setup - Before Use

Components and Controls

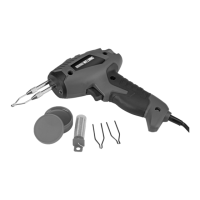
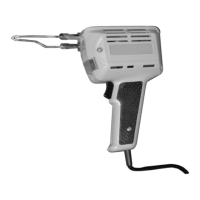
Identifies key parts like Soldering Tip, Trigger, Handle, LED, Flux, Solder, etc.

Operating Instructions

Tool Set Up

Ensure trigger is off and tool is unplugged before setup.

Workpiece and Work Area Set Up

Designate clean, well-lit area; secure workpieces; route cord safely.

General Operating Procedures

Set gun on workbench, plug in, heat tip, apply solder flux, and solder joint.

Maintenance and Servicing

Inspection Before Use

Inspect tool for loose hardware, damage, or conditions affecting safe operation.

Cleaning After Use

Coat tip with solder after use and wipe clean for readiness.

Soldering Tip Replacement

Loosen nuts, remove old tip, install new tip, tighten nuts carefully.

Supply Cord Damage

Damaged supply cords must be replaced only by a qualified service technician.

Parts List and Diagram

Parts List

Lists all parts with their descriptions and quantities.

Assembly Diagram

Visual representation of how the parts assemble.

Limited 90 Day Warranty

Warranty Coverage

Product is warranted against defects in materials and workmanship for 90 days.

Warranty Exclusions

Warranty does not apply to damage from misuse, abuse, accidents, or lack of maintenance.

Claiming Warranty Service

Return product with proof of purchase and complaint explanation for inspection.

Related product manuals