13
• WARNING:Checkthatthespacein
whichchairwillbeusedisfreeofob-
jects or furniture that may obstruct
orcompromisethecorrectuse.
•Do not let your child stand up on
thechairtoavoidtheriskoffalling.
•Donotallowmorethanonechildat
atimetositonthechairsoasnotto
compromiseitsstability.
•This chair is intended solely for
householduseandondrysurfaces.
•Do not make any modifications:
any modification may prejudice
itssafety.
•Prolonged exposure to direct sun-
light can cause the fabric to fade.
After prolonged exposure to high
temperatures, wait a few minutes
beforeusingtheproduct.
•Nevermovethechairwhilethechild
isseatedonit.
REMOVING THE RESTRAINT SYSTEMS
•Passthewaistbeltthroughtheholesinthebackrest(Fig.22)and
thenthroughtheD-shapedringsbehindthebackrest.Keepthe
beltoutofreachofchildren.
•PassthecrotchstrapintherelevantholeR(Fig.23)intheseatand
placeitintherelevantpocket,asshowninFig.24.
Ifyouneedtottherestraintsystemsagain(tousetheproductasa
reclinedcradle),repeatthesestepsinreverseorder.
Ifnecessary,adjustthebeltsdependingonyourchild’ssize.
WARRANTY
Theproductisguaranteedagainstanyconformitydefectinnormal
conditionsofuseasprovidedforbytheinstructionsforuse.Thewar-
rantyshallnotthereforeapplyinthecaseofdamagescausedbyim-
properuse,wearoraccidentalevents.Forthedurationofwarrantyon
conformitydefectspleaserefertothespecicprovisionsofnational
lawsapplicableinthecountryofpurchase,whereprovided.
safetyharness(Fig.12).
BOOSTER CUSHION
10.ThereducercushionD-DDisidealfrombirthandcanbere-
movedaccordingtoneeds.Toxittotheseat,placeitonthe
seatandslidethecrotchstrapthroughthehole(Fig.13).Thread
thesafetyharnessintherelativesideslotsofthereducercushion
(Fig.13a).
PositiontheheadrestDD at thedesiredheight; itcanbe chosen
withinthreedierentheights; x theheadresttotheseat,sliding
thestrapsthroughtheslotandcloseitagainusingthevelcrostrap
(Fig.14).
TOYBAR
11.Fasten the toybar(E)totheframeinsertingthelowerendsin
therelevantfasteningholesofthebarsupport(Fig.15).WARN-
ING!Always check thatthe toybarisproperly fastenedbefore
everyuse.
12.Thetoyscanbexedtothetoybarinsertingtheupperendsinthe
relevantholesinthefabricbar(Fig.16).Adierentfasteningpoint
canbechosenforeachtoy.Thetoyscanalsobeinsertedinthetwo
sliderrings“F”onthearcsofthetoybar(Fig.17):theSlideLinesystem
letsyouslidethetoysalongthearcandtochangetheplayscenarios
wheneveryouwant.
HOW TO REMOVE THE FABRIC COVER
Itispossibletoremovetheseatcoverandtheboostercushionfromthe
reclinedcradletowashthem.
13.Removetheboostercushion(Fig.18).
14.Removethesafetyharnessfromtheslotsinthefabricandstart
toremovethecoverfromthe front.Release the 4clickbuttons
Qatthesideunderthemetaltubes(Fig.19),removetheVelcro
strapunderit(Fig.20and20A),thentakeothefabricthrough
theentireframepayingattention not todamageit.Toretthe
cover,proceedinreverseorder,makingsurethatthelowerfabric
strapgoesthroughtheadjustmentjointsofthebackrest(Fig.21)
andthetoybarsupports.
*Thetheme ofthe detachabletoys variesdepending on these-
lectedset.
10/12 M, up to 18 Kg
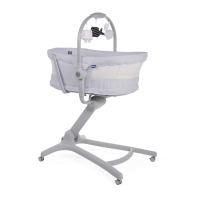
(CHAIR USE)
•Age range intended for use: from
when your child starts walking and
isabletositdownandstandupby
himself (about 10/12 months, max.
18kg).
• WARNING:Beforeusingasachair,
remove the safety harness (crotch
strap and waist belt) and position
themintherelevantspaces.
• WARNING: Never leave the child
unattended.
•Placeonlyonatandstablesurfaces.
•Donotusetheproductasachairin
rockermode.
•Thedimensionsoftheproductare
80x43x32/62cm.
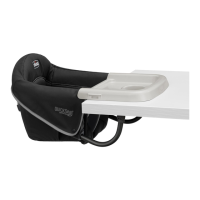
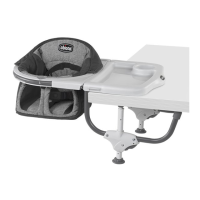
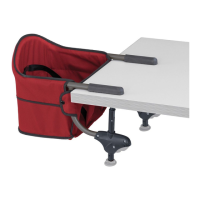
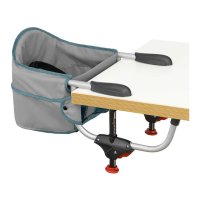
B-Feet
B1-Non-sliprubber
B2-Open/closebuttons
C-Seat
D-Boostercushion
DD-Headrest
E-Toybar
F-Sliderring
G-Toys*
H-Toybarcouplingholes
I-Fabrichandles
L-Safetyharness
M-Buckles
N-Clips
O-Ringfortheadjustmentofthesafetyharness
P-Recliningbutton
Q-Clickbuttons
R-Seatbuttonhole
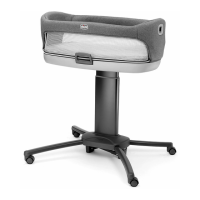
ASSEMBLY
Thereclinedcradlecomesalreadyassembled.Touseit,thefollow-
ingoperationsmustbeperformed:
1.Toopenthereclinedcradlepull theseatupward(Fig.1),when
youhearitclick,itmeanstheproductiscorrectlyopened.Make
surethatbothsidesofthereclinedcradleareproperlyopen.
2.Fastenthetoybaronbothsidesbyttingthelowerendsofthe
barintotherelevantcouplingholes(Fig.2).
Atthispointyoucanchoosethepositionyouprefer.
HOW TO ADJUST THE BACKREST
3.Toadjustthebackrestfromahigherpositiontoamoreinclined
one, take the two side buttons(Fig.3) and pull them upward,
keepingthempresseddown;choosethedesiredrecliningwithin
the4availablepositions.Thisoperationmayalsobecarriedout
withthechildsittinginthereclinedcradle.Inthiscaseitcanbe
moredicult.
WARNING:Alwaysguidethebackrestwiththengerswhenadjust-
ingthereclining.
Tomovefromthehighestinclinedpositiontoalowerinclination,
justpullthebackrestupward(Fig.4-5).
WARNING:Alwayscheckthatthebackrestisproperlylockedbeforeuse.
The reclined cradle is equipped with transport handles made of
fabric.
WARNING:Thetransporthandles(I),whennotused,shallbexedon
thebackofthebackrestwiththevelcroribbons.
FIXED OR ROCKING MODE
4.Thereclinedcradlecanbeusedinxedorrockingmode:
•Fixedmode:turnthefrontfeet(B)clockwiseuntilthelowerpartof
thefoottouchestheground(Fig.6);
•Rockingmode:turnthefrontfeet(B)intheoppositedirection(coun-
ter-clockwise),sothatthefootisnottouchingtheground(Fig.7).
HOW TO CLOSE THE CHAIR
5.Thereclinedcradlecanbeclosedfortransport.
WARNING:Thereclinedcradlemustneverbeclosedwiththechild
sittinginit.Removethechildfromthereclinedcradlebeforeclos-
ingtheframe!
6.Toclosethereclinedcradle,pressthe2buttonsinsidethefront
feet(Fig.8)simultaneously.
7.Toopenthereclinedcradleagain,justpulltheseatupward(Fig.9)
untilyouhearaclickthatindicatesthecorrectopening.
USING THE SAFETY HARNESS
8.Thesafetyharnessispre-ttedandreadyforusethersttimeyou
usethereclinedcradle(Fig.10).
Toreleaseit,pressthetoothedendsoftheclaspandremovethetwo
clasps(Fig.11).Thebouncerisreadyforthechild.
WARNING:Whenusing,alwaysremembertofastenthebeltbypass-
ingitaroundthecrotchstrapandcheckitistightenoughandin
therightposition.
Itispossibletoalterthetightnessofthebeltbyadjustingitandpass-
ingthefabricaroundthebackofthebackrest.
9.Keep one clasp end blocked and simultaneously pull the belt
andslideitinsidetherelativering(O),toadjustthetensionofthe

 Loading...