16
F. Mattresses with removable covering (x2)
ASSEMBLY OF THE CRIB
1. Assemble the feet “B” by inserting them in the appropri-
ate leg supports “A”, pressing the metal pins on the sup-
ports, until a fastening click is heard (Fig. 1).
2. Hold the bottom support “A” and insert the lower bar “C” in
the appropriate slot “A4” (Fig. 2), pushing the metal pin un-
til you hear the fastening click. Repeat the same operation
for both feet (Fig. 3).
3. Take hold of the connectors for the lower base “D4” and
rotate them by 90° (Fig. 4).
4. Insert the base of the crib “D5” in the appropriate connec-
tors, pushing the metal pins until you hear the fastening
click (Fig. 5).
5. Rotate the upper arms “D6” by 90° (Fig. 6) and insert the
upper tube “D7” in the appropriate slots pushing the
metal pins until you hear the fastening click (Fig. 7).
6. Insert the central partition “D8” into the appropriate con-
nectors “D5.3” making sure that it locks in correctly (Fig.
8).
7. Fit the fabric “D1” onto the frame, inserting the fabric but-
tonholes into the fasteners on the frame of the legs “D2”
(Fig. 9 and 10).
8. Connect the frame of the crib “D” to the legs “A” inserting
the fasteners “D2” into the housing “A5” found on each
leg (Fig. 11). Be careful to position the structure “D” so that
the front drop panel faces in the same direction as the
foldable feet.
To carry out this operation be sure that the crib height is
set to level 1. To adjust the height refer to the subsequent
paragraph (ADJUSTING THE CRIB HEIGHT).
9. Close the zip fastener that runs along the top perimeter
“D1.2” (Fig. 12).
10. Fasten the buttons located in the upper anterior corners
(Fig. 13) and in the front areas of the oor of the crib
“D1.4” (Fig. 14) and fasten the rear straps “D1.5” (Fig. 15).
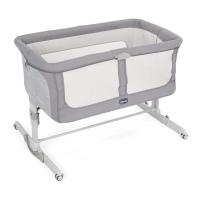
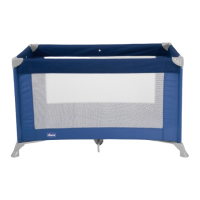
11. Insert the 2 mattresses “F” inside the structure “D” (Fig. 16).
The crib is now ready to be used.
ADJUSTING THE CRIB HEIGHT
The height of the crib can be adjusted in 11 dierent po-
sitions. To adjust the height, press the buttons "A1" on the
leg support "A" and lift or lower the structure "D" to the
desired position (Fig.17). Release after hearing the click.
WARNING: The crib's 2 legs must always be set at the
same height.
SIDE SLEEPING CONFIGURATION (FASTENING THE
CRIB TO THE BED)
The crib can be fastened to the parents' bed (side sleeping
conguration).
WARNING - IMPORTANT FOR THE SAFETY OF YOUR
CHILDREN: This conguration is allowed only with beds
that allow compliance with all the conditions described
in this paragraph. In particular, the lowered side of the
crib must always be positioned against the mattress of
the parents’ bed and the top of the parents’ mattress must
be aligned with (or at most higher than) the height of the
open side of the crib (g.18A-18B). Moreover, the crib must
be fastened to the structure of the adult bed or to the mat-
tress support (mesh or slat sprung base).
WARNING: Check that the structure of the crib in side
sleeping conguration does not interfere with the parents’
bed.
WARNING: During use, make sure that the bedsheets,
blankets, etc. do not interfere with the crib’s space.
WARNING: Check that the size of your bed is compatible
with the straps provided. If the straps are too short for prop-
er installation, an additional set of straps can be purchased
and attached to the ones that were provided with the
product to lengthen them.
12. Lower the side of the crib by pushing button "D3" and
accompanying the side until it reaches the end of its
travel (Fig.19).
WARNING: Use the crib with the side lowered only in side
sleeping mode.
13. Put the crib against the parents’ bed and check its
height compared to the parents’ mattress.
WARNING: The top of the parents’ mattress must be higher
than or the same as that of the side of the crib. If this is not
the case, use the adjustment system to achieve this condi-
tion on both sides.
WARNING: In side sleeping conguration, the 2 leg sup-
ports of the crib must be set at the same height
14. To fasten the crib to the parents’ bed (co-sleeping con-
guration), use the pair of supplied straps “E”.
15. Connect the grey prong “E1” to the buckle located in the
rear part of the oor of the crib “D5.1” (Fig. 20)
16. Then run the straps around the frame of the parent's bed
from the top down (Fig. 21) and fasten the red prong “E3”
to the red buckle “E2” forming a noose (Fig. 22). Make
sure to repeat the step on both sides. To make installation
easy, when fastening the buckles, always keep the crib
slightly away from the parents’ bed.
17. At this point put the crib against the parents’ bed and
tighten the noose pulling the straps (g.23). Carry out
this step rst on one side and then on the other, ad-
justing the straps until the crib is in contact with the
parents’ mattress.
WARNING: Before use, always make sure that there is no
space between the parents’ mattress and crib’s side. Other-
wise adjust the straps pulling them until the required con-
dition is restored. Make sure that the side is always free to
be lowered and raised completely.
18. If, when fastening the crib to the parents’ bed, the feet
of the crib do not t under the parents’ bed, the crib can
be fastened to the bed anyway by following the instruc-
tions above with the added step of folding the feet “A9”
when pressing the crib up against the bed. To fold the
feet simply press on the appropriate button and rotate
the foot 90° up to the point necessary (Fig. 24).
19. To close the side, simply lift it upwards, holding it from
the centre (Fig.25). Always make sure that it is engaged
correctly.
WARNING: Whenever the side is lowered, make sure that
the position compared to the parents’ mattress has not
changed from that illustrated in the paragraphs above.
WARNING: Use the product with beds and/or mattresses
with straight sides only. Do not use the product with round
beds and/or mattresses or water mattresses. To be used
with this product, the parents' bed must have a slatted or
mesh frame.
WARNING: When the product is used in co-sleeping con-
guration (fastened to the bed), it must always be mounted
on the long side of the bed. DO NOT install the product at
 Loading...