Do you have a question about the Chr. Hansen MilkSafe Fast and is the answer not in the manual?
Specifies the purpose of the MilkSafe® Desktop Reader Connect for interpreting antibiotic and aflatoxin tests in milk.
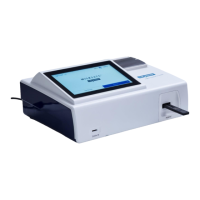
Lists all components provided with the MilkSafe® Desktop Reader Connect package.
Details the warranty coverage, duration, and limitations for the MilkSafe® Desktop Reader Connect.
Guides the user through the process of running a selected test type on the reader.
Allows viewing, managing, and annotating previous test results on the reader.
Enables configuration of reader language, test types, connectivity, and other preferences.
Defines the ideal placement for the reader to avoid external interference and ensure usability.
Specifies the recommended temperature and humidity ranges for optimal reader performance.
Details the required voltage and frequency for powering the MilkSafe® Desktop Reader Connect.
Provides step-by-step instructions for unpacking and initially configuring the reader.
Describes the power, battery life, and specifications of the handheld scanner accessory.
Explains the procedure for scanning QR codes and barcodes with the handheld scanner.
Details how to recharge the battery of the handheld scanner using a USB power cord.
Explains how to access and configure advanced reader settings via password and menus.
Details exporting test results via USB stick from a stand-alone reader.
Explains real-time data transfer to local systems via serial cable, including setup details.
Describes automatic data export to Milksafe™ Cloud for test records and future results.
Instructions for updating the reader software using a USB drive.
Explains how to initiate software updates from Milksafe™ Cloud.
Step-by-step guide to performing and reading qualitative and quantitative tests using strips.
Procedure for performing and reading tests using Milksafe™ FAST cassettes.
Outlines the process for confirming initial positive or weak-positive test results.
Explains how to determine the final test result based on the confirmation flow outcomes.
How to access and navigate through stored test results on the reader.
Instructions for exporting test results in CSV or Excel format.
How to add comments to results and print detailed test information.
Setting the frequency or manually initiating reader verification tests.
Steps to perform a verification test using the supplied thermometer and standard strips.
Guidelines for routine cleaning of the reader using dry or alcohol-moistened cloths.
Procedure for cleaning the reader after milk spillage, emphasizing safety precautions.
The MilkSafe® Desktop Reader Connect, referred to as "the Reader," is a sophisticated instrument designed for the digital interpretation of MilkSafe® Rapid Tests, specifically for detecting antibiotic residues and aflatoxins in milk. This device streamlines the testing process, offering both standard and advanced functionalities to ensure accurate and reliable results in a laboratory or milk reception setting.
The primary function of the Reader is to digitally interpret MilkSafe® Rapid Tests. It guides the user through the testing process, from selecting the test type to displaying the final result. The Reader is compatible with both strip-based and cassette-based tests, allowing for flexible testing workflows. For strip tests, it performs simple end-point readings, while for MilkSafe™ FAST tests, it integrates incubation and reading into a combined flow.
The device features a user-friendly interface with a "Run Test" button that presents a list of activated test types. Once a test type is selected, the Reader provides step-by-step instructions. It automatically saves test results and, if connected to the MilkSafe™ Cloud, synchronizes them for easy access and management. In cases of positive test results, the Reader initiates a confirmation flow to ensure the validity of the initial finding, annotating a group of test results to form a conclusive outcome (Original, 1st confirmation, and 2nd confirmation).
The Reader also includes a "Test Records" section where users can view previous test results, each displayed with the date, test type, result, sample ID, and any annotations. This feature allows for comprehensive record-keeping and easy retrieval of historical data.
For enhanced functionality, the Reader can be connected to the MilkSafe™ Cloud, LIMS (Laboratory Information Management System), or PLC (Programmable Logic Controller) for real-time data transfer. This connectivity enables automatic software updates, download of the latest test types, and synchronized account settings. The device also supports manual data export via USB, offering flexibility for various operational environments.
Setting up the Reader involves unpacking the device and its accessories, which include a handheld scanner, USB stick, power cable, digital thermometer, test cartridge, verification strips, thermal printer paper, and a Serial to USB cable. The Reader should be placed on a stable, level surface with adequate surrounding space for easy insertion of test strips/cassettes and unplugging.
Upon powering on, the user selects a preferred language. The Reader can then be connected to the internet via cable or Wi-Fi to access software updates and test types. For MilkSafe™ Cloud integration, users log in with administrator-provided credentials, allowing the Reader to synchronize with account settings. The device also offers options to enable or disable printing of test results and commenting on them.
The handheld scanner, powered by a lithium battery with an estimated 18-hour battery life, is used for scanning QR codes on MilkSafe™ FAST tests, as well as other QR or barcodes for recording test-related information and operator identification. The scanner connects via a USB stick inserted into the Reader's back port. It indicates readiness with a constant blue light and beeps upon successful scanning. The scanner enters sleep mode after 60 seconds of inactivity to conserve battery. Charging is done via a USB power cord, and the scanner can be used while recharging.
For advanced functionalities, the Reader's settings can be accessed with a password (CH123456). Here, users can manually enable new test types, configure mandatory QR code scanning for MilkSafe™ FAST tests, enable automatic data transfer via serial cable for LIMS integration, log in to MilkSafe™ Cloud, and define the interval between verification tests.
When performing a test, the Reader takes approximately 5-7 minutes to reach the desired temperature of 50 degrees Celsius. Users select "Run Test" and the preferred test type. For quantitative tests like MilkSafe Afla M1, the required standard curve must be loaded using the supplied data chip. Operator ID and test-related information are entered, often with the aid of the handheld scanner.
For strip tests, the test strip is inserted into the standard cartridge, which is then fully inserted into the Reader housing, followed by pressing "Start Test." For MilkSafe™ FAST cassette tests, the cassette is inserted, and "Read only" is pressed. The Reader automatically interprets the result and displays it on the screen. Results are interpreted based on line ratios: Ratio <0.9 indicates Positive, Ratio 0.9-1.1 indicates Weak Positive, and Ratio >1.1 indicates Negative. Positive control samples can be marked as such to differentiate them from regular test records.
For incubating and reading cassette tests (MilkSafe™ FAST), if QR code scanning is enabled, the unique QR code on the cassette is scanned using the handheld scanner. After pipetting milk into the cassette and inserting it into the Reader, "Incubate and Read" is selected. The Reader automatically starts incubation and interprets the result after the defined incubation time.
A crucial feature is the confirmation flow, initiated when a test result is positive or weak-positive (ratio <1.1). This involves re-reading the same strip/cassette to eliminate false positives due to positioning issues. If the re-read remains positive, a new test is run as a "Run confirmation test," followed by a "Run second confirmation test" to complete the flow and determine the overall conclusive result.
The Reader also supports software updates, which can be performed manually via USB or automatically through the MilkSafe™ Cloud. This ensures the device always has the newest features and test types.
Regular cleaning of the Reader is essential for its optimal performance and longevity. It is recommended to clean the device regularly, especially if used in dusty or contaminated environments. A dry cloth can be used for general cleaning. For persistent contamination, a cloth moisturized with pure alcohol (isopropanol or ethanol) is suitable. Aggressive cleaning agents like acetone should be avoided as they can damage the Reader's surface.
In the event of milk spillage, it is critical to turn off the power and remove the power cord before cleaning to prevent short-circuits and electric shock hazards. A 75% alcohol or ethanol cotton pad/swab should be used. Strong bleach is not recommended as it can damage the housing and touch screen. The outside of the instrument should be gently wiped, taking care to avoid the edges of the display to prevent alcohol/ethanol from infiltrating and causing display faults.
For thorough cleaning of the cassette slot, the outer protection should be removed by pulling downwards. It is important not to pull outwards, as this can break the clamps on the upper backside. After cleaning, any milk residues visible on the lens should be gently cleaned with a similar cotton swab and 75% alcohol or ethanol. The lens should then be wiped with a clean, dry cloth. After cleaning the cassette slot, a verification flow should be run to confirm that the reader returns normal values.
The Reader's health and measurement accuracy are routinely verified through verification tests. A notification to perform a verification test automatically displays after every 500 tests. Users can set a specific interval between verification tests or manually initiate one via the "Settings" menu. The verification procedure requires the supplied thermometer and standard strips. The user must ensure the temperature is stabilized on the Reader and external thermometer before entering the displayed temperature. The standard test corresponding to the regular test performed on the reader (e.g., MilkSafe FAST 3BTC) is selected, and "Start test" is pressed. The verification may fail if the measured temperature deviates by more than 2 degrees Celsius from the defined temperature or if the verification reading falls outside the ratio interval of 0.9-1.1.
In case of any issues with the optical module (lens) indicated by a mistake, a verification test should be run to check the calibration of the reader. For service and repairs, any issues beyond regular verification protocols or external device exchanges (e.g., handheld scanner) should be reported to a local Chr. Hansen representative. Attempts to open or repair the Reader by unauthorized personnel will void the warranty.
| Storage | 2-8°C |
|---|---|
| Target antibiotics | Beta-lactams |
| Sample type | Milk |
| Product Type | Test kit |
| Application | Detection of antibiotic residues in milk |
| Function | Detection of antibiotic residues |
| Form | Dipstick |