EasyManua.ls Logo

Chubb 24/7 FIRE PROTECTION FP301 - User Manual

Default Icon
19 pages
Print Icon
To Next Page IconTo Next Page
Loading...
Photoelectric
Smoke Alarm with Hush
Manual
P/N:135996
0301-7203-02
Model FP301
Photoelectric smoke alarms are designed to detect visible particles
(associated with slow smouldering fires). Home fires develop in different
ways and are often unpredictable. For maximum protection against fast
flaming fires and slow smouldering fires, both ionisation and photoelectric
alarms should be installed.
24/7 FIRE PROTECTION
®
is a registered trademark of Chubb Fire & Security Pty Ltd
Copyright © 2013 Chubb Fire & Security Pty Ltd. All rights reserved.
0301-7203-02_FP301(135996)_V1.qxd:_ 2015.5.22 1:59 PM Page 1
Question and Answer IconNeed help?

Do you have a question about the Chubb 24/7 FIRE PROTECTION FP301 and is the answer not in the manual?

Overview

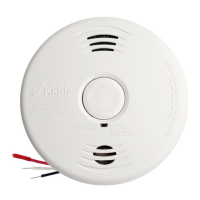
This document describes the 24/7 FIRE PROTECTION® Photoelectric Smoke Alarm with Hush, Model FP301.

Function Description

The FP301 is a photoelectric smoke alarm designed to detect visible particles associated with slow smouldering fires. For maximum protection against both fast flaming and slow smouldering fires, it is recommended to install both ionisation and photoelectric alarms. The device provides early warning of potentially life-threatening conditions, allowing for maximum exit time. It features an alarm silencer (Hush™) function to temporarily desensitise the alarm for approximately 11 minutes, useful in areas prone to nuisance alarms like kitchens.

Important Technical Specifications

  • Alarm Type: Photoelectric smoke alarm
  • Power Source: 9-volt battery (alkaline and lithium batteries may be used). A fresh battery should last for one year under normal operating conditions.
  • Low Battery Indicator: The alarm will "chirp" approximately every 40-50 seconds for a minimum of seven days when the battery is low. This chirp occurs at the same time as the red LED flash.
  • Smoke Sensing Chamber Fault Indicator: The alarm will "chirp" approximately 20 seconds after the red LED indicator light flashes if it detects a problem with the smoke sensing chamber.
  • Alarm Loudness: 85 decibels.
  • LED Indicator: A red LED indicator with three modes:
    • Normal Operation: Flashes every 40-50 seconds.
    • Alarm/Test Mode: Flashes once per second during an alarm or when the Test/Hush button is pressed.
    • Hush™ Mode: Flashes every 11 seconds.
  • Operating Temperature Range: 5°C to 45°C.
  • Relative Humidity Range: Below 85%.
  • Warranty: Six-year limited warranty from the date of purchase.
  • Recommended Replacement: Ten years from the date of manufacture (indicated on the product label).
  • Certifications: Australian Standard AS 3786 Lic 1377 SAI Global.

Usage Features

Installation:

  • General Placement: By law, at least one smoke alarm must be installed on each level of the home.
  • Recommended Locations:
    • In every room where someone sleeps with the door closed.
    • In the immediate area of bedrooms and the exit path from all sleeping areas.
    • In stairways (as they act like chimneys for smoke and heat).
    • In any room where large electrical appliances are operated (e.g., portable heaters or humidifiers).
    • If a hallway or room is more than 9.1m long, place alarms at both ends.
    • For maximum household protection, refer to Figure 1C in the manual.
  • Ceiling Mounting:
    • Minimum 30cm from the side wall (Figure 2A).
    • For sloped, peaked, or cathedral ceilings, place between 500mm and 1500mm from the highest point (Figure 2B).
    • In rooms with ceiling slopes greater than 1m in 8m horizontally, locate on the high side of the room (Figure 2B).
  • Wall Mounting:
    • On an interior wall, with the top edge of the alarm a minimum of 10cm and a maximum of 30cm below the ceiling (Figure 2A).
  • Mobile Home Installation:
    • Well Insulated: Follow general installation recommendations.
    • Poorly Insulated: Install on an inside wall with the top edge of the alarm a minimum of 10cm and a maximum of 30cm below the ceiling (Figure 2A). For minimum protection, install at least one alarm close to bedrooms.
  • Mounting Procedure:
    1. Remove the mounting plate by twisting the alarm clockwise (indicated by the "OFF" arrow).
    2. Hold the mounting plate against the desired location and mark the centre of the holes. Ensure the "A" line on the mounting plate is parallel with the hallway (ceiling mount) or horizontal (wall mount) for aesthetic alignment (Figures 3A and 3B).
    3. Drill holes (3/16 inch drill bit) and secure the mounting plate with enclosed screws and anchors.
    4. Press the battery reminder tab down into the battery compartment while inserting the battery (Figure 3E). Ensure correct polarity.
    5. Place the alarm onto the mounting plate, aligning marks, and twist anti-clockwise in the "ON" direction until it locks in place (Figure 3D).
  • Tamper-Resist Feature:
    • To activate, break out the tamper-resist blocks on the mounting plate using a small screwdriver (Figure 4A). This deters removal.
    • To change the battery when this feature is active, push the tamper-resist tab away from the mounting plate with a tool and rotate the alarm clockwise in the "OFF" direction (Figure 4B).

Operation:

  • Testing: Press and hold the Test/Hush button for at least 5 seconds (or until the unit sounds). Test weekly. Stand an arm's length away due to loudness.
  • Alarm Silencer (Hush™):
    • Temporarily desensitises the alarm for about 11 minutes.
    • Activated by pushing the Test/Hush button.
    • Red LED flashes every 11 seconds in Hush™ mode.
    • Automatically resets after approximately 11 minutes.
    • Can be used repeatedly until the air clears.
    • Pushing the Test/Hush button again ends the Hush™ period.
    • Dense smoke will override Hush™ mode and sound a continuous alarm.
    • CAUTION: Identify the smoke source and ensure safety before using Hush™.

Locations to Avoid (to minimise nuisance alarms):

  • Within 0.9m of kitchen/bathroom doors (with tub/shower), forced air supply ducts, ceiling/whole house ventilating fans, or high air-flow areas.
  • Areas where curtains or other objects block the sensor.
  • Within 30cm of fluorescent lights.
  • Insect-infested, excessively dusty, dirty, or greasy areas.
  • Areas where temperature is colder than 5°C or hotter than 45°C.
  • Areas where relative humidity is greater than 85%.
  • Garages.
  • Dead air spaces (e.g., peak of an "A" frame ceiling) where smoke may not reach the alarm in time.
  • Not to be used with detector guards unless evaluated as suitable.

Maintenance Features

  • Battery Replacement:
    • Replace the 9-volt battery when the low battery chirp occurs (every 40-50 seconds).
    • Use only specified batteries: Energizer 522, Duracell MN1604 or MX1604, Gold Peak 1604A, Panasonic 6AM6, 6AM-6, 6AM-6PI, 6AM6X or 6LR61(GA), Ultralife U9VL-J.
    • Replace the battery at least once a year, or when changing clocks for daylight saving.
    • WARNING: Use only specified batteries; other batteries may affect operation or explode.
  • Cleaning the Alarm:
    • Clean at least once a year.
    • Remove from the mounting plate.
    • Use compressed air or a vacuum cleaner hose with a soft brush attachment to blow or vacuum around the perimeter to remove dust and dirt.
    • Wipe the outside with a damp cloth (avoid wet cloths).
    • Reinstall and test after cleaning.
    • If cleaning does not restore normal operation, replace the alarm.
    • DO NOT paint the unit, disassemble, or clean inside, as this will void the warranty.
  • Replacing the Alarm:
    • It is recommended to replace the alarm ten years from the date of manufacture (found on the product label).

Important Safety Habits:

  • Develop and practice an escape plan, including two escape routes from each room and a designated outdoor meeting place.
  • Familiarise everyone with the alarm sound and train them to leave immediately.
  • Practice fire drills at least every six months, including at night.
  • Alert small children immediately if the alarm sounds.
  • Leave immediately; do not waste time collecting valuables.
  • Before opening inside doors, feel their surface. If hot or smoky, use an alternative exit.
  • Stay close to the floor in smoky conditions and breathe shallowly through a cloth.
  • Call the fire brigade (000 in AUS, 111 in NZ) from a neighbour's home or a phone box.
  • Do not return to the home until fire officials declare it safe.
  • Smoke alarms may not be effective in situations like smoking in bed, unsupervised children, cleaning with flammable liquids, or fires where egress is blocked rapidly.
  • Homeowners, landlords, and tenants should have adequate insurance.

Chubb 24/7 FIRE PROTECTION FP301 Specifications

General IconGeneral
BrandChubb
Model24/7 FIRE PROTECTION FP301
CategorySmoke Alarm
LanguageEnglish

Related product manuals