MAIN UNIT / APPAREIL PRINCIPAL / HAUPTGERÄT
/ APPARECCHIO PRINCIPALE / HOOFDTOESTEL
/ UNIDAD PRINCIPAL / HUVUDENHET / UNIDADE PRINCIPAL
Note: Be sure to unfold this page and refer to the front diagrams as you read each chapter.
Remarque: Veuillez déplier cette page et vous référer aux schémas quand vous lisez chaque chapitre.
Hinweis: Bitte diese Seite ausfalten und beim Lesen der einzelnen Kapital die Frontdiagramme beachten.
Nota: Assicurarsi di aprire questa pagina e fare riferimento a questi diagrammi quando si legge ciascun capitolo.
Opmerking: Vouw deze pagina uit en zie tevens de afbeeldingen van het voorpaneel tijdens het doorlezen van de volgende hoofdstukken.
Nota: Cuando lea los capítulos, despliegue esta página y consulte los diagramas.
Observera: Vik ut denna sida för att kunna se figurerna över bilstereons framsida medan du läser de olika kapitlen.
Nota: Certifique-se de abrir esta página e consulte os diagramas frontais conforme realiza a leitura de cada capítulo.
With the FLIP DOWN PANEL opened / Ouvrez le PANNEAU RABATTABLE
ÖFFNUNG DER KLAPPSCHALTTAFEL / Apertura del PANNELLO APRIBILE
Met het NEERKLAPBARE PANEEL geopend / Apertura del PANEL ABATIBLE
DEN NEDFÄLLBARA PANELEN öppen / Abrindo o PAINEL RECLINÁVEL
Note:
• Be sure to read this chapter referring to the front diagrams of chapter “2. CONTROLS” on page 5
(
unfold
)
.
CONTROLS / LES COMMANDES / REGLER / CONTROLLI
REGELAARS / CONTROLES / KONTROLLER / CONTROLOS
English
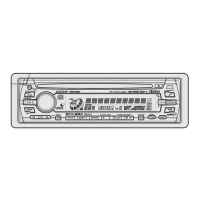
3. NOMENCLATURE
English
6 7
DXZ468RMP DXZ468RMP
5
DXZ468RMP
English Français Deutsch Italiano
Nederlands
Español Svenska
Português
2.
Names of the Buttons and their Functions
[
OPEN
]
button
• Deeply push in
[
OPEN
]
button to unlock the flip
down panel.
[
ADJ
]
button
• Press the button to switch to the ADJ mode.
When the button press and hold for 1 second or
longer to enter RDS ADJ mode.
[
]
button
• Perform preset scan while in the radio mode.
Press and hold the button for 2 seconds or
longer to perform auto store.
• Play or pause a CD while in the CD/MP3/WMA
mode.
[
SENSOR
]
• Receiver for remote control unit.
• Operating range: 30° in all directions.
[
TA
]
button
• Press the button to set the TA
(
Traffic Announce
-
ment
)
standby mode.
[
D
]
button
• Switch the display indication
(
Main display, Title
display
)
.
• Press and hold the button for 1 second or longer
to enter the display adjustment mode.
[
Z
]
button
• Press the button to select one of the 3 types
of sound characteristics already stored in
memory.
[
T
]
button
• Press the button to input a title in the CD
mode.
• Press the button to switch the user titles or track
titles, while in the CD/MP3/WMA mode.
• Press the button to scroll the title during the CD-
text play, while in the CD/MP3/WMA mode.
[
BND
]
button
• Switch the band, or seek tuning or manual tuning
while in the radio mode.
• Play a first track while in the CD/MP3/WMA
mode.
Press and hold the button for 1 second or longer
to perform multi-session.
• Press the button to change the character.
[
UP
]
,
[
DN
]
buttons
• Select the Folder.
(
MP3/WMA disc only
)
[
RDM
]
button
• Perform random play while in the CD/MP3/WMA
mode.
• Press and hold the button for 1 second or lon-
ger to perform folder random play while in the
MP3/WMA mode.
[
RPT
]
button
• Repeat play while in the CD/MP3/WMA mode.
• Press and hold the button for 1 second or longer
to perform folder repeat play while in the MP3/
WMA mode.
[
SCN
]
button
• Perform scan play for 10 seconds of each track
while in the CD/MP3/WMA mode.
• Press and hold the button for 1 second or longer
to perform folder scan play while in the MP3/
WMA mode.
[
]
button
• Eject a CD when it is loaded into the unit.
Names of the Buttons and their Functions
[
A-M
]
button
• Press the button to switch to the audio mode.
(
bass/treble, balance/fader
)
• Press and hold for 1 second or longer to turn
on or off the M-B EX mode.
[
DIRECT
]
buttons
• Store a station into memory or recall it directly
while in the radio mode.
[
SRC
]
button
• Press the button to turn on the power.
• Press and hold the button for 1 second or longer
to turn off the power.
• Switch the operation mode among the radio
mode, etc.
[
ROTARY
]
knob
• Adjust the volume by turning the knob clockwise
or counterclockwise.
• Use the knob to perform various settings.
[
CD SLOT
]
• CD insertion slot.
[
,
]
lever
• Select a station while in the radio mode or select
a track when listening to a CD. This lever is used
to make various settings.
• Press the lever upward or downward and hold
in position for 1 second or longer to enter the
fast-forward or fast-backward mode.
Major Button Operations when external equipment is
connected to this unit
[
]
button
• Play or pause a CD or DVD.
When the CD/DVD changer is
connected
∗ For details, see the section “CD changer opera-
tions”. For the DVD changer, refer to the Ownerʼs
Manual provided with the DVD changer.
[
D
]
button
• Press the button to display the title.
(
Main dis
-
play, Title display, Clock display
)
• Press and hold the button for 1 second or longer
to enter the display adjust mode.
[
T
]
button
• Press the button switches the user titles or track
titles, etc. while in the CD changer mode.
• Press and hold the button for 1 second or longer
to input a title in the CD changer mode.
• Press the button to scroll the title during CD-text
play.
[
BND
]
button
• Move the next disc in increasing order.
[
UP
]
,
[
DN
]
buttons
• Select the disc.
[
RDM
]
button
• Perform random play. Press and hold the button
for 1 second or longer to perform disc random
play.
[
RPT
]
button
• Perform repeat play. Press and hold the button
for 1 second or longer to perform disc repeat play.
[
SCN
]
button
• Perform scan play for 10 seconds of each
track.
Press and hold the button for 1 second or longer
to perform disc scan play.
[
,
]
lever
• Select a track when listening to a disc.
• Press the lever upward or downward and hold
in position for 1 second or longer to enter the
fast-forward or fast-backward mode.
[
]
button
• Perform preset scan while in the TV mode.
Press and hold the button for 2 seconds or
longer to perform auto store.
(
This function is
only TV tuner.
)
• Perform service scan while in the DAB mode.
When the TV/DAB is connected
∗ For details, see the section “TV Operations” or
“Digital Radio/DAB Operations”.
[
TA
]
button
• Press the button to set the TA
(
Traffic
Announcement
)
standby mode in the DAB
mode.
(
This function is only DAB tuner.
)
[
BND
]
button
• Switch the band.
Press and hold the button for 1 second or longer
to switch to the seek tuning or manual mode.
 Loading...