English
GREAT BRITAIN • customer service
tel: 0845 300 9799 e-mail: customerservice@clasohlson.co.uk internet: www.clasohlson.com/uk
Ver. 20150202
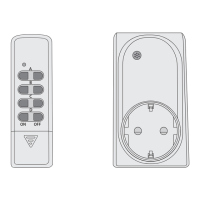
Remote Switch Set
Art.no 18-8881 Model 50027 + 3×55005GBX10
36-8836 50027 + 3×55001X10
Please read theentire instruction manual before using theproduct and
then save it for future reference. We reserve theright for any errors in
text or images and any necessary changes made to technicaldata.
If you have any questions concerning technical problems please
contact our Customer Services.
Safety
• This set of switches is suitable for controlling devices such as lights.
• Make sure that theload device is turned off before connecting it to
thereceiver.
• Never connect aload device with ahigher power rating than 1000W.
• These switches are intended for indoor use; do not expose them to
rain or moisture.
3. Eachreceiver has anindicator in thesocket showing which of
thebuttons (A, B, or C) it is programmedfor. Theindicator should
be removed thefirst time thereceiver isused.
Iftheprogramming does not work for some reason, theprogramming
must be re-done. Referto theNew programming section.
Operating instructions
Note: Donot touch any of thebuttons on thetransmitter
before theLED indicator has stopped flashing, otherwise
theprogramming will change.
1. Plugreceiver Ainto anelectrical socket.
2. TheLED indicator on thereceiver will begin to flash slowly for
30seconds and then goout.
3. Theon/off switching of thesocket built into receiver Awill now be
controlled by button [ A–ON ] and [ A–OFF ]. TheLED indicator on
thereceiver will come on when thereceiver is switched on and go
out when thereceiver is switchedoff.
4. Theother two receivers will be controlled in thesame way but with
buttons [ B–ON ], [ B–OFF ] and [ C–ON ], [ C–OFF ] respectively.
5. Buttons [ D–ON ] and [ D–OFF ] are from theoutset pre-programmed
to control all three receivers simultaneously.
Note: Eachtime areceiver is unplugged from anelectrical socket and
plugged in again, it goes into learning mode (theLED indicator flashes
slowly) for 30 seconds.
In learning mode, achannel can be added or several channels can
be removed. Allthechannels, (A, B, C and D) can be aput on one
receiver if desired. Referto theDeleting theprogramming and New
programming sections.
Deleting theprogramming
1. Unplug thereceiver from theelectrical socket.
2. Plugthereceiver into anelectrical socket after about 10 seconds.
3. TheLED indicator on thereceiver will flash slowly for 30 seconds
while it is in learningmode.
4. Pressthedesired [ OFF ] button while theLED indicator is flashing
to delete theprogramming. TheLED indicator will flash quickly
whilst theprogramming is being deleted.
5. Onceprogramming has been deleted, thereceiver is no longer
programmed to any of thebuttons on thetransmitter.
New programming
Thereceiver needs to be programmed to one of thebuttons A, B, C or
D as follows:
1. Unplug thereceiver from theelectrical socket.
2. Plugthereceiver into anelectrical socket after about 10 seconds.
3. TheLED indicator on thereceiver will flash slowly for 30 seconds
while it is in learningmode.
4. Press [ A–ON ], [ B–ON ], [ C–ON ] or [ D–ON ] whilst theLED indicator
is flashing to programme thereceiver to thetransmitter.
5. TheLED indicator comes on when theprogramming is completed.
6. Follow thesame procedure with theother receivers.
TheLED indicator on thereceiver shows thestatus of thereceiver in
4differentways:
• Thereceiver socket is switched off when theLED indicator is noton.
• Thereceiver socket is switched on when theLED indicator ison.
• TheLED indicator flashes slowly for 30 seconds when thereceiver
is in learningmode.
• TheLED indicator flashes quickly whilst theprogramming is being
deleted.
Care and maintenance
• Unplug themains lead before cleaning theproduct.
• Clean theproduct using asoft, moistcloth. Onlyuse mild
detergents; never use solvents or strong, abrasive cleaning agents
for cleaning as these can damage theproduct.
Disposal
This product should be disposed of in accordance with local regulations.
Ifyou are unsure how to proceed, contact your local council.
Specifications
55001X10 (receiver)
Rated voltage 230V AC, 50 Hz
Maxload 1000W (4.35 A) resistive load
(incandescent light bulbs, etc)
400 W inductive load
(fluorescent tubes, energy saving bulbs/CFLs,etc.)
50027 (transmitter)
Battery V23GA, 12 V DC
Frequency 433.92 MHz
Range up to 25 metres (line-of-sight)
Capable of controlling up to 4 receivers
Transmitter Receiver
Beforeuse
Inserting thetransmitter battery
1. Pressthecatch on thebattery cover in thedirection of thearrow
and removeit. Insert theincluded battery into thetransmitter
in accordance with themarkings in thebattery compartment.
Refitthebatterycover.
2. Thereceivers are already preprogrammed for buttons A, B
and C on thetransmitter. Button D controls all three receivers
simultaneously.