Do you have a question about the Classic Accessories Fairway and is the answer not in the manual?
Ensure enclosure is properly and securely fastened before operating golf car.
Enclosures do not protect against noise, exhaust, chemicals, collision, or roll-over accidents.
Open a side door when golf car is at idle to ensure proper ventilation against carbon monoxide.
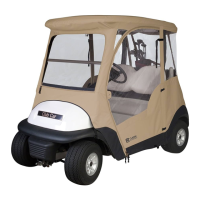
Rear zippered entry for golf clubs works well with rear canopies.
Side zippers allow for easy door entry and exit.
Driver and passenger doors can be rolled to the side and held open with straps.
Hooked straps along each side secure the cover to the car for a custom fit.
Identify the front using the yellow tag and drape the enclosure over the golf car roof.
Pull the cover from front to back, aligning roof edges with seams.
Zip the side and rear panels down over the golf car.
Attach the elastic hooked straps along the sides of the golf car.
Open side doors with zippers, fold, snap, and secure them to the back with straps.
For removable doors, hold zipper and door, then pull horizontally apart to detach.
Utilize rear zippered opening for loading clubs; roll up rear panel and secure with straps.
Unzip or store the removable windshield in the hideaway pocket.
Clean with a soft brush and lukewarm water. Do not use soap. Line dry.
Smooth wrinkled vinyl windows with a low-heat hair dryer or clean with mild soap and soft cloth.
Store the completely dry enclosure in the provided handy storage bag to avoid mildew.
Start with enclosure flat, then fold rear, side, and front panels towards the center.
Tuck in any loose ends of the enclosure after folding panels.
Roll the enclosure to match the bag length, then insert it into the storage bag.
Zip the storage bag closed after inserting the rolled enclosure.
| Brand | Classic Accessories |
|---|---|
| Model | Fairway |
| Category | Offroad Vehicle |
| Language | English |