HUMIDIFIER
WWW.CLEANCOMFORT.COM
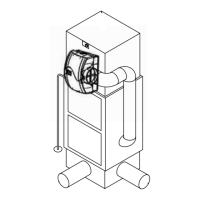
Return Air
Return Air
Drain
Drain
Clean Comfort High Eciency
Media or Electronic Air Cleaner
Warm Air
Warm Air
Warm Air
DOWN FLOW
UP FLOW
IO-HE12-A 10/13
HE12
Evaporave Bypass Humidier
Precaution:
The installer should be an experienced service
technician. DISCONNECT ELECTRICAL POWER
BEFORE BEGINNING INSTALLATION. Do not
install where temperatures fall below
32° F / 0° C or where plenum temperatures
exceed 150° F / 66° C. When wiring into a
mul-speed blower circuit see Step 6.
Installation:
The humidier may be mounted with the
6˝ outlet to the right or le by inverng the
cabinet and reversing the posions of the
side panel. The humidier may be mounted
on the supply or return air plenum with
equal eciency.
FOR INSTALLATION ON A VERTICAL PLENUM
SURFACE OF ANY FORCED AIR FURNACE
Additional Materials That May Be Necessary:
1. 1/4˝ diameter plasc supply tubing
(or 1/4˝ copper supply tubing for hot
water applicaons).
2. 6˝ diameter galvanized by-pass pipe
(provided with “B” models, which include
a bypass kit).
3. 18 Gage electrical wire and wire nuts
4. Current sensing relay (part number HEP-GA50
suggested) or air pressure proving switch
(part number HEP-12500 suggested).
5. #8 self piercing sheet metal screws.
Proprietary Notice
This document and the informaon disclosed herein are
proprietary data of Daikin North America LLC. Neither this
document nor the informaon contained herein shall be
reproduced, used, or disclosed to others without the wrien
authorizaon of Daikin North America LLC except to the
extent required for installaon or maintenance of recipient’s
equipment.
Liability Notice
Daikin North America LLC does not accept any liability for
installaons of humidity equipment installed by unqualied
personnel or the use of parts/components/equipment that
are not authorized or approved by Daikin.
Copyright Notice
Copyright 2013, Daikin North America LLC All rights reserved.
Typical Installation For Bypass Humidiers
Important:
HVAC Installer: Read and save these instrucons. This guide to be le with equipment owner. Equipment Owner: Fill out and send
in the product registration card to register this product.
Product registration is required to get the benets of the warranty,
except that failure by residents of California or Quebec to register the products will not diminish their warranty rights.
See the full warranty text at your dealer or at the end of this document.