EasyManua.ls Logo

Clip Sonic SL207 - User Manual

Clip Sonic SL207
4 pages
Print Icon
To Next Page IconTo Next Page
Loading...
User Manual
WWW.CLIPSONIC.COM
Reference : SL207
Version : 1.3
Language : English
WEATHER MULTI-FUNCTION LCD
CLOCK
Question and Answer IconNeed help?

Do you have a question about the Clip Sonic SL207 and is the answer not in the manual?

Summary

Features

Operation

Setting the Time

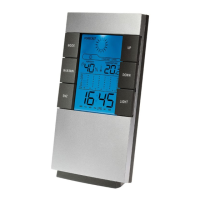
Press and hold MODE for 3 seconds to enter time setting. Hour digits blink and can be set by UP or DOWN.

Setting the Alarm

Press MODE to view alarm time. Hold MODE for 3 seconds to enter alarm setting. Hour digits blink and can be set by UP or DOWN.

Setting the Calendar

Press MODE to view calendar. Hold MODE for 3 seconds to enter calendar setting. Year digits blink and can be set by UP or DOWN.

Alarm On;Off

Press UP to turn the alarm on or off.

Max;Min Temperature and Humidity Records

Press MAX/MIN to display MAX or MIN temperature and humidity records.

12;24 Hour Format

At time mode, press UP for 3 seconds to switch between 12 or 24 hour format.

Temperature Display Format

Press DOWN to switch between Celsius (°C) and Fahrenheit (°F) display.

Snooze and Light Function

In alarm mode, press SNZ/LIGHT for snooze. Press SNZ/LIGHT to turn on the light.

Overview

The Clip Sonic Weather Multi-Function LCD Clock (model SL207) is a versatile device designed to provide time, calendar, weather forecast, temperature, and humidity information. This user manual, version 1.3, is available in English and provides comprehensive instructions for operation and setup.

Function Description:

The primary function of this device is to display time, date, and environmental conditions. It features a clear LCD screen that shows the current time, indoor temperature, humidity, and a weather forecast icon. The clock also includes an alarm function with a snooze option and the ability to record maximum and minimum temperature and humidity readings.

Important Technical Specifications:

  • Measuring Temperature Range: 0°C to 50°C (32°F to 122°F)
  • Measuring Humidity Range: 30% to 90%
  • Resolution: 1°C
  • Calendar Range: 2001 to 2099
  • Display: LCD with backlight
  • Power Source: Not explicitly stated in the provided manual snippet, but typically battery-operated for such devices.

Usage Features:

The device is equipped with several buttons for easy navigation and setting:

  • MODE Button: Used to cycle through display modes (calendar, alarm time) and to enter setting modes (time, alarm, calendar). Pressing and holding MODE for 3 seconds initiates setting modes.
  • UP Button: Used to adjust values upwards during setting modes (e.g., hour, minute, year, month, day). Also used to turn the alarm on/off and to switch between 12-hour and 24-hour time formats (by pressing for 3 seconds in time mode).
  • DOWN Button: Used to adjust values downwards during setting modes. Also used to switch between Celsius (°C) and Fahrenheit (°F) temperature display.
  • MAX/MIN Button: Displays the maximum recorded temperature and humidity. Pressing it again displays the minimum recorded temperature and humidity.
  • SNZ/LIGHT Button: Functions as a snooze button when the alarm is active and as a backlight activator to illuminate the display.

Setting the Time:

  1. Press and hold the MODE button for 3 seconds. The hour digits will blink.
  2. Use the UP or DOWN buttons to set the hour.
  3. Press MODE again. The minute digits will blink.
  4. Use the UP or DOWN buttons to set the minutes.

Setting the Alarm:

  1. Press MODE once to view the alarm time.
  2. Press and hold MODE for 3 seconds. The hour digits will blink.
  3. Use the UP or DOWN buttons to set the alarm hour.
  4. Press MODE again. The minute digits will blink.
  5. Use the UP or DOWN buttons to set the alarm minutes.
  6. To turn the alarm on/off, press the UP button.

Setting the Calendar:

  1. Press MODE once to view the calendar.
  2. Press and hold MODE for 3 seconds. The year digits will blink.
  3. Use the UP or DOWN buttons to set the year.
  4. Press MODE again. The month digits will blink.
  5. Use the UP or DOWN buttons to set the month.
  6. Press MODE again. The day digits will blink.
  7. Use the UP or DOWN buttons to set the day.

Temperature and Time Format:

  • To switch between 12-hour and 24-hour time display, press the UP button for 3 seconds while in time mode.
  • To switch between Celsius (°C) and Fahrenheit (°F) temperature display, press the DOWN button.

Maintenance Features:

The manual includes information regarding the correct disposal of the unit, adhering to the European Directive 2012/19/EU on Waste Electrical and Electronic Equipment (WEEE). This indicates a commitment to environmental responsibility. Users are advised to dispose of the product separately from normal household waste and to contact local authorities or retailers for proper disposal information. The CE mark and the "Pour en savoir plus: www.quefairedemesdechets.fr" link further emphasize compliance with European standards and provide resources for waste management.

General Information:

The product is manufactured by Clip Sonic Technology, a brand that emphasizes design, ergonomics, and ease of use. The manual also states that product information is subject to change without prior notice and that illustrations are non-contractual. The company's address is CLIP SONIC, BP 61071, 67452 Mundolsheim.

Clip Sonic SL207 Specifications

General IconGeneral
BrandClip Sonic
ModelSL207
CategoryClock
LanguageEnglish