This document describes the CMI C-B-RM-40 petrol-driven lawnmower, an appliance designed for cutting grass areas in private and hobby gardens. It is not intended for commercial use.
Function Description
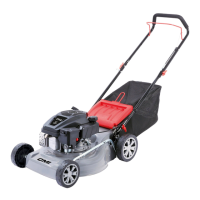
The CMI C-B-RM-40 is a petrol-driven lawnmower designed for efficient grass cutting. It features a robust motor, a collection box for clippings, and adjustable cutting height settings. The device is operated by pushing it at a walking pace, making it suitable for maintaining lawns in a controlled manner.
Key components include:
- Switch-on lever (1): Engages the motor.
- Handlebar (2) and Handlebar, bottom part (3): Provides control and maneuverability.
- Safety flap (4): Protects against thrown objects.
- Motor (5): The petrol engine that powers the cutting blade.
- Lever for cutting height adjustment (6): Allows selection of different cutting heights.
- Collection box (7): Gathers grass clippings.
- Motor oil filling screw (8): Used for adding and checking motor oil.
- Pull-starter (9): For manually starting the engine.
- Tank cover (10): Secures the fuel tank.
- Fuel pump (11): Used to prime the fuel system.
- Air filter housing (12): Protects the air filter.
- Ignition cable with spark plug (13): Essential for engine ignition.
- Cutting blade (17): The primary cutting component.
- Blade screw (18): Secures the cutting blade.
- Journals (19): Alignment pins for the blade.
- Washer (20): Used with the blade screw.
- Air filter (21): Filters air for the engine.
- Spark plug (22): Ignites the fuel-air mixture.
Important Technical Specifications
The CMI C-B-RM-40 lawnmower has the following key technical specifications:
- Article number: 234185
- Displacement: 127.1 cm³
- Rated output: 2 kW (2900 min⁻¹)
- Tank capacity: 0.8 l
- Motor oil quantity: 0.5 l
- Working width: 40 cm
- Cutting height: 25–75 mm
- Number of stages (cutting height): 5
- Volume of collecting sack: 45 l
- Weight: 17 kg
- Max. motor speed: 2900 min⁻¹
- Sound power level (LWA)*: 96 dB(A) (K = 3 dB(A))
- Sound pressure level (LPA)*: 83 dB(A) (K = 3 dB(A))
- Vibration**: 6.5 m/s² (K = 1.5 m/s²)
- Spark plug: TORCH F5RTC/F7RTC
* The noise emission values indicated have been measured according to a standardized test method and can be used to compare one power tool with another. The noise emission values indicated can also be used for a preliminary assessment of the exposure. Warning: The noise emissions during the actual use of the power tool may differ from the indicated values, depending on the way in which the power tool is used, in particular what type of workpiece is being machined. Safety measures must be defined to protect the operator, based on an estimation of the vibration load during actual conditions of use (taking into consideration all parts of the operating cycle, such as time periods when the power tool is switched off and time periods when it is switched on but running without a load).
** The specified vibration emission value was measured in accordance with a normed test procedure and can be used in order to compare one tool with another. The specified vibration emission value can also be used for an introductory evaluation of the exposure. The vibration emission value may fluctuate from the specified value during actual use of the power tool. These fluctuations will depend on the way in which the power tool is used. Try to keep vibrations to a minimum. One method of reducing the vibration load is, for example, limiting the length of time you work with the tool. All parts of the operating cycle must be taken into account for this purpose (for example, also including times in which the power tool is switched off and times in which it is switched on, but is running without a load). Determination of vibration emission values in accordance with EN 60745-1 & EN 60745-2-13.
Usage Features
Before starting:
- Fueling: The lawnmower requires unleaded normal petrol with 90 octane (or higher if 90 octane is unavailable). The motor must be switched off and cooled down before refueling. Smoking and open flames are prohibited. Fuel should be stored in approved, labeled canisters. If petrol spills, do not attempt to start the motor; move the machine away from the contaminated area and wait for vapors to dissipate.
- Motor oil: The product is supplied without motor oil and must be filled before first use with SAE 10W-30 motor oil. The oil level should be checked using the dipstick on the motor oil filling plug and must be between marks [A] and [B].
- Collection box: The collection box (7) is attached by lifting the safety flap (4) and hooking the box into place, ensuring it is securely engaged.
- Cutting height adjustment: The cutting height can be set to 5 different levels using the lever (6).
Starting the motor:
- Press the switch-on lever (1).
- Lightly press the fuel pump (11) approximately 3 times.
- Slowly pull out the pull-starter (9) until resistance is felt, then pull quickly and forcefully until the first ignition noise is heard.
- Pull the pull-starter again quickly and forcefully until the motor starts up.
Switching off the motor:
- Release the switch-on lever (1). Always switch off the product when not in use for short periods.
Mowing:
- Before starting, inspect the terrain and remove any objects that could be thrown out by the product.
- Steer the product at an even, slow speed (walking pace) in the straightest lines possible.
- Always work across slopes, not up or down.
- Avoid cutting wet grass if possible.
- Overlap mowing lines slightly for an even appearance.
- For long grass, cut at the greatest possible height first, then mow transversely at the desired height.
- Be especially vigilant when changing direction on slopes, turning, or pulling the lawnmower towards you.
- Stop the cutting blade(s) when the lawnmower needs to be tipped for transport over non-grass surfaces or when moving it to and from the mowing area.
- Never use the lawnmower with damaged protective devices or without attached protective devices.
- Do not modify motor control settings or over-rev the engine.
- Release the motor brake before starting.
Maintenance Features
General maintenance:
- Ensure all nuts, bolts, and screws are firmly tightened to keep the device in a safe working condition.
- Regularly check the fuel system for leaks or defective parts.
- The motor, exhaust, and fuel tank area should be kept free of grass, leaves, or leaking oil to prevent fire hazards.
- Regularly check the grass catcher for wear or loss of functionality.
- Allow the motor to cool down before storing the machine.
- When maintaining cutting blades, note that they can move even when the machine is switched off.
- Replace worn or damaged parts with original spare parts and accessories for safety reasons.
- If the fuel tank needs draining, do so outdoors using a petrol suction pump.
Cleaning:
- Clean the product immediately after each use. Remove dried-on grass residues with a brush or plastic scraper (do not use sharp implements).
- Remove deposits from the wheels.
- Wipe the product with a slightly damp cloth.
- Never clean the product with water or a high-pressure jet.
Blade replacement:
- Lift the machine at the front and set it on end.
- Loosen the blade screw (18) with a 14 mm hexagon spanner.
- Remove the washer (20) and carefully remove the blade (17).
- For installation, carefully place the blade (17) so that the journals (19) align with the holes in the blade.
- Place the washer (20) and tighten the blade screw (18) with a 14 mm hexagon spanner (35-40 Nm). Always wear protective gloves when handling the blade.
Air filter replacement:
- Switch off the motor and remove the spark plug connector (13).
- Open the air filter housing (12).
- Remove the air filter (21).
- Clean all parts of the air filter unit.
- Fit a new air filter (21) and re-close the air filter housing (12). Never operate the device without an air filter.
Spark plug cleaning/replacement:
- Disconnect the spark plug connector (13).
- Unscrew the spark plug (22) with a spark plug spanner.
- Check the electrode for discoloration (standard color: light brown) and measure the electrode distance (correct distance: 0.457–0.61 mm).
- Clean carbon deposits from the electrode with a brass wire brush (do not use brushes made of other materials).
- Insert a cleaned or new spark plug and tighten by hand. Then, tighten the hand-screwed spark plug by another quarter turn with the spark plug spanner (do not overtighten).
- Replace the spark plug connector (13) firmly on the spark plug. Only replace the spark plug when the motor is cold.
Storage:
- Clean the product before storage.
- Store the product in a dry, well-ventilated place, out of reach of unauthorized persons and children.
- Never store the lawnmower with fuel in the tank inside a building where fuel vapors could come into contact with open flames or sparks.
- Allow the motor to cool before storing in enclosed spaces.
Transport:
- Use the original packaging for shipping whenever possible.